Operating Instructions Design Food Processor S Art.-No.
Carefully read all provided instructions before you start running the appliance and pay regard to the warnings mentioned in these instructions. Table of Contents Knowing your Design Food Processor S............................................35 Important safeguards......................................................................37 General safety instructions............................................................37 Important safeguards for electrical appliances.................................
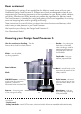
Dear customer! Congratulations! A variety of new possibilities for delicious meals comes with your new Gastroback Design Food Processor S. Different sets of tools are designed to meet all your requirements for time-saving preparation of the ingredients for your dishes, salads, desserts, and drinks. Effortless and within seconds you prepare the ingredients for delicious meals.
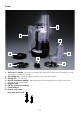
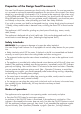
Tools 6 7 8 5 4 1 2 3 1 Universal ‘s’ blade – the work horse blade used most often for most tasks of chopping, mincing and mixing in a matter of seconds 2 Shredding disc – shreds and grates quickly to even and uniform pieces. 3 Slicing disc – for even cuts. 4 Disc for continous feeding – the sliced food will be transported over the disc for continous feeding into the food collector.
Important safeguards Carefully read all instructions before operating this appliance and save for further reference. Do not attempt to use this appliance for any other than the intended use, described in these instructions. Any other use, especially misuse, can cause severe injuries or damage by electric shock, moving parts, heat or fire. These instructions are an essential part of the appliance. Do not pass the appliance without this booklet to third parties.
• Do not place the appliance or any part of it on or near hot surfaces (e.g. burner, heater or oven). Do not use any parts or tools of the appliance with any other device or for any other purpose. • Before operation, always ensure that the appliance is assembled completely and correctly according to the instructions in this booklet. Do not use violence. • Do not insert your fingers or any foreign objects (e.g. clothes, cooking utensils) in the feed tube, with the appliance connected to the power supply.
rements for safe operation of the appliance. Thus, before operating the appliance abroad, ensure that safe operation is possible. • Do not to use any extension cords or desk top multi socket outlets. • Always handle power cords with care. Always completely unwind the power cord before use. Do not place the appliance on a power cord. Power cords may never be knotted, twisted, pulled, strained or squeezed. Do not let the plug or power cord hang over the edge of the table or counter.
Technical specifications Model: Art. No. 40963 Design Food Processor S Power supply: 230-240 V AC, 50/60 Hz Power consumption: 450 - 500 W Length of power cord: ca. 1 m Weight: ca. 0.75 kg Dimensions: ca. 16.5 cm x 19.8 cm x 36.0 cm (width x depth x height) Maximum filling level: 0.75 Litre Certification: Before first use WARNING: DO NOT let young children play with the appliance, or any part of it, or the packaging! The cutting tools are very sharp.
Properties of the Design Food Processor S Your new Food Processor processes your food in only a few seconds. For most purposes there is no need to continuously operate the appliance for more than a few minutes. Even heavy dough (e.g. yeast dough) is processed in 2 or 3 minutes (at the maximum). Also when using a cutting blade and adding your food via the feed tube, you should switch off the motor for filling the feed tube anew. This way you get better results.
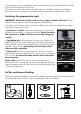
• Alternatively, you can operate the motor in short pulses using the PULSE button for a better control of the consistency of your food. This function is most useful, when using the universal ‘s’ blade for mincing and puréeing. Even when using a cutting disc, you should prefer this operating mode for better results. Selecting the appropriate tools WARNING: The blades of the tools are very sharp. Handle with care! Do not attempt to use more than one set of cutting tools simultaneously.
Tips for best results General • When processing some vegetables (e.g. onions), peel, if required, and quarter or cut very large vegetables in eighths – especially if you wish to process the vegetables using the universal ‘s’ blade and do not feed it through the feed tube. • For measuring out small amounts up to 150 ml you can use the pusher. It is equipped with an appropriate scale. Using the universal ‘s’ blade • In most cases, you should not process your food excessively.
Operation WARNING: The appliance is intended for cutting and mixing food. For this, the appliance is equipped with sharp knives and other electrically driven moving parts. DO NOT insert your hands or any foreign objects (e.g. cooking utensils, clothes) in the feed tube, when the appliance is connected to the power supply, to avoid risks of injuries and damage. Only use the provided pusher for pushing food down in the feed tube.
Chopping, kneading, mixing or puréeing Required Tools: Bowl, short shaft, - universal ‘s’ blade (chopping, puréeing, mixing, and kneading solid food) - lid with feed chute including pusher Operating functions, buttons: Continuous operation or in short bursts, ON/OFF button or PULSE button Maximum filling level: Depending on the type of processed food Minimum amount: Cover the lower blade Usual operating time: A few seconds up to 2-3 minutes Typical way of operation: Directly filling the bowl whil
Eggs 3 Meats (raw or cooked) 100 g 15-20 seconds cut into 2 cm pieces Walnuts 100 g 10-15 seconds without shells, use halved or broken; scrap down sides of the bowl to ensure even consistency Onions 100 g 10-15 seconds peel and cut into quarters Fresh herbs a few springs 10 seconds bowl and herbs must be completely dry; remove stalks Potatoes 100 g 15-25 seconds cooked and peeled; cut into 3 cm cubes Royal icing 280 g icing sugar + 1 eggs 15 seconds 5-10 seconds hard-boiled; pe
8. Connect the appliance to the power supply. If the motor starts running, press the ON/OFF button to stop it. 9. Switch on the appliance. The appliance processes your food in a few seconds. Thus, it is sufficient for mixing and chopping of most foods to use the PULSE button in a few short bursts. The motor will agitate only as long as you press this button down. For kneading dough or ice mixtures or similar food, you need to operate the appliance for some minutes. For this, use the ON/OFF button.
Grating, shredding and slicing using the cutting discs The appliance is delivered with 2 different cutting discs. The blades on the two sides of these discs are shaped differently, designated for different purposes and, thus, providing different results. Therefore, it is essential to assemble the cutting discs with the side facing upwards that is provided with the required type of blades.
WARNING: The blades of the cutting discs are very sharp. Only grasp the cutting discs at the brim or at the black central plastic body. 4. For slicing, shredding, and grating you need one of the cutting discs. Select the appropriate disc. The cutting discs can be used in two orientations. The processing results depend on which side is facing upwards: coarse or fine. The discs are assembled with the bowl still EMPTY and are mounted on top of the shaft, almost level with the brim of the bowl. 5.
12. After you have processed your food as desired, switch OFF (indicators go out) and unplug the appliance. Continue as described in section „After Processing“. Clean the appliance and all used parts and accessories immediately after use. Do not let any food dry on the surfaces. Working with the lid for continuous feeding The lid for continuous feeding can be used for bigger quantities of food. The sliced food will be transported over the disc for continous feeding into the food collector.
which side is facing upwards: coarse or fine. If you can not install the cutting disc in combination with the separator disc, check whether you use the correct (long) shaft, and whether you installed the separator disc in the correct orientation. 6. Cover the bowl with the lid for continuous feeding. The protrusion on the lid must fact to the right side near the handle of the bowl. If necessary, turn the lid a little over the bowl until the lid settles on the brim of the bowl. 7.
disc and shaft. Thereafter pour out the juice. If you wish to continue processing, replace shaft and cutting disc and re-assemble the lid. Wipe off all spilled liquids or food carefully from the exterior of the bowl. Then, replace the bowl on the motor base and lock bowl and lid. Thereafter, you can connect the appliance to the power supply again and continue working quite usually. 15. After you have processed your food as desired, switch OFF and unplug the appliance.
• Take out the shaft. If you have used the universal ‘s’ blade or emulsifying disc, these tools will come out with the shaft. 6. Empty the container. 7. Clean the appliance and all used parts and tools according to the instructions in chapter „Care and Cleaning“. Solving problems If any problems occur during operation, you will find solutions in this section. Problem Reason The Solution The motor will not work, the The appliance is not live.
Bowl or lid is not locked correctly. A safety interlock has been released, for example, by turning the lid while feeding food through the feed tube. Ensure that bowl and lid are still mounted correctly. Malfunction of the appliance Send the appliance to an authorized service centre for repair. You can not loosen the universal ‘s’ blade from the shaft. You have mounted the universal ‘s’ blade in wrong orientation.
ditionally, the large universal ‘s’ blade and emulsifying disc are firmly locked for operation via nozzles on the shaft. Remainder of food and liquids could drop from the parts of the appliance, when disassembling. Ensure that no liquids drip on the motor base, or any other delicate objects. Always remove the bowl from the motor base first, and place it on a stable and water-resistant surface, before opening the lid. 1.
Dishwasher use Do not place the motor base or power cord in an automatic dishwasher. All plastic components deteriorate through prolonged use of a dishwasher for cleaning (e.g. discolouration, cracks, distortions). Nevertheless, all removable parts and accessories (bowl, lid, shaft, and tools) of your Food Processor are tolerant to dishwasher use. However, if using the dishwasher, place the parts only on the top rack. If your dishwasher features temperature control, do not select more than 65 °C (150 °F).
„Preparing the Appliance“) Place the bowl on the motor base. For storage, it is quite sufficient to lock the bowl only until it engages firmly on the motor base and will not fall. This way, you avoid excessive wear to the safety interlocks. Insert the long shaft in the container, and place the chopping blade on it without pushing it down. There is no need to fix it on the shaft. Then, place the short shaft carefully in the container, and put the emulsifying disc on it. Insert the separator disc.
Index bowl.................................................................................................35, 41, 44, 52 workspace..........................................................................................................37 storage...............................................................................................................56 food collector..........................................................................................35, 43, 50 continuous feeding..................
GASTROBACK GmbH Gewerbestraße 20 . D-21279 Hollenstedt / Germany Telefon +49 (0)41 65/22 25-0 . Telefax +49 (0)41 65/22 25-29 info@gastroback.de . www.gastroback.