Operating Instructions Smart Ice Cream Advanced Automatic Art.-Nr.
Carefully read all provided instructions before you start running the appliance and pay attention to the warnings mentioned in these instructions. Table of Contents Knowing your Smart Ice Cream Advanced Automatic..............................................34 Important safeguards...........................................................................................36 General safety instructions................................................................................
Dear Customer! Congratulations! A series of new possibilities comes with your new Gastroback Smart Ice Cream Advanced Automatic. The new ice cream maker »Smart Ice Cream Advanced Automatic« from GASTROBACK will delight both the ice cream gourmet and the whole family. With the integrated compressor cooling delicious ice creams can be prepared in just 20 minutes. Precooling in a few minutes up to -30 °C to accelerates the manufacturing process.
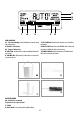
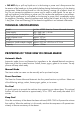
Knowing Your smart Ice Cream Advanced Automatic A B C N G H I D K L C M F E A. Anodised ice cream bowl with handle for easy removal. Not dishwasher safe and should not be stored in the freezer. B. Paddle used to scrape the sides of the bowl and churn the ice cream. Note: not to be stored in the freezer*. C. Lid can be lifted or folded back into 2 parts. D. Stainless steel housing E. POWER button will turn the ice cream machine on or off. F.
R U V T Q S P LCD-Display O. LCD Control Display provides information on function setting and cooling progress. P. Hardness selection bar Q. Progress indicator bar R. KEEP COOL will keep the frozen dessert chilled and churned for up to 3 hours. S. ADD MIX-INS will flash to let you know when it is time to add your favorite mix-ins. O T. PRE-COOLING indicates that the compressor is on and cooling the machine. U.
Important Safeguards Carefully read all instructions before operating this appliance and save for further reference. Do not attempt to use this appliance for any other than the intended use, described in these instructions. Any other use, especially misuse, can cause severe injuries or damage by electric shock, moving parts or fire. These instructions are an essential part of the appliance. Do not pass the appliance without this booklet to third parties.
sible for their safety. Children must always be supervised to ensure that they do not play with the appliance or any parts of the appliance or the packaging. Always keep the appliance where it is dry, frost-free, and clean, and where young children cannot reach it. Do not leave the appliance or any part of it unattended, when in reach of young children. • Do not place the appliance or any part of it in a range, or on or near hot surfaces (e.g. burner, heater or oven).
• Do not cover the air vents when the ice cream machine is in use. • Do not place any ingredients directly into the ice cream chamber. Place ingredients into the ice cream bowl only. • Do not store explosive substances such as aerosol cans with a flammable propellant in this appliance. • Ensure ice cream chamber is clean, dry, and free of debris before each use. • Do not place fingers or hands inside the ice cream machine during operation. Avoid contact with moving parts.
• DO NOT drip or spill any liquids on or in the housing or power cord. Always ensure that the exterior of the bread pan is clean and dry before placing the bread pan on/in the heating compartment. Otherwise liquid could run into the housing, causing risk of electric shock or fire. Do not immerse the appliance or power cord in water or other liquids. Do not pour or spill any liquids on/in the housing or power cord. Do not place the appliance on wet surfaces.
Child Lock The Smart Ice Cream Advanced Automatic features a child lock. Press and hold HOLD for 2 seconds to set the child lock mode. To exit this mode press and hold for 2 seconds again. Add Mix-Ins Mix-ins such as chocolate chips, fresh fruit and flavours can all be added easily through the flip back lid.
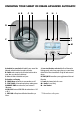
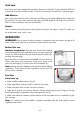
1. To lock the lid into position, align the lid handle to the alignment graphic, rotating clockwise into the LOCK position. (pic C) C 2. Press the POWER button to turn the machine on. 3. Rotate the hardness selection dial to your chosen dessert. Press the START | PAUSE button to begin the churning process. The elapsed time will be displayed on the LCD. 4. The appliance will beep when your dessert has reached its desired consistency.
Automatic Mode Start up Unwind the power cord completely and insert the power plug into a 220/240V outlet. Press the POWER button to turn the machine on. The POWER button will illuminate white. The LCD screen will display AUTO. The progress and hardness bar will also be illuminated. The arrow should be pointed at the AUTO on the LCD screen to indicate the mode you are in. To ensure the machine is in auto mode, turn the hardness dial.
b) Add ingredients to the ice cream bowl as specified in the recipes. Wipe any spilled ingredients from the rim of the bowl. D c) Insert the bowl by lowering into position, ensuring bowl handle hinges sit inside grooves on the chamber. It is important that the ice cream paddle is properly assembled onto the drive shaft to ensure that the paddle operates correctly. (pic D) d) Place the lid onto the ice cream bowl. It is not recommended to open the lid during operation unless stated in the recipe.
1. To engage the KEEP COOL feature, press the KEEP COOL button. KEEP COOL is function is selected when the button surround is illuminated red. 2. Once KEEP COOL is engaged in the manual mode, the compressor and motor will on and off incrementally to keep the consistency of the dessert if the ice cream maker detects that your dessert has melted below the pre-determined consistency within the selected time period.
• When making crème anglaise and recipes that require heating ingredients, it’s always a good idea to make this the day before. Alternatively, cool ingredients for at least 4 hours prior to making ice cream. • Always add ingredients into the bowl before inserting into the ice cream maker. • Ice cream recipes stated in this instruction booklet use ingredients such as cream, milk, eggs and sugar. These ingredients can be substituted with similar ingredients to suit different taste or dietary requirements.
• Ensure that the mixture is constantly stirred with a wooden spoon until it thickens. A flat bottom wooden spoon works best. To test using the back of the spoon, coat the spoon in the crème anglaise. Run your finger through the mixture on the back of the spoon. If the finger mark stays then the mixture is thick enough. Remove mixture immediately. • If the mixture separates or curdles then heat is too high. If the mixture separates you will need to start again.
Care and Cleaning Always ensure that the appliance is out of reach of young children. Always switch off the appliance (START/STOP button), then unplug the appliance, and wait until the appliance cooled down, before moving or cleaning the appliance. Do not attempt to move the appliance during operation. Do not use any abrasive cleaners or corrosive chemicals (e.g. bleach) for cleaning the appliance or any parts of it, to avoid damage to the surfaces.
Cleaning the paddle 1. Wash the paddle with warm soapy water. Using the bottle brush supplied insert this in the central part of the paddle to clean all the ice cream out. 2. Let all surfaces dry thoroughly before reassembling the ice cream machine Note: Paddle and lid are dishwasher safe on the top rack ONLY. STORAGE 1. Ensure the ice cream machine is turned off. Remove power plug from the power outlet. 2. Ensure the ice cream machine and all accessories are completely clean and dry. 3.
Problem Easy Solution Frozen dessert not frozen in allocated time • Dessert mixture was too warm when placed in the ice cream bowl for time allocated in manual setting. • Different ingredients and quantities will effect freezing time. Allow for more time if using ingredients like eggs/alcohol. Can’t remove bowl insert after churning • Ingredients may have spilt over the side of the bowl and into the chamber. Turn the machine off and let stand for 10 - 20 minutes to defrost the ice cream.
Notes for Disposal Important information for correct disposal of the product in accordance with EC Directive 2002/96/EC. At the end of its working life, the product must not be disposed of as urban waste. It must be taken to a special local authority differentiated waste collection centre or to a dealer providing this service.
REcipe ideas Ice Creams Basic Vanilla Ice Cream Quick Mix Vanilla Ice cream Ingredients 2 cups pouring cream 1 cup milk 1 vanilla bean, split and seeds scraped or 1 teaspoon vanilla extract 5 egg yolks ½ cup sugar Ingredients 1 cup heavy pouring cream 1¼ cups whole milk ¾ cup sweetened condensed milk 1 teaspoon vanilla extract Makes approximately 1 litre Makes approximately 1 litre Method 1. Place cream, milks and vanilla into a large jug and stir to combine. Refrigerate until cold. Method 1.
2. Meanwhile beat egg yolks and sugar in a bowl until pale and thick. Once chocolate mixture is hot, slowly whisk chocolate into the egg mixture. the back of the spoon (see tips for better ice cream making). 4. Pour mixture into a heatproof bowl, cover and refrigerate until well chilled. 3. Clean saucepan and return mixture back to a low heat. Stir constantly with a wooden spoon until mixture has thickened and coats the back of the spoon (see tips for better ice cream making). 5.
Salted Caramel Ice cream and rub together with fingertips until butter is mixed through other ingredients. Spoon mixture onto baking tray and bake in oven for about 10 - 15 minutes or until golden. Allow crumble to cool on tray. Makes approximately 1 litre Ingredients 1½ cups milk 7 egg yolks 1 cup white sugar 3 tablespoons water 1¼ cups pouring cream 1 teaspoon fine sea salt 2.
6 ½ egg yolks cup good quality honey 4. Pour mixture into a heatproof bowl, cover and refrigerate until well chilled. 5. Pour gelato base into ice cream bowl. Set ice cream maker to desired setting and churn. Method 1. Place cream and milk into a medium heavy-based saucepan. Heat until mixture just starts to simmer. 6. Add chopped pistachios once machine specifies to add in mix-ins. 2. Meanwhile beat egg yolks and honey in a bowl until pale and thick.
Mint Chocolate Gelato Method Makes approximately 1 litre 1. Place milk, cream and vanilla extract into a medium heavy-based saucepan. Heat until mixture just starts to simmer. Ingredients 1½ cups milk ½ cup pouring cream 120 g good quality dark chocolate, chopped 2-3 drops peppermint essence 5 egg yolks 1/ 3 cup caster sugar 60 g good quality dark chocolate, finely chopped (extra) 2. Meanwhile beat egg yolks and sugar in a bowl until pale and thick.
Tip: To make this recipe without using the eggwhite we recommend using the manual setting and allow approximately 60 minutes for churning. Mixture will make approximately 700ml sorbet once churned. Method 1. Combine sugar, water and vanilla bean and seeds in a saucepan over a low heat. Cook, stirring, until the sugar has dissolved. Increase heat and simmer for 2 minutes. Remove from heat and allow to cool. Refrigerate until needed. Pink Grapefruit Sorbet Makes approximately 1 litre 2. 2.
Set ice cream maker to desired setting and churn. Banana Frozen Yogurt 4. Once mixture is frozen transfer to a freezer safe container and freezer for up to 1 week. Ingredients 1½ cups mashed ripe bananas (about 3 large) 2 teaspoons lemon juice 2 cups vanilla yogurt 1-2 tablespoons honey, to taste Makes approximately 1 litre Tip: To make this recipe without using the eggwhite we recommend using the manual setting and allow approximately 60 minutes for churning.
20141209 GASTROBACK GmbH Gewerbestraße 20 . 21279 Hollenstedt / Germany Telefon +49 (0)41 65/22 25-0 . Telefax +49 (0)41 65/22 25-29 info@gastroback.de . www.gastroback.