Operating Instructions Design Multicook plus Art.-No.
Carefully read all provided instructions before you start running the appliance and pay attention to the warnings mentioned in these instructions. Table of Contents Knowing Your Design Multicook Plus...................................................................46 Important Safeguards.........................................................................................49 Important Safeguards for Electrical Appliances.................................................50 High Temperatures—Risk of Burns.
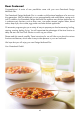
Dear Customer! Congratulations! A series of new possibilities come with your new Gastroback Design Multicook Plus. The Gastroback Design Multicook Plus is a modern multi-functional appliance of a new cooking generation. With this Multicook you can prepare healthy and varied dishes, saving much time.
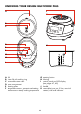
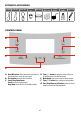
Knowing Your Design multicook plus A J C B C D K E F G H I A lid B inner lid with sealing ring C removable steam vent D oven compartment E heating plate F temperature sensor - prevents overheating and ensures a steady cooking temperature G opening button H housing I control panel and LED-display (see pages 47, 48) J handle K removable inner pot, 5 litre, non-stick coated, with level indicator 46
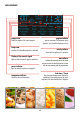
extensive accessories rice spoon soup ladle spoon shelf measuring steam insert yogurt insert cup with 6 cups frying basket inner pot handle power cord control panel A B C D A Hour/Min-button switches between hours and minutes for the time adjustment, controls the acoustic signal B Preset-button controls the Auto-Start-function C Cancel/Keep Warm-button Cancel interrupts the running program Keep Warm switches directly to the Keep-Warm-function D Time +/− -buttons for setting the minutes an
LED-Display program indicator gives an overview of all programs; during operation, only the selected program is lit up progress bar shows the progress of the current program Keep warm specifies if the Keep-Warm-function is activated activity indicator shows that the appliance is in operation Display of the acoustic signal lights up when the acoustic signal is switched on time indicator indicates the remaining time of the current program or when the Auto-Start-function is activated, the time remaining u
Important Safeguards Carefully read all instructions before operating this appliance and save for further reference. Do not attempt to use this appliance for any other than the intended use described in these instructions. Any other use, especially misuse, can cause severe injuries or damage by electric shock, heat or fire. Any operation, repair and technical maintenance of the appliance or any part of it other than described in these instructions may only be performed at an authorised service centre.
• Do not leave any cooking utensils or other foreign objects in the pot of the appliance during operation. Do not use any hard, sharp or edged objects (e.g. knives, forks) with the appliance. Only use wooden or heat-resistant plastic cooking utensils to stir and serve the food (e.g. supplied serving spoon). Do not use the inner pot for mixing ingredients to avoid excessive wear of the non-stick coating. Do not handle the appliance or any part of it with violence.
the appliance. Thus, before operating the appliance abroad, ensure that safe operation is possible. • Do not to use any extension cords or multisocket outlets. • Always handle the power cord with care. Always completely unwind the power cord before use. Do not place the appliance on a power cord. Power cords may never be knotted, twisted, pulled, strained or squeezed. Do not let the plug or power cord hang over the edge of the table or counter. The power cord may not touch hot surfaces.
Technical Specifications Model: Art. No. 42526 Design Multicook Plus Power supply: 220 - 240 V, 50 Hz Power consumption: 950 W Length of power cord: ca. 110 cm Weight: ca. 4.3 kg Dimensions: ca. 32 cm x 39,5 cm x 24 cm (width x depth x height) Capacity: max.
Alteration of the cooking time During operation of the Design Multicook Plus you can adjust the cooking time regardless of the pre-set time of the program. The steps and the total time depend on the selected program. To change the cooking time: 1. After selecting a cooking program, you can use the ›Timer / t °C‹-button to reach the time selection mode. The time indicator flashes. 2. Press the ›Hour / Min‹-button to select hours or minutes. The selected position flashes. 3.
If necessary, this function can be switched off by pressing and holding the ›Start / Keep Warm on / off‹-button. The corresponding indicator will switch off. This function can also be turned on or off during operation at any time. Warm-up Function With the Design Multicook Plus you can also reheat cold food. 1. Place the food in the inner pot and insert it into the appliance. 2. Close the lid, and connect the appliance to the power outlet. 3.
5. Press again the ›Timer / t °C‹-button to adjust the temperature. The temperature indicator flashes. The LED-display shows the pre-set temperature 100 °C. Use the › + ‹ and › – ‹-buttons to select the desired temperature. 6. If necessary, adjust the Auto-Start-Function to start cooking later. 7. Press and hold for a few seconds the ›Start / Keep Warm on / off‹-button to start the appliance.
8. After completion of the program an acoustic signal will sound. Depending on the settings of the appliance, the Keep-Warm-Function will launch (the LED display counts up the time) or the appliance will return to standby mode. 9. To cancel the selected program, to interrupt the cooking process or the Keep-Warm-Function press and hold the ›Cancel / Keep Warm‹-button for a few seconds. Program Fast Cook This program is intended for heating ready meals or for cooking convenience side dishes.
the program is selected. The LED-display shows the default values for the temperature and cooking time. 4. Use the ›Timer / t °C‹-button to reach the time selection mode. The minute indicator flashes. Use the › + ‹ and › – ‹-buttons to adjust the time. With the ›Hour / Min‹-button you can switch between hours and minutes. The LED-display shows the pre-set cooking time 1 hour. You can adjust the cooking time from 10 minutes to 12 hours. 5. If necessary, adjust the Auto-Start-Function to start cooking later.
8. After completion of the program an acoustic signal will sound. Depending on the settings of the appliance, the Keep-Warm-Function will launch (the LED-display counts up the time) or the appliance will return to standby mode. 9. To cancel the selected program, to interrupt the cooking process or the Keep-Warm-Function press and hold the ›Cancel / Keep Warm‹-button for a few seconds. Program Milk Porridge Recommended for preparing milk porridge, oatmeal and other milk puddings.
• adhere strictly to the information about amounts of ingredients in the recipe; • if you want to reduce or increase the amount of the ingredients, do so always proportional and do not exceed the maximum quantity; The properties of milk and cereals, are dependent on the origin and the manufacturer, and can therefore vary, which sometimes affects the results. If the desired result with the ›Milk Porridge‹ program was not reached, you can also use the general-purpose ›Multi Cook‹-program.
Program Rice Recommended for cooking rice and various side dishes. The setting range of the time is 5 minutes to 4 hours in 1-minute steps (for the range up to 1 hour) or 5 minutes steps (for a time interval of more than 1 hour). The 24-hour Auto-Start-Function is available for this program. 1. Prepare the ingredients according to the recipe. Place these evenly in the inner pot and insert the inner pot into the housing.
Program Grain/Bean Recommended for cooking various types of single-and multi-grains (including couscous, bulgur, buckwheat, etc.) and various side dishes. The setting range of the time is 5 minutes to 4 hours in 1-minute steps (for the range up to 1 hour) or 5 minutes steps (for a time interval of more than 1 hour). The 24-hour Auto-Start-Function is available for this program. 1. Prepare the ingredients according to the recipe. Place these evenly in the inner pot and insert the inner pot into the housing.
3. Press the ›Menu‹-button or the › + ‹ and › – ‹-buttons to select the program ›Jam‹. Once ›Jam‹ flashes on the LED-display the program is selected. The LED-display shows the default values for the temperature and cooking time. 4. Use the ›Timer / t °C‹-button to reach the time selection mode. The minute indicator flashes. Use the › + ‹ and › – ‹-buttons to adjust the time. With the ›Hour / Min‹-button you can switch between hours and minutes. The LED-display shows the pre-set cooking time 35 min.
7. Press and hold for a few seconds the ›Start / Keep Warm on / off‹-button to start the appliance. The ›Start / Keep Warm on / off‹-button lights up. The countdown of the operating time will start after reaching operating temperature (boiling water and steam development). 8. The Keep-Warm-Function turns on automatically, immediately after the program is over. If necessary, this function can be switched off by pressing and holding the ›Start / Keep Warm on / off‹-button at any time. 9.
Program Slow Cook Recommended for Slow Cooking recipes as for the preparation of corned beef. The setting range of the time is 10 minutes to 8 hours in 10-minute steps. The 24-hour Auto-Start-Function is available for this program. 1. Prepare the ingredients according to the recipe. Place these evenly in the inner pot and insert the inner pot into the housing. Please make sure that all ingredients, including liquids, are below the maximum mark (10 Cup) on the inner surface of the inner pot.
4. Press the ›Menu‹-button or the › + ‹ and › – ‹-buttons to select the program ›Bread‹. Once ›Bread‹ flashes on the LED-display the program is selected. The LED-display shows the default values for the temperature and cooking time. 5. Use the ›Timer / t °C‹-button to reach the time selection mode. The minute indicator flashes. Use the › + ‹ and › – ‹-buttons to adjust the time. With the ›Hour / Min‹-button you can switch between hours and minutes. The LED-display shows the pre-set cooking time 2 hours.
display the program is selected. The LED-display shows the default values for the temperature and cooking time. 4. Use the ›Timer / t °C‹-button to reach the time selection mode. The minute indicator flashes. Use the › + ‹ and › – ‹-buttons to adjust the time. With the ›Hour / Min‹-button you can switch between hours and minutes. The LED-display shows the pre-set cooking time 30 min. You can adjust the cooking time from 5 minutes to 30 minutes. 5.
5. If necessary, adjust the Auto-Start-Function to start cooking later. 6. Press and hold for a few seconds the ›Start / Keep Warm on / off‹-button to start the appliance. The ›Start / Keep Warm on / off‹-button lights up and the countdown of the cooking time is shown in the time indicator. 7. The Keep-Warm-Function turns on automatically, immediately after the program is over. If necessary, this function can be switched off by pressing and holding the ›Start / Keep Warm on / off‹-button at any time. 8.
8. After completion of the program an acoustic signal will sound. Depending on the settings of the appliance, the Keep-Warm-Function will launch (the LED-display counts up the time) or the appliance will return to standby mode. 9. To cancel the selected program, to interrupt the cooking process or the Keep-Warm-Function press and hold the ›Cancel / Keep Warm‹-button for a few seconds.
3. Press the ›Menu‹-button or the › + ‹ and › – ‹-buttons to select the program ›Jelly‹. Once ›Jelly‹ flashes on the LED-display the program is selected. The LED-display shows the default values for the temperature and cooking time. 4. Use the ›Timer / t °C‹-button to reach the time selection mode. The minute indicator flashes. Use the › + ‹ and › – ‹-buttons to adjust the time. With the ›Hour / Min‹-button you can switch between hours and minutes. The LED-display shows the pre-set cooking time 6 hours.
8. The Keep-Warm-Function turns on automatically, immediately after the program is over. If necessary, this function can be switched off by pressing and holding the ›Start / Keep Warm on / off‹-button at any time. 9. After completion of the program an acoustic signal will sound. Depending on the settings of the appliance, the Keep-Warm-Function will launch (the LED-display counts up the time) or the appliance will return to standby mode. 10.
10. To cancel the selected program, to interrupt the cooking process press and hold the ›Cancel / Keep Warm‹-button for a few seconds. Please note that during the process the dough increases in volume or even doubles in volume. To keep the dough from overflowing, the volume of the original ingredients should be located under the ½ mark (2 l) on the inner surface of the inner pot. During the proofing process of the dough it is nessesary to maintain a constant temperature and humidity.
Tips and further information Steaming Steamed foods retain most of their nutritional value when cooked in the multicook. Foods may be steamed by placing food in the steam insert over stock or water. Keep lid closed while steaming food unless the recipe or chart specifically states to open the lid. By opening the lid unnecessarily steam is lost and the cooking time will be extended. Recommended preparation time for steaming Note that the following table contains general recommendations.
Ingredients Temperature Preparation of sugar syrup 115°C Preparation of stews 125°C Preparation of casseroles 130°C Sautéing cooked dishes 135°C Smoking sth.
Program Recommended Use Preparation of jams, jellies, etc. Cleaning of the inner Autoclean pot and lid Searing meat, fish, Fry vegetables etc.
Problem Possible Cause Solution of the problem The cooking You forgot to close the lid temperature is not of the appliance or the lid high enough was not tightly enough closed, so that the cooking temperature was not able to develop high enough. The cooking bowl and the heating element had poor contact, so that the cooking temperature could not be high enough. The dishes do not turn out well.
Problem Possible Cause Solution of the problem The result is overcooked You have made a mistake in the selection of ingredients or their size (the pieces are too small) or the setting of the cooking time. After cooking, the finished dish was kept too long in the ›Keep Warm‹-mode. • Stick exactly to the recipes for the appliance. • Selection of ingredients, the way they are cut, program selection and cooking time must be in accordance with the recommendations in the recipe.
Problem Possible Cause Solution of the problem The baking result is moist Wrong ingredients were used, which increase the amount of moisture e. g. juicy vegetables or fruits, frozen berries, cream, etc. • Select ingredients for recipes that are provided for this appliance. • Try to avoid ingredients that contain too much moisture, or use minimum quantity of these ingredients. The finished pastry was kept too long after completion of baking process in the closed appliance.
of the appliance housing or inner pot as these can damage the housing or the coating of the inner pot. Do not immerse housing or power cord in water or any other liquid as this may cause electrocution. Storage WARNING: Young children must be supervised that they do not play with the appliance or any part of it. When the appliance is not in use, always unplug the appliance. Do not leave the appliance unattended while connected to the power supply to avoid risk of electric shock or fire.
Information and service Please check www.gastroback.de for further information. For technical support, please contact Gastroback Customer Care Center by phone: +49 (0)4165/22 25-0 or e-mail: info@gastroback.de. Warranty We guarantee that all our products are free of defects at the time of purchase. Any demonstrable manufacturing or material defects will be to the exclusion of any further claim and within warranty limits of the law free of charge repaired or substituted.
GASTROBACK GmbH 20140925 Gewerbestraße 20 . 21279 Hollenstedt / Germany Telefon +49 (0)41 65/22 25-0 . Telefax +49 (0)41 65/22 25-29 info@gastroback.de . www.gastroback.