GASTROBACK ® Operating Instructions Design Mincer Advanced included accessories: Art.-Nr.
Carefully read all provided instructions before you start running the appliance and pay attention to the warnings mentioned in these instructions. Table of Contents Knowing Your Design Mincer Advanced................................................................. 19 Important instructions............................................................................................ 20 Important safeguards............................................................................................
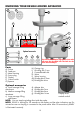
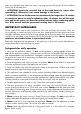
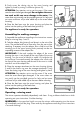
Knowing Your Design Mincer Advanced M N A B G H I J C L K D E F Optional accessories a b d e f g Pay attention assembling the single parts in correct order and ensure that the rounded side of the knife faces the worm when assembling it! c Parts: A) B) C) D) E) F) G) Pusher Feed pan Motor housing Screw plug Display Control switch Spanner Optional accessories a) Small sausage filling attachment b) Medium sausage filling attachment c) Large sausage filling attachment H) Closing ring
Design Mincer Advanced (standard size 8) Please read all the advice and instructions with care and keep the manual. The mincer is used for mincing meat (uncooked or cooked) and soft vegetables. Please prepare the ingredients before filling them into the feed chute. Using the pusher you press the food slowly into the worm which pushes it against the spinning crossed-blade knife. The knife and the worm are driven by a 350 watt induction motor (max. 1,28 Nm).
parts over the feed chute when the motor is running because little pieces of food could be thrown out of the feed chute. • ATTENTION: Ensure the rounded side of the knife faces the worm when assembling it. Otherwise it can cause damage to the motor. • ATTENTION: Do not let the motor run permanently for longer then 15 minutes on maximum power to avoid overheating. After 15 minutes turn off the appliance and let the motor cool down for several minutes before continuing operation.
• Ensure that the switch and power cord do not come into contact with water! Should this inadvertently happen, all parts must be completely dry before the appliance is used again. • Never let water or other liquids run into the motor housing. Do not use the appliance in moist and wet areas. • Never clean the power cord or the appliance in the dishwasher, pour liquids over the appliance or douse or dip it in water or other liquids.
hard or stingily ingredients (for example: bones, nuts, ginger). If you use hard ingredients like onions or carrots, you have to steam them before adding them to the meat otherwise they can block the motor. If the motor or if the worm is blocked turn off the mincer (by turning the control switch to STANDBY) and wait for approx. 6 seconds to be certain that the motor is no longer running. Work according to the instructions ›Trouble shooting‹ before continuing operation.
causing serious accidents. Do not put any cloth or napkins underneath the appliance to avoid endangering by fire and electric shocks. Never place the appliance on paper towels or uneven working areas. The air has to able to circulate. IMPORTANT: Always ensure that the plug is not connected to the power outlet before assembling or disassembling the appliance. Place the mincer on a flat, dry surface such as a bench top. A Assembling for mincing 1.
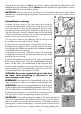
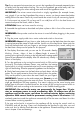
5. Firmly screw the closing ring on the worm housing and tighten by hand by turning it clockwise (picture G). F ATTENTION: Pay attention not to cant the screw. If the screw cants the screw thread gets damaged. Do not tighten the screw too much as this can cause damage to the motor. If the screw does not turn easily use the provided spanner for help and put some sunflower oil (or other edible oil) on the screw before mounting. 6.
Tip: If you use special mince-recipes you can mix the ingredients (for example steamed onions or spices) with the meat before mincing. This way the ingredients get mixed really well. Use the medium grinding disc when making tartar and mince the ingredients twice. IMPORTANT: The mincer cannot mince hard or stingily ingredients (for example: bones, nuts, ginger). If you use hard ingredients like onions or carrots, you have to steam them before adding them to the meat.
Making Sausages 1. Prepare the meat according to the instructions in chapter ›Operating- Mincing meat‹. Season the meat as desired. 2. Assemble the sausage attachment according to the instructions in chapter ›Assemble for making sausages‹ 3. Soak the sausage skin for 10 minutes in lukewarm water. Slide the sausage skin over the sausage attachment. Tip: If the skin gets stuck to the sausage attachment, wet it with some water. 4.
5. Take the closing ring of the worm housing and take the accessories (worm, crossed-blade knife and grinding disc or the sausage filling attachment and the adaptor disc) out of the worm housing. Tip: If the tools got stuck knock the mincer carefully on a stable cutting board. The grinding disc should be facing up. ATTENTION: Be careful not to damage your bench top, the cutting board or the mincer. 6. Remove meat residues.
Possible problem Easy solution After cleaning the motor does start again when turning the appliance ON. • Is the power cord plugged in? • The motor might be blocked with some hard substance (for example a bone). Turn the appliance off immediately and pull the plug. • Disassemble and clean the appliance. Operate according to the instructions ›Care and cleaning‹.
Storage Always clean the appliance before storing. ATTENTION: Store and use the appliance in a clean, frost free environment where it is protected from dampness, moistness and immoderate and extraordinary burden (such as: downfall, beat, overheating, moisture in the motor housing). Never lay heavy or hard objects on top of the appliance. Always assemble the appliance for storing. This way the parts are protected and cannot get lost. Note: You can store the grinding discs inside the pusher (see picture).
Technical specifications Model: Art. No. 41409 Design Mincer Advanced Power supply: 220 – 240 V AC, 50 Hz Power consumption: 350 W, 1,3 Nm Length of power cord: approx. 140 cm Weight: approx. 8 kg Dimensions: approx.
GASTROBACK GmbH Gewerbestraße 20 • D-21279 Hollenstedt / Germany Telefon +49 (0)41 65/22 25-0 • Telefax +49 (0)41 65/22 25-29 20140325 info@gastroback.de • www.gastroback.