GASTROBACK ® Instructions For Use Design Mincer Electronic Pro Art.-Nr.
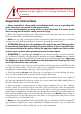
! Carefully read all provided instructions before you start running the appliance and pay regard to the warnings mentioned in these instructions. Important Instructions • Never assemble or disassemble crossed-blade knife, worm or grinding disc when the plug is connected to the power outlet. In case of unintentional pressing of the on and off button the motor would start running and therefore cause personal injury.
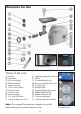
Directions for Use D) Release button G) Power switch Name of the units A) B) C) D) E) F) G) g) H) h) I) Pusher Feed pan Worm housing Release button Motor housing LCD control panel Power button Caution light Reverse button On and off button fine grinding disc 3 mm J) K) L) M) N) 0) P) Q) R) S) T) medium grinding disc 4,8 mm Worm Crossed-blade knife Coarse grinding disc 8 mm Closing ring Adaptor disc Sausage filling attachment Kebbe attachment A Kebbe attachment B Cookie attachment Cookie attachment bla
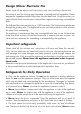
Design Mincer Electronic Pro Please read all the advice and instructions with care and keep the manual. The mincer is used for mincing meat (uncooked or cooked) and soft vegetables. Please prepare the ingredients before filling them into the feed chute. Using the pusher you press the food slowly into the worm which pushes it against the spinning crossed-blade knife. The knife and the worm are driven by a 1.000 watt motor. The finished mince discharges through the grinding disc.
the appliance close to the edge of the working area. Ensure that the power supply cable does not hang down from the work surface as it could be easily pulled, particularly by small children, thereby causing serious accidents. • Never immerse the motor block in water! Short-circuit danger! Do not put any cloth or napkins underneath the appliance to avoid endangering by fire and electric shocks. • Never cover the air box underneath the appliance.
• Do not use the appliance if it is damaged or units of the appliance are damaged. Do not use the appliance if it does not function properly or if it was excessively loaded. The appliance is likely damaged if the appliance or units of the appliance show cracks, exorbitant wearing down, alterations or leaks. It is also likely damaged if the drive wheel of the motorblock moves slowly. Take the appliance for technical maintenance and repair to an authorised specialised reparation shop.
• Take care handling the crossed-blade knife because it is very sharp. • Never hold your face or other body parts over the feed chute when the motor is running because little pieces of food could be thrown out of the feed chute. Important Safeguards for all Electrical Appliances • Always uncoil the line cord completely before installing the appliance.
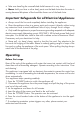
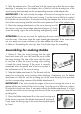
Assembling the appliance WARNING: The work space has to be easily accessible, solid, even, dry and of sufficient size. The mincer should only be set up on a firm level work surface. Never situate the appliance close to the edge of the working area. Ensure that the power supply cable does not hang down from the work surface as it could be easily pulled, particularly by small children, thereby causing serious accidents.
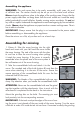
disc pokes out approx. 2mm of the front of the worm housing and the axis of the worm pokes out 2 mm of the grinding disc. Firmly screw the closing ring on the worm housing and tighten by hand. ATTENTION: Do not use any tools, for tightening the screw and pay attention not to cant the screw. If the screw cants the screw thread gets damaged. If the screw does not turn easily put some sunflower oil (or other edible oil) on the screw. 3. Firmly secure the worm housing in the opening for the drive shaft.
2. Take the adaptor disc. The small end with the recess has to face the worm when attaching. If necessary turn the adaptor disc a little bit until the arresting pin of the worm housing locks precisely into the corresponding recesses of the adaptor disc. IMPORTANT: If the tools overlap the edges of the worm housing the worm is not placed all the way inside of the worm housing. Turn the worm a little bit to make it fit inside but do not use force.
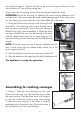
ATTENTION: Do not use any tools, for tightening the screw and pay attention not to cant the screw. If the screw cants the screw thread gets damaged. If the screw does not turn easily put some sunflower oil (or other edible oil) on the screw. 4. Refer to ´Assembling for mincing` step 3 for further steps for assembling. Assembling for making cookies 1. Picture C: Take the worm housing into the right hand and insert with your left hand the worm inside the worm housing.
Operating - Mincing meat The mincer operates absolutely dependently and clean. If any problems should occur while operating act upon instructions ´Trouble shooting`. WARNING: For the case that liquid runs over the mincer while operating turn the mincer off immediately and pull the plug. Clean and dry the appliance according to the instructions ´Care and cleaning`. TIP: If you use special mince-recipes you can mix the ingredients (for example steamed onions or spices) with the meat before mincing.
then the LCD display shows one circle rotating clockwise (picture D). D WARNING: • When you press the “POWER”-button, a signal sounds, indicating that the appliance is connected to the power supply. E • When the appliance operates in the “ON”-mode, only press the “ON/OFF”-button to stop the appliance. It is not available to press the “REVERSE”-button when the appliance is in the “ON”-mode. • When switching into the “REVERSE”-mode, you have to wait 4 seconds till the motor runnings.
Making Sausages 1. Prepare the meat according to the instruction ´Operating- Mincing meat`. Season the meat as desired. 2. Assemble the sausage attachment according to the instruction ´Assemble for making sausages` 3. Soak the sausage skin for 10 minutes in lukewarm water. Slide the sausage skin over the sausage attachment. TIP: If the skin gets stuck to the sausage attachment, wet it with some water. 4.
3. Unscrew the closing ring and take out the grinding disc and crossed-blade knife. Operate according to the instructions ´disassembling` the appliance. WARNING: Do not cut yourself removing the crossed-blade knife. 4. Assemble the appliance this time using the Kebbe attachments (Refer to ´Assembling for making Kebbe`). ATTENTION: Never assemble the appliance with the Kebbe attachment AND the crossed-blade knife with the grinding disc. 5.
or cookie attachment) off the worm housing. TIP: If the tools are stucked knock the mincer carefully on a stable cutting board. The grinding disc should be facing up. ATTENTION: Be careful not to damage your bench top, the cutting board or the mincer. 6. Remove meat residues. Operate as described: ATTENTION: Never put the appliance or parts of the appliance in the dishwasher or use abrasives for cleaning! This will cause discolouration and corrosion. 7. Wash all parts thoroughly in hot soapy water.
Trouble shooting guide Always clear blockage according to the following instructions. For the case that you are unsuccessful take the appliance to an authorised specialist reparation shop. Possible problem Easy solution The mince is not fine enough. Use a smaller grinding disc and/or mince the ingredients more then once. There are still ingredients in the feed chute but no mince is coming out of the mincer. The mincer is blocked.
Clear a blocking If the worm housing is blocked no mince comes out of the mincer while operating or the motor stops moving automatically because of the overload protection. ATTENTION: If a blocking occurs turn off the appliance immediately. Clear the problem before turning on the motor again. 1. Turn the appliance off and take the pusher out of the feed chute. 2. If the motor stopped running because of overloading, press the power button to turn the appliance off. 3.
Notes for disposal Dispose of the appliance and packaging must be effected in accordance with the corresponding local regulations and requirements for electrical appliances and packaging. Please contact your local disposal company. Do not dispose of electrical appliances as unsorted municipal waste, use separate collection facilities. Contact your local government for information regarding the collection systems available.
Notes
20121126 Gastroback GmbH Gewerbestraße 20 • 21279 Hollenstedt/Germany http://www.gastroback.de • E-Mail: info@gastroback.