
Brochure

Gastite Division, Titeflex Corporation
1116 Vaughn Parkway / Portland, TN 37148
800.662.0208 / www.gastite.com / gastite@gastite.com
49
April 2015
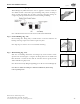
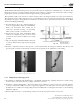
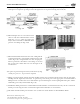
Step 4 Position Bushings (Fig. 4-28)
Insert bushings into fitting body. A small amount of resistance indicates the
bushings are being compressed to further capture the jacket. Note: e piloting
feature of the bushings ensures the tubing is aligned properly with the fitting body
for a uniform flare and a gas tight seal.
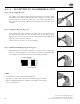
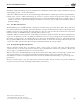
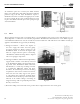
Step 5 Wrench Fitting (Fig. 4-29)
Slide nut over bushings and thread onto fitting body. Some resistance will be
experienced as the nut begins to compress the tubing and create the double wall
flare.
Continue to thread the nut until resistance to wrenching increases greatly and the
double wall flare is tightly seated.
Note: During the tightening process rotate the nut only. Do not rotate the fitting
body.
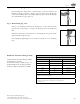
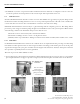
FlashShield™ Termination Fitting Assembly
1) Remove flange from brass fitting assembly.
2) Slide flange over tubing.
3) Attach brass fitting to tubing (Steps 2 - 5).
4) read flange back onto fitting assembly.
5) Mount completed termination assembly.
Table 4-2
Nut Recommended Torque Values
Size EHD *Torque
1/2" 18 35 ft-lbs
3/4" 23 45 ft-lbs
1" 31 65 ft-lbs
1-1/4" 37 95 ft-lbs
1-1/2" 48 120 ft-lbs
2" 60 150 ft-lbs
* Fitting is factory lubricated to reduce field torque requirements.
Lubrication must be chloride free.
* Minimum torque values supplied for lab testing reference only. Field
installation requirements: system must pass pressure/leak test
(See Section 6).
Fig. 4-29
Fig. 4-28