FOR FUTURE REFERENCE IMPORTANT: PLEASE READ AND UNDERSTAND ALL INSTRUCTIONS AND OPERATIONS BEFORE OPERATING THIS UNIT. FOLLOW ALL STEPS IN ORDER. NEVER ALLOW CHILDREN TO OPERATE THIS UNIT. SAVE THESE INSTRUCTIONS FOR FUTURE REFERENCE. THIS GAS GRILL IS DESIGNED FOR OUTDOOR USE ONLY. Warnings: • • • • • • • Only to be used outdoors. Read the instructions before using the appliance. Accessible parts maybe very hot - keep young children away. Do not move the appliance during use.
2.
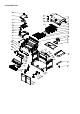
3. Parts list Item No. Description Qty Item No.
4. Fastenings Note: This BBQ has the spare screw bag which includes 2xA and 2xB. 5. Assembly steps Follow these instructions carefully to ensure the correct and safe assembly of the grill. CAUTION: Although we take every effort to ensure that the assembly process is as easy as possible, it is inherent with fabricated steel parts that corners and edges can cause cuts if improperly handled during assembly procedures. Be careful while handling any parts during assembly.
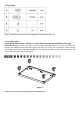
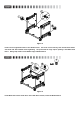
Figure 2 Fit the left and right Side Panels to the Bottom Panel. onto them and slide forward before tightening. Panel. Pre-fit the screws loosely, then slot the Side Panels The panel with the large square opening is the RIGHT Side Note group of holes in the FRONT edge of Bottom Panel. 4xB Figure 3 Fit the Back Panel to the inside faces of the Side Panel returns, and to the Bottom Panel.
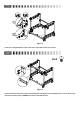
Figure 4 Fit the two Triangle Brackets to the inside faces of the Side Panels’ front returns. 4xA Figure 5 Fit the Cart Frame (front) to the top of each Side Panel ensuring that the two Magnet slots are at the lower edge, and the Cart Frame (front) is BEHIND the returns of the Side Panels.
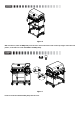
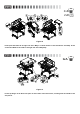
Figure 6 With assistance, lower the BBQ Body onto the Cart. Place between the tabs on the top edges of the two side panels, so the tabs are on the OUTSIDE of the BBQ Body. 4xB Figure 7 Fit the 4 screws that hold the BBQ body onto the Cart.
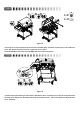
2xB 2xD Figure 8 Loosen the 3 screws already fitted to the left side of the BBQ body, and fit the keyhole slots on the inside face of the Side burner assembly over them. Tighten the screws again. Fit the Grid Baffle to the inside left of the BBQ with two screws and washers. Figure 9 Carefully extend the flexible gas tube with the Side Burner base assembled to it, and fit to the bracket under the body of the Side Burner Assembly with two pre-assembled screws. in the Assembly.
2xB 2xD Figure 10 Fit the plain Side Shelf to the right side of the BBQ in a similar manner to the Side Burner Assembly. Fit the second Grid Baffle to the inside of the right side of the BBQ body. 1xA Figure 11 Fix the top hinges of the Doors into place on the insides of the Side Panels, screwing from the outside of the side panels.
ze 4xA 2xC C C C Figure 12 Fit the Door Handles.C Fit the Doors – place the lower corner of each door in turn over the lower hinge pin in the Cart Bottom Panel and then, pressing up on the spring loaded top pin, slide in the top corner of the Door and let the pin snap back into the hole in the top of the Door. 2xA Figure 13 Fit the Grease Box Bracket to the bottom of the Grease Tray, and slide into the BBQ Body, from the back, as shown.
Figure 14 Fit the 2 Flame Tamers to the BBQ body, above the Burners under where the Cooking Grid will sit. Place the Cooking Grid and Hotplate on the BBQ and then fit the Warming Rack on top of the BBQ sides. Please ensure that a Flame Tamer is never placed below the Hot Plate. Note: 1. This BBQ has 2 spare flame tamers. 2. Do not use the warming rack when using the rotisserie.
Figure 16 Connect a Gas Cylinder to the Regulator, following all safety procedures shown later in this Manual. Adjust the Cylinder Hook as required to allow the Cylinder to hang off the ground. NEVER USE THE BBQ WITH THE GAS CYLINDER INSIDE THE BBQ CART CABINET. Figure 17 Fit the Bottle Opener to the left Side Panel of the cart, placing the reinforcing plate on the inside of the side panel for strength.
Important Information Please read these instructions fully before using the appliance. • Use this barbecue only on a non-combustible, stable and flat surface • Before using this barbecue, perform a leak test. This is the only safe and sure way to detect any gas leaking from joints and connections of the • barbecue after assembly. Assembly time: approx. 50 mins. Assistance will be required for some steps. • Retain these instructions for future reference. • Use outdoors only.
flexible hose. Check for leaks by brushing a solution of ½ water and ½ liquid detergent or soap over all the gas system Check your hose and regulator closely, at least joints, including gas cylinder valve connections, hose annually, for any signs of damage, cracking or splits connections, and regulator connections. due to aging especially if the barbecue is stored AN OPEN FLAME to test for leaks at any time. outdoors.
valve jams, try closing the valve first. been left open previously. It may have NEVER try to open the Side burner ignition Push in the gas control knob and turn anti-clockwise until a slight resistance to turning is felt. valve with a wrench. Hold for 3-5 seconds to allow gas flow and then turn to HIGH. You Your barbecue may have one or more of the following will hear and feel a click, and sight a spark alongside ignition methods: the side burner cap which should ignite the burner.
Roasting Hood Cooking below. Barbecues equipped with a roasting hood give the option to form an ‘oven’ for roasting or baking food, Fat Fires such as joints of meat or whole chickens, etc. More Empty and clean the drip tray, of food debris after each even cooking of food will actually be achieved by using cooking session. If the barbecue is to be used for large the barbecue with the hood down.
Care and Maintenance The burners should be removed and cleaned annually, or whenever heavy build-up is found, to ensure that Regularly clean your barbecue between uses and there are no signs of blockage (debris, insects) in either especially after extended periods of storage. Ensure the burner portholes or the primary air inlet of the the barbecue and its components are sufficiently cool burners. Use a pipe cleaner to clear obstructions. before cleaning.
A stainless steel cleaner may be used on stainless not come into contact with the food should be treated steel parts if required. with a rust inhibitor and painted with barbecue paint or Whenever a barbecue is being assembled for the first a heat resistant paint. time or its burners are being cleaned, make sure each Cooking grills should be coated with cooking oil.