
User Guide


f
g
Prepare the parts for reassembly
1. Clean the bonding surfaces of the bushings and
frame. These surfaces include the outside of the
tubular main pivot bushing, the seating surfaces
of the main pivot ‘top hat’ bushings that go into
the swingarm, and the parts of the frame and
swingarm that the bushings contact. These surfac-
es should be cleaned with Loktite Kleen ‘n Prime.
Be careful not to get Kleen ‘n Prime on the
paint or bushing material. It will remove paint,
and also remove the lubrication in the bush-
ings.
2. With the other bushings, simply wipe clean of dust
or other debris.
3. Do not lubricate any bushings.
4. Clean the pivot and link bolts with Kleen n Prime.
Install the main pivot bushings
1. Check the fit of the bushings in the frame and
swingarm by dry-assembling them (practice instal-
lation, but without Loktite). Normally the bushings
are a light press fit, meaning they are snug but
easily go into place with hand pressure. If the parts
fit correctly, go to Step 2. If they seem very loose,
go to Step 3.
2. If the parts fit correctly, apply Loktite 290 to
all contact surfaces between the bushings and the
frame or swingarm, and install the bushings.
3. If the parts seem very loose, Loktite RC680 is
required. 290 is a thread locker, and it works best
where parts are in tight contact. RC 680 is a filler,
so it has the ability to fill larger gaps and securely
bond parts that do not fit tightly together.
4. After installing the bushings, wipe off any excess
Loktite, particularly removing any Loktite that
contacts the bearing surface.
Install the main pivot axle.
1. Carefully align the swingarm with the main pivot
of the frame. The fit is tight. Avoid contact between
the bushings and any residual Loktite.
2. Align the swingarm and install the main pivot axle
(the long one) from the right side of the bike. Slide
it all the way through the frame and swingarm
eyes.
3. Apply Loktite 290 to the threads of the pivot bolt,
and install the bolt from the left side of the bike.
Tighten to 61-75 lb•in (6.9-8.5Nm).
Install the link bushings
1. The bushings supporting the link, the swingarm
link pivot, and rear shock are all installed dry.
Simply press them into place, being careful to keep
them aligned during insertion.
Install the lower link pivot axle.
1. This axle goes through the link and the frame.
Make sure the link is oriented in the way you’d like
it (note printing on the side, etc.). Insert the lower
link axle from the left side of the bike.
2. Apply Loktite 290 to the threads of the pivot bolt,
and install the bolt from the right side of the bike.
Tighten to 50-75 lb•in (5.7-8.5 Nm).
Install the upper link pivot axle.
1. This axle goes through the swingarm, link, and
rear shock. Make sure the shock orientation is how
you would like it. Insert the upper link axle from
the right side of the bike.
2. Apply Loktite 290 to the threads of the pivot bolt,
and install the bolt from the left side of the bike.
Tighten to 15-20 lb•in (1.7-2.2 Nm).
Install the shock mount bolt.
1. Insert the shock mount bolt.
2. Apply Loktite 290 to the threads of the pivot bolt,
and install the bolt from the right side of the bike.
Tighten to 61-75 lb•in (6.9-8.5Nm).
Allow to Dry
Loktite normally requires 24 hours to full
set. During this time, the bike should not be
ridden. Do not compress the suspension or
in other ways disturb the Loktite until is has
fully set.
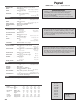
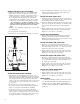
Fig. P4
Swingarm
Link pivot
axle
Shock
mount
bolt
Pivot bolt
Tubular main bushing
Main pivot
axle
‘Top hat’ bushing
Link bush-
ing