
User Guide


d
e
Prepare the bike
1. Clamp the frame upright in a workstand by its
seatpost with the head tube vertical.
2. Remove the rear wheel and right crankarm.
Disconnect the rear brake and rear derailleur
cable.
3. If possible, open the front derailleur cage and
remove the chain. Otherwise, remove the rear
derailleur.
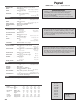
Remove the rear swingarm
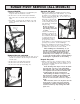
1. Remove the upper link bolt and axle (Fig. P1). Be
careful not to let the shock swing down and hit
a frame tube.
2. Remove the lower link bolt and axle.
3. Remove the front shock mount bolt.
4. Remove the main pivot bolt (Fig. P2).
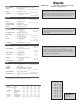
Separate the parts
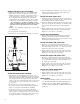
1. Remove the main pivot bushing from the frame.
This part is held in place with Loktite, so you will
probably need to lightly tap it with a hammer to
drive it out of the frame (Fig. 16). A socket on an
extension makes a good
drift. The socket should
contact the metal portion
of the bushing, barely fit-
ting inside the swingarm
and pivot lug.
Do not use heat to
loosen the Loktite, as
may damage the frame
or paint.
2. Remove the main pivot
bushing “top hats” from
the swingarm. These are
also installed with Loktite,
so again tap them out
with hammer using a
properly sized socket.
Avoid damage to the swingarm by properly sup-
porting it as you drive out the bushings.
3. Inspect the bushings from the shock and both
linkage axles. If they are in good shape, you can
probably leave them. If not, remove them.
These bushings are installed dry, so you
should be able to simply push them out. Do
not use a screwdriver or other sharp tool,
instead try something blunt like an allen
wrench. If you use a sharp tool, you may cut
or gouge the bearing surface, and this damage
would require replacement of the bushing.
Inspect the parts
1. With a clean rag, wipe off all the surfaces. If any
part is worn, it should be replaced. Signs of wear
on the pivot and link axles are discoloration or a
high degree of polish.
Some dark deposits may be left as the bush-
ings and axle ‘seat in’ to each other. When
this happens, some of the bearing material is
sort of plated onto the axle. Its normal, and
actually makes the pivot run smoother.
The bushings are harder to inspect; some
discoloration is normal as the bushings and
axle ‘seat in’ to each other. If wear looks
uneven or non-concentric, its best to replace
them.
When in doubt, throw out old parts. Its rela-
tively cheap to replace the parts, and time
consuming to perform a rebuild. You do the
customer a favor by only tearing their bike
apart once.
Fig. P3
Fig. P1
Upper link
axle and bolt
Lower link
axle and bolt
Front shock
mount bolt
Main pivot
Fig. P2
Main pivot
axle and bolt
SUGAR PIVOT SERVICE (ALL MODELS)