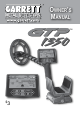
Owner’s Manual TM $ 3
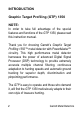
INTRODUCTION Graphic Target Profiling (GTP) 1350 NOTE: In order to take full advantage of the special features and functions of the GTP 1350, please read this instruction manual. Thank you for choosing Garrett’s Graphic Target Profiling 1350™ metal detector with PowerMaster™ circuitry.
TABLE OF CONTENTS To The Owner. . . . . . . . . . . . . . . . . . . . . . . . . . . . . . . . . . . . . . . . . . 5 GTP 1350 Parts. . . . . . . . . . . . . . . . . . . . . . . . . . . . . . . . . . . . . . . . 7 GTP 1350 Assembly. . . . . . . . . . . . . . . . . . . . . . . . . . . . . . . . . . . . 8 GTP 1350 Touchpad Functions POWER... . . . . . . . . . . . . . . . . . . . . . . . . . . . . . . . . . . . . . . . . 11 MENU / SCROLL . . . . . . . . . . . . . . . . . . . . . . . . . . . . . . . . . .
Junk Targets... . . . . . . . . . . . . . . . . . . . . . . . . . . . . . . . . . . . . . . . . 32 Field Operations. . . . . . . . . . . . . . . . . . . . . . . . . . . . . . . . . . . . . . . 33 Test Plot Construction. . . . . . . . . . . . . . . . . . . . . . . . . . . . . . . . . . 34 Bench Testing. . . . . . . . . . . . . . . . . . . . . . . . . . . . . . . . . . . . . . . . . 35 Batteries.......... . . . . . . . . . . . . . . . . . . . . . . . . . . . . . . . . . . . . . . . . 37 Headphone Jack . . . .
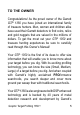
TO THE OWNER Congratulations! As the proud owner of the Garrett GTP 1350 you have joined an international family of treasure hunters. Men, women and children alike have used their Garrett detectors to find coins, relics and gold nuggets that are valued in the millions of dollars.
leading team of engineers. It is unparalleled in its ability to locate coins, jewelry and other metallic objects at greater depths than any other metal detector in its class. With Garrett’s revolutionary Graphic Target Analyzer (GTA) display that offers target acceptance/rejection, precise discrimination and other key information, you can spend more time digging treasure and less time digging trash.
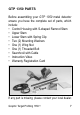
GTP 1350 PARTS Before assembling your GTP 1350 metal detector ensure you have the complete set of parts, which include: • Control Housing with S-shaped Ramrod Stem • Upper Stem • Lower Stem with Spring Clip • Two (2) Mounting Washers • One (1) Wing Nut • One (1) Threaded Bolt • Searchcoil with Cable • Instruction Video • Warranty Registration Card If any part is missing, please contact your local dealer.
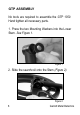
GTP ASSEMBLY No tools are required to assemble the GTP 1350. Hand tighten all necessary parts. 1. Press the two Mounting Washers into the Lower Stem. See Figure 1. Figure 1 2. Slide the searchcoil onto the Stem (Figure 2).
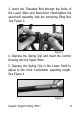
3. Insert the Threaded Bolt through the holes of the Lower Stem and Searchcoil. Hand-tighten the searchcoil assembly with the remaining Wing Nut. See Figure 3. Figure 3 4. Depress the Spring Clip and insert the Control Housing into the Upper Stem. 5. Depress the Spring Clip in the Lower Stem to adjust to the most comfortable operating length. See Figure 4.
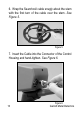
6. Wrap the Searchcoil cable snugly about the stem with the first turn of the cable over the stem. See Figure 5. Figure 5 7. Insert the Cable into the Connector of the Control Housing and hand-tighten. See Figure 6.
TOUCHPAD FUNCTIONS The GTP 1350 has eight (8) touchpads that control all operating functions. The battery pack and headphone jack are located beneath the arm rest. POWER Touchpad Press the POWER touchpad once to turn the detector ON or OFF. The detector will beep twice when turned ON and once when turned OFF.
Each time the GTP 1350 is turned on, it returns to the most recent settings it was programmed to use. However, modifications made to the COINS, JEWELRY, RELIC and ZERO Discrimination settings are not stored by the 1350 when turned OFF. MENU / SCROLL Touchpad Press the MENU / SCROLL touchpad to scroll through the MENU options to make adjustments to the detector’s settings.
COINS MODE—Designed to eliminate detection of lower conductivity trash targets such as iron, bottle caps, most pull tabs and other objects normally encountered in coin hunting. Some bent pull tabs and pieces of tabs may not be eliminated from detection. Some digging of junk targets is to be expected on occasion. JEWELRY MODE—Designed to eliminate trash targets such as lower conductivity items and bottle caps, while still detecting jewelry.
1350 is factory preset with the CUSTOM Mode set the same as the COINS Mode. By using the ACCEPT / REJECT touchpad, an operator can modify the Discrimination settings to individual specifications, which will be retained in the CUSTOM Mode. SENSITIVITY Press the (+) or (-) touchpad to select the desired SENSITIVITY level, indicated on the Lower Scale of the LCD panel. The 1350’s Sensitivity setting can be adjusted from 3 (least sensitive) to 12 (most sensitive).
possible, prior to the point where the detector becomes unstable. AUDIO THRESHOLD LEVEL Press the (+) or (-) touchpad to adjust the audio THRESHOLD level, indicated on the Lower Scale of the LCD panel. The audio THRESHOLD refers to the volume of the background “hum” made by the detector when no metal is being detected. FREQUENCY Press the (+) or (-) touchpad to select between 4 (four) operating FREQUENCY settings, indicated on the Lower Scale of the LCD panel.
TONE Press the (+) or (-) touchpad to adjust the TONE, indicated on the Lower Scale of the LCD panel. The TONE refers to the pitch of the sound the detector makes when a target is found. SALT ELIMINATION Press the (+) touchpad to activate SALT ELIMINATION or the (-) touchpad to deactivate (flashing) SALT ELIMINATION. The SALT ELIMINATION MODE eliminates interference caused by wetted salt; a feature that is particularly helpful when hunting on saltwater beaches.
pitched audio signal. A high-pitched tone replaces the standard belltone when the PROFILING feature is activated. (See Table on Page 18 for additional information). BACKLIGHT Press the (+) touchpad to activate the BACKLIGHT or the (-) touchpad to deactivate (flashing) the BACKLIGHT. The BACKLIGHT illuminates the LCD screen for low light or night hunting conditions. BATTERY TYPE When using rechargeable batteries press the (+) touchpad to activate the RECHARGEABLE battery option.
Setting Tone ID OFF/Profiling OFF Function All tones have the same standard pitch. Tone duration changes with the strength of the target signal (e.g. the stronger the target signal, the longer the duration). Tone ID OFF/Profiling ON The tone duration changes, but the pitch remains the same (e.g. a small target produces a quick, standard tone; a medium target produces a medium, standard tone; a large target produces a long standard tone).
OPERATE Touchpad Press the OPERATE touchpad at any time to return to the hunting mode while making changes or adjustments during the MENU / SCROLL sequence. ACCEPT / REJECT Touchpad Use the ACCEPT / REJECT touchpad to modify the Notch Discrimination pattern, shown on the Lower Scale of the LCD screen. Press the (+) or (-) touchpad to move the Target ID cursor to the right or left.
Modifications made to the Lower Discrimination scale in the CUSTOM Mode will be retained when the detector is turned OFF, until manually changed by the operator or until the detector is returned to the factory default settings by pressing and holding the POWER touchpad. Any changes made to Discrimination settings while hunting in all other MODES will be lost when the detector is turned OFF and will return to the factory default settings.
PINPOINT (Coin Depth) / PROFILING Touchpad Press and hold the PINPOINT touchpad to enter the PINPOINT Mode and find the exact location and coin depth of a target. When the PINPOINT touchpad is released the PROFILING feature will automatically turn ON to provide target size information. To exit the PROFILING feature, briefly press and release the PINPOINT / PROFILING touchpad again.
+ and - Touchpad Press the (+) and (-) touchpads to move the Target ID cursor when modifying Discrimination settings and when adjusting all MENU settings.
Target ID Guide (Legend) An illustrated Target ID Guide is located directly above the LCD screen. When hunting, the Target ID cursor will appear below the illustration that most likely indicates the type of target found, based on its conductivity. Three (3) color-coded bands correspond with the Small (red), Medium (blue) and Large (green) target size shown on the Profiling display.
the Lower Scale where no cursors are visible) no audible signal will be produced by those targets. The Lower Scale also indicates settings for SENSITIVITY, THRESHOLD, FREQUENCY, VOLUME and TONE as well as the depth of a coin-sized target (measured in inches) when pinpointing. Numerical Reference Guide The Numerical Reference Guide is used to indicate SENSITIVITY, THRESHOLD, FREQUENCY, VOLUME and TONE settings as well as the depth (in inches) of a coin-sized target when pinpointing.
OPERATING INSTRUCTIONS 1. Lower the searchcoil to a level approximately one (1) inch above the ground. 2. Press the POWER touchpad, two (2) beeps will sound to indicate the GTP 1350 is ON. Each time the 1350 is turned on, it returns to the most recent settings it was programmed to use, with the exception of modifications made to the Notch Discrimination settings in the pre-programmed Modes. (See ACCEPT / REJECT on page 19 for additional information.
above the ground. Do not allow the searchcoil to raise or tilt at the end of the swing, much like a “golf” swing. This can significantly degrade detection performance. Scan the searchcoil at a rate of about two (2) to five (5) feet per second. 4. The GTP 1350 will produce an audio signal and illuminate a Target ID cursor on the LCD screen when metal is detected. The Target ID cursor will appear directly below the Target ID Guide to reference the probable identity of the target.
6. Pinpoint the target to find its exact location. Place the searchcoil on the ground near, but not directly over the target’s suspected location. Then press and hold the PINPOINT touchpad. While maintaining contact with the ground, first scan the searchcoil left to right then scan front to back (i.e. make an X) until the loudest sound is produced, indicating the target is directly beneath the center of the searchcoil.
PROFILING feature is activated a target’s size is indicated as Small, Medium or Large on the Profiling display. Small targets include those which are approximately 1.5 inches in diameter or less (e.g. most U.S. coins). Medium targets range from approximately 1.5 to 4 (four) inches in diameter (e.g. silver dollar or flattened drink can.) Targets greater than 4 (four) inches are classified as Large.
IMPORTANT! To achieve optimum results when Profiling: • Isolate and pinpoint the target (Press and hold the PINPOINT touchpad) to determine its exact location. • Make sure you are only detecting one target at a time. Profiling multiple targets at the same time may produce inaccurate results; if necessary, scan the target from different angles.
smaller that actuality, then your Profiling sweep width is too wide. Conversely, if the target Profile displays larger than it actually is, then your sweep width is too narrow. Maintain a 14” sweep width to correct this error. Some targets may fall on or near the boundary of two sizes. In such cases, the PROFILING display may change between sizes on successive sweeps (i.e. a screw cap may read Small to Medium).
OVERLOAD AUDIO Very large and / or close targets may cause the GTP 1350’s circuitry to overload, resulting in inaccurate Target ID and Profiling information. If target overload occurs, as indicated by a machine-gun sound, raise the searchcoil a few inches until the overload audio ceases. COIN DEPTH MEASUREMENT Pinpoint the target as mentioned in the PINPOINTING section. While still pressing the PINPOINT touchpad, check the Lower Scale to determine the coin-depth in inches.
JUNK TARGETS The GTP 1350’s factory default COINS mode will not audibly respond to most junk targets. It may, however, respond with a signal that is not as clear or sharp as that of a coin signal. It is recommended that before digging these “blips”, the region where the Target ID cursor is illuminated on the Upper Scale is verified. Often, a junk target has been found when a Target ID cursor illuminates irregularly.
FIELD OPERATIONS As you walk, scan the searchcoil from side to side in a straight line or slight arc pattern. Keep the coil level and at a constant height of one or two inches above the ground while you scan at the rate of two to five feet per second. When scanning, do not hurry. Be methodical. Overlap each scan sweep at least 25 percent of the searchcoil’s width. Wear headphones to avoid ambient noises and to concentrate on scanning.
TEST PLOT CONSTRUCTION Your own test plot section will enable you to increase your treasure hunting proficiency. Create a test plot by burying several items at varying depths of one (1) to six (6) inches about 18 inches apart. Include coins, rings, nails, foil, pull tabs and bottle caps. Bury larger items, such as a 12 ounce soda can, approximately ten (10) inches deep. Clearly mark where each article is buried and its depth. Scan over them while carefully studying the detection signals.
BENCH TESTING Bench testing enables you to test typical trash items and learn about the discrimination capabilities of the GTP 1350 before taking it into the field or attempting to alter the Discrimination settings. The following tests should be performed as shown below with the searchcoil perpendicular to a bench, floor or other non metallic object. 1. Select the ZERO Discrimination Mode. 2. Pass various metallic objects across the bottom of the searchcoil at a distance of about two inches.
for the sound to increase only when certain items are scanned. Notice the specific segments on the Upper Scale of the display that are highlighted when various targets are passed across the searchcoil. 6. Perform the same tests in the JEWELRY Mode and observe the sounds produced. 7. Experiment with the ACCEPT / REJECT touchpad. Notice which of the 24 segments are illuminated as you identify various targets. 8.
BATTERIES The GTP 1350 requires eight (8) AA batteries (included), which are contained in two battery compartments that hold 4 (four) batteries each. These holders slide into the Battery Pack beneath the Arm Rest assembly. When replacing batteries, ensure they are installed correctly and the holders are inserted into the case with the rivet at the bottom of the holder towards the center of the case. Failure to install the batteries correctly may result in electronic damage to the detector.
The GTP 1350 is engineered with a battery saving feature. If no touchpads are pressed within 30 minutes of being turned ON, the detector automatically turns OFF in order to minimize battery use due to accidental turn ON. Simply press the POWER touchpad to resume hunting. The GTP 1350 does not come with an on-board battery recharge function. Completely remove all batteries from the detector when stored for extended periods. Replace or remove batteries by following these instructions: 1. 2.
4. 5. 6. 7. 8. Slide out the two battery holders (which are not connected by the wire) by tilting the pack. Each of the holders contains four AA batteries. Remove the old batteries. Install new batteries. Carefully observe the polarity of the batteries and place them in the holders. Replace the battery holders in the GTP 1350. Ensure the rivet on each side of the battery holder is visible in the center of the battery case.
HEADPHONE JACK The headphone jack is located at the rear of the battery pack under the armrest. Headphones are a valuable accessory of any metal detector to mask interference from outside noise. They permit you to hear small and deep targets that might be missed when using only audio from the detector speaker. Headphones are particularly essential when hunting where noise of people and/or traffic is excessive. BATTERY PACK HIP MOUNT OPTION Hip mount adaptability is built into the GTP 1350.
easily accessible and your GTP 1350 display is visible on the control stem of the detector. The removable hip mount pack and built-in coiled cable permit easy reassembly of carrying and storage. When reassembling, be sure the cable slides into its tube and is not pinched between the arm rest and the battery compartment. SEARCHCOILS Garrett takes pride in offering you a wide selection of searchoils and accessories that enable you to personalize your detector for the way you like to hunt treasure.
MAINTENANCE Avoid extreme temperatures as much as possible, such as storing the detector in an automobile during hot summer months or in freezing weather. Clean your detector frequently. Wipe the housing after use and wash the coil with warm, soap water when necessary. Protect your instrument from dust and sand as much as possible. Your searchcoil is submersible; however, the control housing is not! NEVER submerge the control housing in water and ALWAYS protect it from heavy mist, rain or blowing surf.
SERVICE AND REPAIR In case of difficulty, read this Owner’s Manual thoroughly to make certain your detector is not inoperable due to manual adjustments (Press and hold the POWER button for ten (10) seconds to return to the factory recommended settings). Contact your dealer for additional assistance. When your detector must be returned to the factory for service, make certain: • You have checked batteries, switches and connectors. (Weak batteries are the most common cause of detector “failure”.
• You have carefully packed the detector in its original shipping carton or other suitable box. Make certain that proper insulation or packing material is used to secure all parts. Do not ship stems or headphones unless they are part of the problem. Be certain to return all coils. Ship to: Garrett Metal Detectors 1881 West State Street Garland, Texas 75042 Call Garrett’s Customer Service Department (800-527-4011) if you have further questions.
MIND YOUR MANNERS Fill holes and obey NO TRESPASSING signs. A sincere request that Charles Garrett makes to every user of one of his detectors is that each hunt site be left in better condition than it was found. Thousands of individuals and organizations have adopted this formal Metal Detector Operators Code of Ethics: • I will respect private and public property, all historical and archaeological sites and will not conduct metal detector searches on these lands without proper permission.
• I will not destroy property, buildings or the remains of ghost towns and other deserted structures. • I will not leave litter or uncovered items lying around. I will carry all trash and dug targets with me when I leave each search area. • 46 I will observe the Golden Rule, using good outdoor manners and conducting myself at all times in a manner which will add to the stature and public image of all people engaged in the field of metal detection.
RAM BOOKS Since your Garrett GTP 1350 is a truly universal detector, all of the RAM books will be pertinent to its use. Of particular interest, however, will be The New Successful Coin Hunting by Charles Garrett, filled with “how to” tips and success stories about coin hunting. This is the complete 21st century guide to searching for coins with a modern metal detector such as the GTP 1350.
Garrett’s Ghost Town Treasures. Also, Bob Marx’s Buried Treasures You Can Find identifies thousands of sites across the United States where treasure is known to have existed. In this fine book Bob also gives helpful advice about One-Touch detectors offered by Garrett. Since the GTP 1350 can be used for finding gold nuggets and ore veins, you will be interested in Find Gold with a Metal Detector.
WARNING! Any metal detector may discover underground power lines, explosives or other items which when struck could cause personal injury. When searching for treasure with your GTP 1350, observe these precautions: • • Do not hunt in an area where you believe there may be shallowly buried underground electric lines or pipes. Avoid striking any line known to be, or suspected to be, carrying electrical power.
Garrett Metal Detectors
RAM BOOKS ORDER FORM Please send me the following RAM books: (Please indicate number of copies desired.) ___ New Successful Coin Hunting.....................$9.95 ___ Treasure Hunting for Fun and Profit..........$9.95 ___ Treasure Caches Can Be Found.................$9.95 ___ Ghost Town Treasures.................................$9.95 ___ You Can Find Gold with a Metal Detector.....$9.95 ___ Buried Treasures You Can Find................$14.95 ___ Gold of the Americas..................................$9.
MAIL-IN ORDER FORM Add $2.00 for first book, and $1.00 for each additional book ordered (maximum $3.00) for handling and shipping charges. Total for books $______________ 8.
FEATURES AND SPECIFICATIONS Audio Threshold, Adjustable Audio Tone ID Coin Alert Belltone Audio Digital Signal Processor (DSP) Discrimination, GTA Accept / Reject Notch Frequency, Adjustable Graphic Target Analyzer (GTA), Target ID cursor Ground Balance, Automatic Ground Tracking Headphone Jack Hip Mount Battery Pack Last Mode Switching LCD, Backlit Shows Target ID and Settings Microprocessor Controlled Pinpointing, Coin Depth Measurement PowerMaster Circuitry Profiling (Target Size) Salt Elimination Mode S
Touchpad Controls with One-Touch Operation Volume Control Length: 40” to 51” - Adjustable Weight: 4.0 lbs (1.9 kgs) Frequency: 7.
Graphic Target Profiling 1350™ 55
1881 W. State Street Garland, Texas 75042 Toll Free: 800.527.4011 Tel: 972.494.6151 Fax: 972.494.1881 Email: sales@garrett.com © 2008 Garrett Electronics, Inc. PN 1526000.C.