
User manual


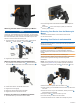
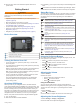
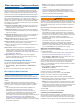
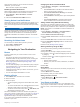
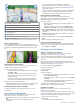
Table Of Contents
- Table of Contents
- Installation
- Mounting Your Device in a Motorcycle
- Removing Your Device from the Motorcycle Mount
- Mounting Your Device in an Automobile
- Getting Started
- Rider Awareness Features and Alerts
- Navigating to Your Destination
- Finding and Saving Locations
- Using the Map
- Live Services, Traffic, and Smartphone Features
- Pairing with Your Phone and Connecting to Smartphone Link
- Bluetooth Feature Status Icons
- Garmin Live Services
- Pairing Your Phone and Headset
- Sending a Location from Your Smartphone to Your Device
- Smart Notifications
- Hands-Free Calling
- Setting Up Bluetooth Features for Your Apple Device
- Setting Up Bluetooth Features for Your Smartphone with Android™
- Disconnecting a Bluetooth Device
- Deleting a Paired Phone
- Traffic
- Using the Apps
- zūmo Settings
- Device Information
- Device Maintenance
- Troubleshooting
- The suction cup will not stay on my windshield
- My device is not acquiring satellite signals
- The device does not charge in my vehicle
- My battery does not stay charged for very long
- My device does not connect to my phone or Smartphone Link
- My device does not appear as a removable drive on my computer
- My device does not appear as a portable device on my computer
- My device does not appear as either a portable device or a removable drive or volume on my computer
- The Smartphone Link app affects the battery charge level on my smartphone
- Appendix
- Index

Installation
Mounting Your Device in a Motorcycle
Powered Motorcycle Mount
WARNING
Garmin
®
strongly recommends having an experienced installer
with the proper knowledge of electrical systems install the
device. Incorrectly wiring the power cable can result in damage
to the vehicle or the battery and can cause bodily injury.
See the Important Safety and Product Information guide in the
product box for product warnings and other important
information.
The device must be mounted in a suitable and secure location
on your motorcycle, based on available power sources and safe
cable routing.
Motorcycle cradle
12 to 24 Vdc system power (red)
NOTE: The red system power cable may include an in-line fuse on
some device models. Cables without an inline fuse are protected
internally.
System ground (black)
Installing the Handlebar Base
The device includes parts for two handlebar installation
solutions. Custom mounts may require additional hardware.
Installing the U-bolt and Handlebar Base
1
Place the U-bolt around the handlebar , and thread the
ends through the handlebar base .
2
Tighten the nuts to secure the base.
NOTE: The recommended torque is 50 lbf-in (5.65 N-m). Do
not exceed torque of 80 lbf-in (9.04 N-m).
Installing the Handlebar Base to the Clutch-Clamp or Brake-
Clamp Brackets
1
Remove the two factory bolts on your clutch-clamp or brake-
clamp bracket .
NOTE: Both 1/4 in. standard and M6 bolts are included.
Match the size of the factory bolts on your clutch-clamp or
brake-clamp bracket.
2
Thread the new bolts through the handlebar base, spacers
, and clutch-clamp or brake-clamp bracket.
3
Tighten the bolts to secure the base.
Attaching the Power Cables to the Motorcycle Mount
1
Thread the power cable connector through the top of the
opening in the motorcycle mount.
2
Slide the cable down to the bottom of the opening and pull
the cable back until it is snug.
3
Screw the black screw into the back of the mount to
hold the cable in place.
4
Thread the weather cap through the top hole and press it
into the hole.
Installation 1