XMap® 7 Administration Guide Last updated on 12/13/2009
Contact DeLorme Professional Sales for support: 1-800-293-2389 Page 2
WARNING: Messaging, tracking and SOS functions require an active Iridium satellite subscription. Always test your device before you go. This manual is provided as a convenience. GARMIN IS NOT RESPONSIBLE FOR THE ACCURACY OF THIS MANUAL AND DISCLAIMS ANY LIABILITY ARISING FROM THE RELIANCE THEREON.
Table of Contents XMAP® 7 ADMINISTRATION GUIDE ............................................................................ 1 INTRODUCTION ............................................................................................................. 5 DEPLOYING XMAP 7 USING ACTIVE DIRECTORY .................................................. 22 DISTRIBUTING A PATCH USING ACTIVE DIRECTORY GPO .................................. 32 DEPLOYING XMAP 7 USING SMS ......................................................
Introduction Introduction This document contains information regarding XMap® 7 installation and tasks at the administrative level. Content may evolve over time as additional information is provided or new tasks are added. This document is not intended to preclude the need of more detailed process descriptions that may be found in the XMap Help documentation. Please contact DeLorme Professional Sales if you are unable to address a particular XMap related issue.
Introduction user group has read permissions for the folder and for the share as the prerequisite installer will run in each client computer’s system context. Using RunPrerequisites.vbs Summary This script installs or checks the prerequisites for XMap. The script is provided in the root of prerequisite installation folder. It can be used as a startup script through Active Directory.
Introduction Optionally, you can prefix the RunPrerequisites.vbs with cscript, e.g. cscript RunPrerequisites.vbs, to see the command line output of the script, otherwise it will run silently. Example Check the prerequisite installation on a remote computer: RunPrerequisites.vbs /installPath: ”\\myserver\xmap_prerequisites\Setup.exe” /computer:lois After running either command, check the ERRORLEVEL property. If it is 0, then the prerequisites are installed; if it is 1, then they are not installed.
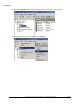
Introduction b) Click the Computers folder under the domain in which you want to create the group. c) Click the Action menu, point to New and click Group.
Introduction d) In the New Object – Group dialog; in the Group name box, type your group name, leave the default settings as is, and click OK. e) Right-click your new computer group and click Properties.
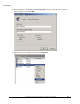
Introduction f) Click the Members tab on the Properties dialog and click the Add button. g) Click Object Types and select Computers so it is one of the types you can add. Type the list of computer names using semi-colons to separate them in the Enter the object names to select box and click OK. h) The list of computers is displayed in the Members tab of the Properties dialog. Click OK to complete creation of the group.
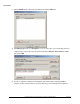
Introduction group is available in your Group Policy object. 4) Open the Group Policy Management tool on your Active Directory Server. 5) Expand Domains, and then expand the domain in which you want to work. 6) Right-click the domain to which you want to add the policy and click Create and Link a GPO Here.
Introduction 7) Type the name of the prerequisite in the Name box and click OK. 8) Click your new policy in the management console and make sure the Scope tab is selected in the pane on the right. Under Security Filtering, click Authenticated Users and then click the Remove button. 9) Under Security Filtering, click the Add button.
Introduction 10) On the Select User, Computer, or Group dialog click the Object Types button, select Computers in the Object Types dialog, and then click OK. 11) Type a computer or a computer group for which you want install prerequisites in the Enter the object name to select box. See step 4 if you are installing to a lot of computers as this dialog only allows you to add one computer at a time. Click OK once you have entered the computer or group.
Introduction 12) Right-click your new group policy and click Edit on the context menu. 13) In the Group Policy Object Editor, expand Computer Configuration. Expand Windows Settings and click Scripts (Startup/Shutdown).
Introduction 14) Double-click the Startup Scripts icon in the Group Policy Object Editor. Click the Show Files button on the Startup Properties dialog once it appears. 15) A file explorer window opens to the group policies startup script folder. Open another window to the network share folder that contains the Prerequisites setup that you created in step 2.
Introduction RunPrerequisites.vbs script to the startup script folder. 16) Close the folders and reopen the Startup Properties dialog from the Group Policy Object Editor. Click the Add button.
Introduction 17) On the Add a Script dialog, click the Browse button; a file dialog opens. Double-click the RunPrerequisites.vbs script that you copied in step 15. This should populate the Script Name box in the Add a Script dialog. 18) Type the script parameter in the Script Parameters box in the Add a Script dialog. There are three possible parameters you can enter. The /installPath:”” parameter is required and is the network path to the Setup.
Introduction /no_sql_server To finish configuring the group policy, click OK, and click OK again in the Startup Properties dialog. 19) The configuration of the group policy for running the prerequisite startup script is complete. Close the Group Policy Object Editor. 20) Open a command prompt and use any tool for running commands on remote computers. These examples use psexec. a) Make sure that psexec is available in your system path, or provide a fully qualified path to psexec to run it.
Introduction batch file again to restart the update for any machines that needed to reboot before installing SQL Server Express. e) Here’s an example for running the gpupdate command followed by the shutdown command for an XP client. f) On the client computer, you should see a shutdown message similar to the following. Note this is from a Windows Vista client. The client message on other operating systems may look slightly different.
Introduction b) Make sure that you are in the directory that contains the RunPrerequisites.vbs script, or the path to the script is in your system path, or that you provide the full path to the local copy of the RunPrerequisites.vbs script on the command line. c) Also make sure that you provide the /no_sql_server switch if you used that option for installing the prerequisites: cscript RunPrerequisites.
Introduction The prerequisite installer may be running asynchronously when the computer is starting up and the user may be able to log in while the prerequisites are installing. If the prerequisites don’t show as installed when running the command above, then you can check to see if the prerequisite install is still running by doing the following: a) Run: pslist \\. This command comes with the same package that you installed for the psexec command. b) You should see a list of processes.
Deploying XMap 7 Using Active Directory 23) If the prerequisites are still running, then periodically repeat steps 22.a and b until the prerequisites are finished. Then you can run the following command again as you did at the beginning of step 21 to see if the prerequisites are fully installed. Remember to provide the /no_sql_server switch if you used that to install the prerequisites, or do not provide it if you did not use it: RunPrerequisites.
Deploying XMap 7 Using Active Directory break installations on other computers. The Create a Transform section describes how to create a transform with Orca. 3) Set up a shared folder containing the setup files. 4) Create an XMap70 group policy against the domain, organizational unit, etc. If applicable, add appropriate machines. a) Go to Start>Programs>Administrative Tools>Group Policy Management.
Deploying XMap 7 Using Active Directory e) On the Scope tab, under Security Filtering, highlight Authenticated Users, click Remove, and then click OK to confirm the removal. f) Click Add (to the left of the Remove button) and then click Advanced. g) Click Object Types in the upper-right corner of the window. h) Clear all check boxes except Computers. i) Click OK. j) Click Find Now to populate all of the computers in the Domain.
Deploying XMap 7 Using Active Directory k) Highlight a computer to add to the policy and click OK. Click OK again to add the policy under Security Filtering. Perform steps g–j for each computer you want to add to the policy. l) Once all of the computers have been added, right-click your policy under Group Policy Objects and then click Edit. A new window opens. m) In the tree view, expand Computer Configuration, expand Administrative Templates, expand Windows Components, and select Windows Installer.
Deploying XMap 7 Using Active Directory n) On the right, double-click Always install with elevated privileges. A new dialog opens. o) Set this option to Enabled, and click on OK. p) In the tree view, expand User Configuration, then expand Administrative Templates, then expand Windows Components. Click Windows Installer, then repeat steps n and o. q) With this done, move back to Computer Configuration in the tree view, expand this option, and then expand Software Settings.
Deploying XMap 7 Using Active Directory s) Browse to the shared folder you created in step 3, select the DeLorme XMap 7.msi file, and then click Open. The Deploy Software dialog box opens. t) Select Advanced to add the transform created in step 2 to the installation and follow the steps below.
Deploying XMap 7 Using Active Directory i) Make sure Assigned is selected on the Deployment tab. ii) On the modification tab click Add to select the *.mst file that you created in step 2. Make sure that the transform is not in the same directory as the MSI and not in a sub directory of the MSI’s directory.
Deploying XMap 7 Using Active Directory Contact DeLorme Professional Sales for support: 1-800-293-2389 Page 29
Deploying XMap 7 Using Active Directory iii) Click OK when complete. u) Once the DeLorme XMap Network package displays, the package is published and available to client machines with the applied group policy. The next time you restart a client computer with the applied group policy, the following install message will display. Note: You may have to restart the client twice for the application to install. Optionally, you can also try running the following command on the client to force it to update.
Deploying XMap 7 Using Active Directory gpupdate /Target:Computer /Sync /Boot Contact DeLorme Professional Sales for support: 1-800-293-2389 Page 31
Distributing a Patch using Active Directory GPO Distributing a Patch using Active Directory GPO Active Directory GPO does not allow native distribution of update.exe or its embedded MSP, Microsoft patch, file. The following steps will allow an administrator to use the embedded .msp file to patch the original MSI. Once the original MSI is patched, then it is possible to redeploy the MSI as an upgrade.
Distributing a Patch using Active Directory GPO Deploy merged MSI To deploy the updated package, create a new software installation object in the same GPO as the original application install. See instructions for deploying the original MSI for a step-by-step guide to create a new installation object. 1) In the Deploy Software screen select the Advanced option and click OK. 2) In the Properties dialog, specify a name for the upgrade.
Distributing a Patch using Active Directory GPO 5) Click the Modifications tab and select any previously created transform (.mst) files. The previous transform should work with the patched MSI. Note that the transform, while not needed for an upgrade, will be needed for new installations in the future. Make sure that the .mst file is accessible by users across the network. The example below uses a local path which is wrong for actual deployment.
Distributing a Patch using Active Directory GPO 6) Click OK. 7) The updated setup will be deployed on the next reboot of the client machine in the GPO. 8) TIP: Use psexec to force a reboot of all client machines. "psexec \\ gpupdate /Target:Computer /Sync /Boot" Psexec is a free command line utility that you can download from Microsoft® TechNet. Once it's downloaded and installed, add it to the computer's system path.
Deploying XMap 7 Using SMS Deploying XMap 7 Using SMS 1) Ensure that the prerequisites installer is available on a network share prior to the following steps. See Installation Prerequisites for more information. 2) Open the SMS administrator console and expand the site to which you will deploy XMap. 3) Right click Packages, point to New, and click Package.
Deploying XMap 7 Using SMS a) In the Package Properties dialog, set the Name to something like XMap Prerequisites.
Deploying XMap 7 Using SMS b) Click the Data Source tab. Make sure the This package contains source files option is selected. Click the Set button and browse to the network share that contains the prerequisite installer. Make sure the Always obtain files from source directory option is selected. Click OK to close the dialog. 4) Expand the prerequisite package, right-click Programs, point to New, and click Program.
Deploying XMap 7 Using SMS 5) In the program Properties dialog, type a name like XMap Prerequisites in the Name box, and then click the Browse button. a) In the Open file dialog, browse to the network share that you created in the Install Prerequisites sections and double-click the Setup.exe program.
Deploying XMap 7 Using SMS b) In the Command line box on the Program Properties dialog edit the text so it looks like Setup.exe /s /boot_only. Optionally you can add the /no_sql_server switch if you do not want to install SQL Server Express, so your command line would look like: Setup.exe /s /boot_only /no_sql_server.
Deploying XMap 7 Using SMS c) Click the Environment tab. Under Run mode, select Run with administrative rights. Change Programs can run to Whether or a user is logged on. Click OK to close the Program Properties dialog.
Deploying XMap 7 Using SMS 6) To distribute the package, right-click the XMap Prerequisites Package that you just created, point to All Tasks, and then click Distribute Software. a) Click Next on the Distribute Package Wizard. Under Distribution points, make sure that the distribution point check box is selected and click Next.
Deploying XMap 7 Using SMS b) Make sure Yes is selected on the Advertise a Program dialog and click Next. c) Select the XMap Prerequisites program on the Select a Program to Advertise dialog and click Next.
Deploying XMap 7 Using SMS d) On the Advertisement Target screen, click Browse and select the collection of computers on which you want to install. Click Next and continue to click Next until you get to the Assign Program dialog. e) Select Yes. Assign the program. Click Next and then click Finish on the last dialog.
Deploying XMap 7 Using SMS 7) If you want to adjust the schedule of your newly advertised prerequisite installer, select Advertisements in the SMS management tool, right-click the prerequisite advertisement in the right hand window (you may have to refresh to see the advertisement), and click Properties.
Deploying XMap 7 Using SMS a) Click the Schedule tab and add new schedule items or edit existing schedule items to suit your needs. For example, we generally change the existing schedule to occur every 30 minutes to test our setups, and you may want to do the same when you first deploy to test your distribution on one or two computers, then change it back to a daily or weekly cycle once you get everything working. If your client computers do not have Windows Installer 4.
Deploying XMap 7 Using SMS 8) You can tell when the package has deployed by following by running the RunPrerequisites.vbs included in the prerequisites installation using the following command line: RunPrerequisites.vbs /installPath:\\server\prerequisites setup directory\Setup.exe /computer:computerName [/no_sql_server] computerName := The name of the client computer to test. /no_sql_server := Provide this parameter if you installed using this parameter, otherwise don’t include it.
Deploying XMap 7 Using SMS 11) In SMS, expand Site Database. Then, right-click Packages, point to New, and click Package From Definition. The Create Package from Definition Wizard opens. 12) Click Next. 13) Click Browse, browse to the shared folder you created in step 2, select DeLorme XMap 7.msi, and then click Open. 14) Click Next.
Deploying XMap 7 Using SMS 15) Select the Always obtain files from a source directory option and click Next. 16) On the Source Directory screen, under Source directory location, select the location for the mapping application. 17) Click Next and then click Finish. 18) Modify the Setup Properties. You may have to refresh to see the new package.
Deploying XMap 7 Using SMS 19) Expand the setup package and select Programs. 20) Right-click Per-system unattended, in the window on the right, and click Properties.
Deploying XMap 7 Using SMS 21) If you see ALLUSERS=2 in the Command line text box, change it to ALLUSERS=1. 22) In the Command line text box, add any properties that you want to change to the command line with the syntax PROPERTY_NAME=value (see the How to Use Properties section of this document for a description of the properties that can be set).
Deploying XMap 7 Using SMS 27) Make sure the Run this other program every time option is selected. 28) Click OK to save your changes and go on to the next step. 29) To distribute the package that was created, right-click the package, point to All Tasks, and then click Distribute Software.
Deploying XMap 7 Using SMS 30) Click to select a distribution point and click Next. 31) Select Yes to advertise the package and then click Next.
Deploying XMap 7 Using SMS 32) Select the Per-system unattended program and click Next.
Deploying XMap 7 Using SMS 33) Select the collection that you used or created for the prerequisites in step 6.d and click Next.
Deploying XMap 7 Using SMS 34) Type a name for the advertisement (and comment, optional) in the Name text box and then click Next. 35) Select whether to include sub-collections and then click Next.
Deploying XMap 7 Using SMS 36) Select a schedule and expiration (if desired) and then click Next. 37) Assign the program, click Next, and then click Finish.
Distributing a Patch using SMS 38) The program is now advertised and SMS clients in the selected collection will install the program according to the selection criteria. NOTE: If you want to change the schedule for the XMap distribution, then follow the instructions in step 7. Distributing a Patch using SMS The following steps describe the process to use SMS for distributing patches using update.exe and its embedded .msp file. See http://technet.microsoft.com/en-us/library/cc750177.
Distributing a Patch using SMS For the command line, click Browse and navigate to the update.exe file. Make sure to navigate through the network path to the file and not a local path. After add in the following /s /v”/qn” for a completely quiet install. Note the space between the /s and /v. If you want to display a basic progress bar to let the user know when the update is complete, use /qb in place of /qn. Click Advanced.
Distributing a Patch using SMS In the Advertisement Target dialog click Browse and click an appropriate collection. Advertise this to all appropriate machines. Option 2: Upgrading existing clients by merging the MSP file Uncompress original MSI files NOTE: If the original install was distributed using an uncompressed setup then this step is not required. A compressed setup will have .cab files in the same directory as the .msi file. 1) Create a collection of computers to install the patch on.
Distributing a Patch using SMS msiexec.exe /a “” TARGETDIR=”. 3) Make sure that the uncompressed directory is accessible by all users on the domain. Extract MSP file 1) Run the update.exe to extract the .msp file. XMap does not need to be installed on the machine where this runs. The msp file is extracted to the temp directory. You can find the temp directory by typing in %temp% at the run prompt. The .
Distributing a Patch using SMS the original setup package file (version1.msi) because this file was patched with the updated source files (version 2). The following is an example of the command line: MSIEXEC /fvomus version1.
Distributing a Patch using SMS 4) Right-click Packages in the SMS manager, point to New, and then click Package From Definition.
Distributing a Patch using SMS a) Click Next on the Create Package From Definition Wizard dialog and then click Browse. Browse to the MSI package on the network share you will be using to upgrade your existing installations. Be sure to browse to the network share and not a local path as a local path will not work for the clients you are distributing to. Double-click the MSI to select it.
Distributing a Patch using SMS c) Make sure Always obtain files from a source directory is selected on the Source Files screen and click Next. d) On the Source Directory screen, enter the network path that contains the MSI that will upgrade your existing installations and click Next. Click Finish on the last dialog.
Distributing a Patch using SMS e) Press the F5 key on your keyboard to refresh the package view so you can see your new package in the SMS manager. 5) In the package manager, expand the package you just added, click Programs, right-click the Persystem unattended program and click Properties.
Distributing a Patch using SMS a) Click the General tab and change the command line to: msiexec /fvomus “” /qn Replace with the MSI that you selected in step 4.a. For example, your command line should look something like: msiexec /fvomus “DeLorme XMap 7.msi” /qn b) Click OK to close the Program Properties dialog.
Distributing a Patch using SMS c) Right click the package you created, point to All Tasks, and click Distribute Software. d) On the Distribution Points screen, under Distribution Points, make sure the check box for each of the distribution points you want the package to go to are selected. Click Next until you get to the Select a Program to Advertise screen.
Distributing a Patch using SMS e) On the Select a Program to Advertise screen, click Per-system unattended and click Next.
Distributing a Patch using SMS f) On the Advertisement Target screen, make sure that Advertise this program to an existing collection is selected. Browse to the collection that you created in step 1 to select the collection to advertise to. Click Next and continue to click Next until you get to the Assign Program screen.
Distributing a Patch using SMS g) On the Assign Program screen, select Yes. Assign the program, and click Next. h) Click Finish on the last dialog to close the distribute software wizard. NOTE: You can adjust the distribution schedule of the advertisement you just created: In the SMS manager, click Advertisements, right-click the advertisement for your software package, click Properties, then adjust the schedule on the Schedule tab.
Distributing a Patch using SMS Create a Collection of Computers That Have XMap Installed You will want to perform the procedure in this section if you want to use either Option 2, or Option 3 for upgrading your XMap installations. 1) Right click Collections in the SMS manager, point to New, and click Collection. 2) Name the collection something like XMap Installed, then click the Membership Rules tab.
Distributing a Patch using SMS 3) Click the yellow database symbol to create a new query rule. a) Name the query rule something like XMap Installed and click the Edit Query Statement button.
Distributing a Patch using SMS i) Click the Criteria tab and click the New Criteria button. ii) Click the Select button on the Criterion Properties dialog. In the Select Attribute dialog, select Add/Remove Programs from the Attribute class. From the Attribute drop-down list, select Product ID. Click OK.
Distributing a Patch using SMS iii) In the Criterion Properties dialog, select is equal to from the Operator drop-down list. Type or paste the XMap GUID in the Value box. For example, XMap 7’s product ID is {57D3FFDB-50C5-41EE-BD81-871045C967F7}. NOTE: The formatting is important and it should be formatted as shown in the example. Click OK until you have closed all the dialogs. You should now have a new collection named something like XMap Installed or whatever you specified in step 2.
Distributing a Patch using SMS 4) To update your collection, click your new collection, right-click it, and click Refresh. You should see all the computers that have XMap installed in the right pane.
XMap 7 Network and Silent Installs XMap 7 Network and Silent Installs **Notice** If you create a transform using InstallShield AdminStudio or any of the InstallShield development products, you must access the property manager table and delete the ISSETUPFILESCOMPLETED property. Internal testing has shown that leaving this property in place can delete core operating system files (boot.ini, etc) when the setup is executed from a batch file. Failure to do this will result in a machine that will not reboot.
XMap 7 Network and Silent Installs Property List for XMap 7 Property Name Default values in bold text. (Must be upper case) LICENSE_NUMBER This property is REQUIRED. The install will not complete if this is not provided. This is the complete license number including hyphens. It is not case sensitive. The format of the license is XXXX-XXXX-XXXX-XXXX INSTALLDIR Fully-qualified path for application.
XMap 7 Network and Silent Installs disable can be added to this list. TAB_CONFIG_PATH The path to a tab configuration file that was created with the Tab Manager program. The path should be fully-qualified and available to everyone on a network share if the install is distributed across a network share. This file can be used to customize the order of tabs and what tabs are displayed when XMap starts. The tab configuration is only applied when the application runs for the first time for a given user.
XMap 7 Network and Silent Installs How to use the EXISTING_MAP_DATA_PATHS property XMap has the ability to connect to multiple data sources simultaneously. You may want to add one or more data connections during the install. The EXISTING_MAP_DATA_PATHS provides the ability to accomplish these connections. Note: The application has to resolve all data connections when starting the application. As an administrator, you should judiciously add connections to speed application start time.
XMap 7 Network and Silent Installs • msiexec.exe /qn /i “\\server\path to msi\DeLorme XMap 7.
XMap 7 Network and Silent Installs Optional Feature List These features can be configured using the INSTALL_FEATURES, and DISABLE_FEATURES properties. Symbols: ‘-‘ Indicates a sub feature. The number of ‘-‘ symbols indicate the level of the sub feature. If the parent feature is disabled, then all the child features are disabled. For example, disabling SampleImagery disables ExplorersMonumentAZ, FontanaLakeNC, JennyLakeWY, and etc.
XMap 7 Network and Silent Installs Required Feature List Do not change these features or their components. Feature Name Notes XData Installs the XData tab. Core Installs the application files. PerUserData Configures registry for current user Voice Installs speech files when needed. Not installed on Vista or newer. ThreeD_For_XP_And_Vista Calculates the cost for installing DirectX 9c for Windows XP, Vista, and newer operating systems. SpeechEngine Installs speech files when needed.
XMap 7 Network and Silent Installs 13) When finished editing, click Transform on the menu bar and select Generate Transform. Save the file to an appropriate location that you can access during setup. Test the transform by installing using the following command line: msiexec /i TRANSFORMS=. For example, msiexec.exe /i \DeLorme Street Atlas USA 2009.msi TRANSFORMS=“\SA2009_transform.
Troubleshooting Troubleshooting Incorrect command line parameters when you install using Setup.exe If you get an "Incorrect command line parameters" error when you install using Setup.exe: 1) Make sure you have not used the same options in both the command line and the Setup.ini CmdLine= ; the options can only be in one place or the other. 2) Make sure you have not included the MSI file name in the command line or Setup.ini CmdLine= .
where log files are stored when the installation is run in the system context, like when distributing installations through Active Directory. Missing the GIS Tab after installation You cannot copy an installed copy of XMap onto a machine. There are registry entries that need to be set and they are unique for each machine. I do not want to install Microsoft SQL Server 2005 Express Simply click No when asked to install SQL Server when running the installation using the Setup.
Additional Information Command Line Options for updates For more information on Command Line Options for updates, visit the Install Shield website: Applying Patches. How to install default tab and toolbar configurations Tab configuration You can create a tab configuration in the Tab Manager utility and send this configuration out for others to use.
994 - The tab manager program does not exist. Our installation was broken somehow if the tab manager program cannot be found. Any other error code indicates that the Tab Manager program failed in some way. Toolbar configuration You can create a custom toolbar configuration by editing the toolbar scheme file (default.toolbar) in the XMap install directory. The file is located in C:\Program Files\DeLorme\XMap 7\default_toolbarschemes_XMap7 by default.
3) Make sure that the SQL Server Configuration on the server you are connecting to has TCP/IP, named pipes, and/or shared memory enabled depending on how you want to connect to the server. This can be accessed through the SQL Server configuration manager on the server to which you are connecting. 4) Make sure that the current user on the client computer has login access to the database server and has the appropriate permissions for the level of access to the database that you want them to have.
Migrating Layers to New Databases SET @ServerName = CONVERT(varchar(100),SERVERPROPERTY('MachineName')) IF SERVERPROPERTY('InstanceName') IS NOT NULL BEGIN SET @SourceServer = @ServerName + '\' + CONVERT(varchar(100),SERVERPROPERTY('InstanceName')) END -- Use temporary table to hold script cmds create table #xmaplayers ( exportcmd varchar(1000) NOT NULL) -- cursor for all of the databases on the server declare c1 cursor for select name from master.dbo.
Migrating Layers to New Databases Sample Script 2: DECLARE @LayerID int DECLARE @LayerName varchar(100) DECLARE @BatchLine varchar(4000) DECLARE @ExportServer varchar(100) DECLARE @ExportDirectory varchar(300) DECLARE @ExportProgramPath varchar(300) DECLARE @ImportProgramPath varchar(300) DECLARE @ExportExtension varchar(100) DECLARE @ImportServer varchar(50) DECLARE @ImportDatabase varchar(100) DECLARE @ExportFileName varchar(2000) DECLARE @OpenspaceType varchar(100) --This will automatically populate th
Migrating Layers to New Databases --Change this line to contain the type of openspace file you would like generated. --This parameter is ignored if you are not exporting to the openspace format. SET @OpenspaceType = 'XMap7' --Adjust the WHERE clause if you do not want to export/import all layers in the database.
Database Administration Using Database Manager Database Administration Using Database Manager This section describes common DeLorme OpenSpace Database administration tasks that can be accomplished using the Database Manager application that installs with XMap. Topics include: Managing SQL Server User Roles, Managing Database User Roles, and Backing Up and Restoring Databases. Refer to the XMap Help section Database Manager Overview for additional Database Manager tasks and detailed information.
Database Administration Using Database Manager In the Add Server Account dialog, type the user’s name in the User Name box and the select the type of authentication method to use. If you choose Windows Authentication, the user name must match the user name on the network domain. If you choose SQL Server Authentication, create the name and password for the new user. The user will need the password to access the GIS layers in the database from within XMap. Click OK.
Database Administration Using Database Manager Managing Database Users and Roles A Server User or Database Creator must be given permissions for a database by a Server Administrator before they can access the GIS layers in the database in XMap. The default database role is XMap User. The table below shows the functionality that is available for each of the role types; XMap User, XMap Edit, XMap Checkout Creator, XMap Administrator, or XMap Owner.
Database Administration Using Database Manager Enable/Disable a layer for checkouts Add users to a database X X X Change database user roles X Drop (delete) databases X * Indicates that XMap Enterprise is required to create an Enterprise Database in order for this feature to function. To add a database user, expand the database's menu in the tree view and then point to the Database Users option underneath it. Right-click and select Add User.
Updating Layers Maintained in Another GIS Back Up To back up a database, right-click it in the tree view and click Backup/Restore. In the Backup/Restore dialog, click the Backup button, and then specify the name of the backup and location to create it in. Then click OK. Note: The destination directory of a backup operation must be one that your SQL server account has permissions to.
Updating Layers Maintained in Another GIS Synchronization Check List 1) The remote machine must be able to connect to the Enterprise SQL database on the network. You can use the Manage Layers and Attach Database dialog box in XMap Professional to check for a connection. 2) The remote user must have Database Create rights on their local SQL Server. 3) Add the remote user or a network group that user is a member of to the list of SQL users using the DB Manager.
Updating Layers Maintained in Another GIS Managing Subscription Layers for Database Users Once a database is enabled for subscriptions, the Working view appears to the right when the Subscriptions item is selected in the tree menu. The Working View is comprised of three components; a list of database users and the database roles (left), a list of layers in the database (right), and a Create Subscription File button (bottom).
Updating Layers Maintained in Another GIS For a detailed look at the contents of a subscription file, you can open it in a text editor like Notepad. The file contains comments on the different parameters it uses, which can be configured by the user if desired. The subscription file parameters are: MasterDB-Server= MasterDB-Database= (Specify the master database name and server. These are typically the only settings required for synchronization using NTML credentials).
Updating Layers Maintained in Another GIS Enabling a Subscription on a User’s Computer To enable the subscription on a user’s computer, the file can be manually sent to them and either dragged onto XMap (while XMap is open) or double-clicked. A message will show that XMap needs to be restarted to enable the subscription. Note: XMap supports passing a subscription file as a command line argument: XMap7.exe c:\temp\myserver.subscription.
Importing From ArcSDE Managing the Redline GIS Layer and Redline Draw Layers Redline draw layers embedded as records in the redline GIS layer on the master database are represented as rectangle geometries on the map. The color of the geometry border is determined by the True/False setting in the COMPLETED field in Attributes. It can be used to track the progress of reviewing the redline draw layers.
Importing From ArcSDE Importing Using the Import Wizard To import from ArcSDE using the GIS import wizard, open the wizard and select the Database option at the top of the first page. In the Connect to Database page, provide the server name and instance (For example SDE_Server:5151), and login and password. Then click the Search button. Note: If the ArcSDE database is on an Oracle server, the search function will not work and the name of the database must be manually specified.
Using Classification Templates Using Classification Templates You can create classification templates from one layer and apply them to other layers that have the same attribute field names and data types and similar attribute values. This is useful if you deploy new or updated layers, such as those that are replaced by regular imports from another system where you maintain your enterprise data, to multiple users.