
User manual


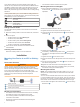
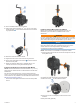
Table Of Contents
- Table of Contents
- Getting Started
- Installation
- Off-Road Navigation Features
- Using the Map
- Using the Apps
- Live Services, Traffic, and Smartphone Features
- Bluetooth Feature Status Icons
- Pairing Your Phone and Headset
- Smart Notifications
- Hands-Free Calling
- Setting Up Bluetooth Features for Your Apple® Device
- Setting Up Bluetooth Features for Your Smartphone with Android™
- Enabling or Disabling Bluetooth Features for Your Headset
- Disconnecting a Bluetooth Device
- Deleting a Paired Phone
- Street Navigation
- Finding and Saving Locations
- Finding a Location Using the Search Bar
- Points of Interest
- Finding a Location by Category
- Viewing Your Garmin Explore Points of Interest
- Location Search Results
- Changing the Search Area
- Finding Parking Near Your Current Location
- Finding Parking Near a Specified Location
- Search Tools
- Finding HISTORY Points of Interest
- Finding National Parks
- Finding Ultimate Campgrounds Points of Interest
- Finding iOverlander™ Points of Interest
- Finding Powersport Points of Interest
- Tripadvisor
- Viewing Recently Found Locations
- Viewing Current Location Information
- Adding a Shortcut
- Saving Locations
- Rider Awareness Features and Alerts
- Settings
- Device Information
- Device Maintenance
- Troubleshooting
- My device is not acquiring satellite signals
- My battery does not stay charged for very long
- My device does not connect to my phone
- My device does not appear as a removable drive on my computer
- My device does not appear as a portable device on my computer
- My device does not appear as either a portable device or a removable drive or volume on my computer
- Appendix
- Garmin PowerSwitch
- Wireless Cameras
- Installing a Memory Card for Maps and Data
- Data Management
- Viewing GPS Signal Status
- Purchasing Additional Maps
- Index

2
Find a suitable location for the antenna.
3
Using a flat head screwdriver or
5
/
16
in. (8 mm) nut driver,
loosen the bolt on the external antenna mount until the
ring separates.
4
Place the mount around the roll bar.
5
Tighten the bolt on the mount until the ring is secure.
6
Screw down and tighten the antenna onto the external
antenna mount plate.
7
Route the antenna cable along a suitable path in your
vehicle, and secure it using the included zip ties.
Installing the Antenna on the Group Ride Mount
NOTE: The mounted antenna must be at least 4 cm (1.57 in.)
away from the nearest roll bar or metal surface to avoid radio
interference.
For the best range performance, use the external antenna
mount. You can mount the antenna directly onto the Group Ride
mount when it is not possible to use the external antenna mount
(Mounting the Antenna, page 2).
Screw down and tighten the antenna onto the Group Ride
mount.
Installing the Fist Microphone and Mount
Before you can attach the fist microphone mount to your
dashboard, you must select a suitable location on the
dashboard.
WARNING
It is your responsibility to ensure the mounting location complies
with all applicable laws and ordinances, and does not block your
view of the road during the safe operation of your vehicle.
NOTICE
Avoid wires, gauges, air bags, air bag covers, HVAC, and other
items when drilling pilot holes and attaching the mount to the
vehicle. Garmin is not responsible for any damages or
consequences arising from the installation.
NOTE: This feature is not available on all product models.
1
Align and insert the connector on the fist microphone onto the
Group Ride mount.
2
Tighten the collar around the connected cable.
3
Place the mount on the selected location.
4
Using the mount as a template, mark the three screw
locations.
5
Drill pilot holes (optional).
Installation 3