
User manual


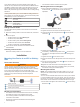
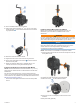
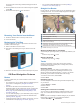
Table Of Contents
- Table of Contents
- Getting Started
- Installation
- Off-Road Navigation Features
- Using the Map
- Using the Apps
- Live Services, Traffic, and Smartphone Features
- Bluetooth Feature Status Icons
- Pairing Your Phone and Headset
- Smart Notifications
- Hands-Free Calling
- Setting Up Bluetooth Features for Your Apple® Device
- Setting Up Bluetooth Features for Your Smartphone with Android™
- Enabling or Disabling Bluetooth Features for Your Headset
- Disconnecting a Bluetooth Device
- Deleting a Paired Phone
- Street Navigation
- Finding and Saving Locations
- Finding a Location Using the Search Bar
- Points of Interest
- Finding a Location by Category
- Viewing Your Garmin Explore Points of Interest
- Location Search Results
- Changing the Search Area
- Finding Parking Near Your Current Location
- Finding Parking Near a Specified Location
- Search Tools
- Finding HISTORY Points of Interest
- Finding National Parks
- Finding Ultimate Campgrounds Points of Interest
- Finding iOverlander™ Points of Interest
- Finding Powersport Points of Interest
- Tripadvisor
- Viewing Recently Found Locations
- Viewing Current Location Information
- Adding a Shortcut
- Saving Locations
- Rider Awareness Features and Alerts
- Settings
- Device Information
- Device Maintenance
- Troubleshooting
- My device is not acquiring satellite signals
- My battery does not stay charged for very long
- My device does not connect to my phone
- My device does not appear as a removable drive on my computer
- My device does not appear as a portable device on my computer
- My device does not appear as either a portable device or a removable drive or volume on my computer
- Appendix
- Garmin PowerSwitch
- Wireless Cameras
- Installing a Memory Card for Maps and Data
- Data Management
- Viewing GPS Signal Status
- Purchasing Additional Maps
- Index

Your vehicle profile is only used to display which trails your
vehicle can use, based on the US Forest Service Motor Vehicle
Use Maps. Limitation may exist in that map data such that your
device cannot account for trail conditions in all cases. Always
defer to all posted trail signs and conditions when making driving
decisions.
Vehicle profiles allow you to choose different settings based on
each vehicle you use with the device. The current vehicle profile
is indicated by an icon in the status bar.
Motorcycle mode
ATV mode
Side-by-side mode
Full size mode
Snowmobile mode
Adding a Vehicle Profile
You can add a vehicle profile for each vehicle to be used with
your device.
1
Select the vehicle profile icon from the status bar, and select
.
2
Select an option:
• To add a motorcycle, select Motorcycle.
• To add an ATV, select ATV.
• To add a side-by-side, select Side-by-Side.
• To add a full size vehicle, select Full Size.
• To add a snowmobile, select Snowmobile.
3
Follow the on-screen instructions to enter the vehicle
characteristics.
Choosing a Vehicle Profile
Select the vehicle profile icon on the status bar.
Installation
Mounting Your Device in an ATV or Side-by-
Side
Power Cable Overview
WARNING
Garmin
®
strongly recommends having an experienced installer
with the proper knowledge of electrical systems install the
device. Incorrectly wiring the power cable can result in damage
to the vehicle or the battery and can cause bodily injury.
See the Important Safety and Product Information guide in the
product box for product warnings and other important
information.
Mount connector
10 to 30 Vdc system power (red)
System ground (black)
Mounting Considerations
• The device must be mounted close to the bus bar or battery
and within the range of the supplied power cable.
• The mounting location must allow for the routing and
connection of all cables.
• Excess wire should be bundled and secured using the
included zip ties.
• The electrical contacts must be free from paint.
Mounting the Device on a Roll Bar
1
Using a flat head screwdriver or
9
/
32
in. (7 mm) nut driver,
loosen the bolt on the roll bar mount until the ring
separates.
2
Place the mount around the roll bar.
3
Tighten the bolt on the mount until the ring is secure.
4
Insert the ball on the Group Ride mount into the double-
socket arm .
5
Tighten the knob slightly.
6
If necessary, rotate the Group Ride mount so the Garmin
logo faces up, and adjust the mount for better viewing and
operation.
7
Tighten the knob to secure the mount.
8
Press the device into the Group Ride mount until it snaps into
place.
9
Connect the Group Ride power cable to the connector on
the vehicle wiring harness.
10
Tighten the collar around the connected power cables.
11
Route the power cable along a suitable path in your vehicle,
and secure it using the included zip ties.
Mounting the Antenna
NOTE: The mounted antenna must be at least 4 cm (1.57 in.)
away from the nearest roll bar or metal surface to avoid radio
interference.
You can use the external antenna mount to mount your antenna
in a more suitable location for your vehicle, such as a roll bar at
the rear of your vehicle, to receive better radio reception. For the
best results, use this method for vehicles that have a roll cage.
1
Screw down and tighten the antenna cable onto the Group
Ride mount .
2 Installation