
User manual


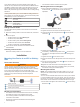
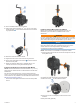
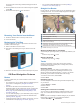
Table Of Contents
- Table of Contents
- Getting Started
- Installation
- Off-Road Navigation Features
- Using the Map
- Using the Apps
- Live Services, Traffic, and Smartphone Features
- Bluetooth Feature Status Icons
- Pairing Your Phone and Headset
- Smart Notifications
- Hands-Free Calling
- Setting Up Bluetooth Features for Your Apple® Device
- Setting Up Bluetooth Features for Your Smartphone with Android™
- Enabling or Disabling Bluetooth Features for Your Headset
- Disconnecting a Bluetooth Device
- Deleting a Paired Phone
- Street Navigation
- Finding and Saving Locations
- Finding a Location Using the Search Bar
- Points of Interest
- Finding a Location by Category
- Viewing Your Garmin Explore Points of Interest
- Location Search Results
- Changing the Search Area
- Finding Parking Near Your Current Location
- Finding Parking Near a Specified Location
- Search Tools
- Finding HISTORY Points of Interest
- Finding National Parks
- Finding Ultimate Campgrounds Points of Interest
- Finding iOverlander™ Points of Interest
- Finding Powersport Points of Interest
- Tripadvisor
- Viewing Recently Found Locations
- Viewing Current Location Information
- Adding a Shortcut
- Saving Locations
- Rider Awareness Features and Alerts
- Settings
- Device Information
- Device Maintenance
- Troubleshooting
- My device is not acquiring satellite signals
- My battery does not stay charged for very long
- My device does not connect to my phone
- My device does not appear as a removable drive on my computer
- My device does not appear as a portable device on my computer
- My device does not appear as either a portable device or a removable drive or volume on my computer
- Appendix
- Garmin PowerSwitch
- Wireless Cameras
- Installing a Memory Card for Maps and Data
- Data Management
- Viewing GPS Signal Status
- Purchasing Additional Maps
- Index

Getting Started
WARNING
See the Important Safety and Product Information guide in the
product box for product warnings and other important
information.
1
Connect to a Wi‑Fi
®
network (Connecting to a Wi
‑
Fi Network,
page 23)(optional).
2
Pair your Bluetooth
®
phone and headset (Pairing Your Phone
and Headset, page 13) (optional).
3
Update the maps and software on your device (Product
Updates, page 24).
4
Acquire GPS signals (Acquiring GPS Signals, page 1).
5
Mount the device and connect it to power (Installation,
page 2).
6
Adjust the screen brightness (Adjusting the Screen
Brightness, page 1).
7
Navigate to your destination (Starting a Route, page 14).
Device Overview
Power button
microSD
®
memory card slot
USB power and data port
Turning the Device On or Off
• To turn the device on, press the power button, or connect the
device to power.
• To put the device in power saving mode, press the power
button while the device is on.
While in power saving mode, the screen is off and the device
uses very little power, but it can wake instantly for use.
TIP: You can charge your device faster by putting it in power
saving mode while charging the battery.
• To turn off the device completely, hold the power button until
a prompt appears on the screen, and select Off.
The prompt appears after five seconds. If you release the
power button before the prompt appears, the device enters
power saving mode.
Acquiring GPS Signals
When you turn on your navigation device, the GPS receiver
must collect satellite data and establish the current location. The
time required to acquire satellite signals varies based on several
factors, including how far you are from the location where you
last used your navigation device, whether you have a clear view
of the sky, and how long it has been since you last used your
navigation device. The first time you turn on your navigation
device, it may take several minutes to acquire satellite signals.
1
Turn on the device.
2
Wait while the device locates satellites.
3
If necessary, go to an open area, away from tall buildings and
trees.
in the status bar indicates the satellite signal strength. When
at least half the bars are filled, the device is ready for navigation.
Status Bar Icons
The status bar is located at the top of the main menu. The status
bar icons display information about features on the device. You
can select some icons to change settings or view additional
information.
GPS signal status. Hold to view GPS accuracy and acquired
satellite information (Viewing GPS Signal Status, page 29).
Bluetooth technology status. Select to view the Bluetooth
settings (Bluetooth Settings, page 22).
Wi-fi signal strength. Select to change the wi-fi settings (Wi
‑
Fi
Settings, page 22).
Connected to hands-free calling. Select to place a phone call
(Hands-Free Calling, page 14).
Active vehicle profile. Select to view the vehicle profile settings.
Current time. Select to set the time (Setting the Time, page 22).
Battery charge level.
Tread app connection status (Pairing Your Phone and Headset,
page 13).
Temperature. Select to view the weather forecast (Viewing the
Weather Forecast, page 10).
Fuel status. Select to view fuel tracking information (Fuel
Tracking, page 21).
Using the On-Screen Buttons
On-screen buttons allow you to navigate the pages, menus, and
menu options on your device.
• Select to return to the previous menu screen.
• Hold to quickly return to the main menu.
• Select or to scroll through lists or menus.
• Hold or to scroll faster.
• Select to see a context-based menu of options for the
current screen.
Adjusting the Volume
1
Select .
2
Select an option:
• Use the slider bar to adjust the volume.
• Select to mute the device.
• Select a check box to enable or disable additional sound
options.
Using the Audio Mixer
You can use the audio mixer to set the volume levels for
different audio types, such as navigation prompts or phone calls.
The level for each audio type is a percentage of the master
volume.
1
Select .
2
Select Mixer.
3
Use the sliders to adjust the volume for each audio type.
Adjusting the Screen Brightness
1
Select > Display > Brightness.
2
Use the slider bar to adjust the brightness.
Vehicle Profiles
WARNING
Vehicle profile selections are not used to calculate route
suggestions.
Getting Started 1