
User manual
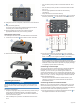
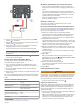

Table Of Contents
- Table of Contents
- Getting Started
- Installation
- Off-Road Navigation Features
- Using the Map
- Using the Apps
- Live Services, Traffic, and Smartphone Features
- Bluetooth Feature Status Icons
- Pairing Your Phone and Headset
- Smart Notifications
- Hands-Free Calling
- Setting Up Bluetooth Features for Your Apple® Device
- Setting Up Bluetooth Features for Your Smartphone with Android™
- Enabling or Disabling Bluetooth Features for Your Headset
- Disconnecting a Bluetooth Device
- Deleting a Paired Phone
- Street Navigation
- Finding and Saving Locations
- Finding a Location Using the Search Bar
- Points of Interest
- Finding a Location by Category
- Viewing Your Garmin Explore Points of Interest
- Location Search Results
- Changing the Search Area
- Finding Parking Near Your Current Location
- Finding Parking Near a Specified Location
- Search Tools
- Finding HISTORY Points of Interest
- Finding National Parks
- Finding Ultimate Campgrounds Points of Interest
- Finding iOverlander™ Points of Interest
- Finding Powersport Points of Interest
- Tripadvisor
- Viewing Recently Found Locations
- Viewing Current Location Information
- Adding a Shortcut
- Saving Locations
- Rider Awareness Features and Alerts
- Settings
- Device Information
- Device Maintenance
- Troubleshooting
- My device is not acquiring satellite signals
- My battery does not stay charged for very long
- My device does not connect to my phone
- My device does not appear as a removable drive on my computer
- My device does not appear as a portable device on my computer
- My device does not appear as either a portable device or a removable drive or volume on my computer
- Appendix
- Garmin PowerSwitch
- Wireless Cameras
- Installing a Memory Card for Maps and Data
- Data Management
- Viewing GPS Signal Status
- Purchasing Additional Maps
- Index

2
From the paired Garmin navigation device, select >
Wireless Cameras.
3
Select the paired camera name, and select Guidance Lines
> Adjust Guidance Lines.
4
Use the arrows in the corners of the screen to move the ends
of the white, driver's-side guidance line.
The guidance line should appear directly on top of the curb,
driveway, or parking stall line.
5
Use the arrows in the center of the screen to move the
colored distance guidance lines up or down.
The red guidance line should be aligned with the rearmost
part of your vehicle. This could be the rear bumper, a trailer
hitch, or another object protruding from the rear of the
vehicle.
6
Reposition the vehicle with the passenger side closely
aligned to a curb, driveway, or parking stall lines, and use the
arrows to align the white, passenger-side guidance line.
The guidance lines should be symmetrical.
Installing a Memory Card for Maps and Data
You can install a memory card to increase the storage space for
maps and other data on your device. You can purchase memory
cards from an electronics supplier, or go to www.garmin.com
/maps to purchase a memory card with pre-loaded Garmin
mapping software. The device supports microSD memory cards
from 4 to 256 GB.
1
Locate the map and data memory card slot on your device
(Device Overview, page 1).
2
Pull up the weather cap from the microSD card slot.
3
Slide the microSD card slot cover toward the edge of the
device.
4
Pull the microSD card slot cover up.
5
Insert a microSD card into the slot.
NOTE: Confirm the microSD card fits flush against the card
slot contacts.
6
Close the SD card cover.
7
Slide the SD card cover toward the center of the device.
Data Management
The device has a memory card slot for additional data storage.
NOTE: The device is compatible with Windows 7 and newer,
and Mac OS 10.7 and newer.
About Memory Cards
You can purchase memory cards from an electronics supplier,
or purchase pre-loaded Garmin mapping software
(www.garmin.com). Memory cards can be used to store files
such as maps and custom POIs.
Connecting the Device to Your Computer
You can connect the device to your computer using a USB
cable.
1
Plug the small end of the USB cable into the port on the
device.
2
Plug the larger end of the USB cable into a port on your
computer.
3
When your Tread device prompts you to enter file transfer
mode, select Yes.
A picture of your device connected to a computer appears on
the device screen.
Depending on your computer operating system, the device
appears as either a portable device, a removable drive, or a
removable volume.
Transferring GPX Files From Your Computer
Apple computers may require additional third-party software,
such as Android File Transfer, to read and write files on this
device.
If you have already created routes that you want to use on your
device, you can transfer GPX files directly from your computer.
1
Connect the device to your computer (Connecting the Device
to Your Computer, page 28).
The device appears as a portable device.
2
On your computer, open the file browser.
3
Select a GPX file.
4
Select Edit > Copy.
5
Browse to the GPX folder on the device.
6
Select Edit > Paste.
Transferring Data From Your Computer
1
Connect the device to your computer (Connecting the Device
to Your Computer, page 28).
Depending on your computer operating system, the device
appears as either a portable device, a removable drive, or a
removable volume.
2
On your computer, open the file browser.
3
Select a file.
4
Select Edit > Copy.
5
Browse to a folder on the device.
NOTE: For a removable drive or volume, you should not
place files in the Garmin folder.
6
Select Edit > Paste.
Disconnecting the USB Cable
If your device is connected to your computer as a removable
drive or volume, you must safely disconnect your device from
your computer to avoid data loss. If your device is connected to
your Windows computer as a portable device, it is not necessary
to safely disconnect the device.
28 Appendix