
User manual
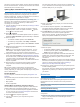
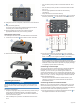
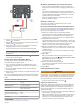
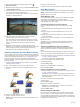

Table Of Contents
- Table of Contents
- Getting Started
- Installation
- Off-Road Navigation Features
- Using the Map
- Using the Apps
- Live Services, Traffic, and Smartphone Features
- Bluetooth Feature Status Icons
- Pairing Your Phone and Headset
- Smart Notifications
- Hands-Free Calling
- Setting Up Bluetooth Features for Your Apple® Device
- Setting Up Bluetooth Features for Your Smartphone with Android™
- Enabling or Disabling Bluetooth Features for Your Headset
- Disconnecting a Bluetooth Device
- Deleting a Paired Phone
- Street Navigation
- Finding and Saving Locations
- Finding a Location Using the Search Bar
- Points of Interest
- Finding a Location by Category
- Viewing Your Garmin Explore Points of Interest
- Location Search Results
- Changing the Search Area
- Finding Parking Near Your Current Location
- Finding Parking Near a Specified Location
- Search Tools
- Finding HISTORY Points of Interest
- Finding National Parks
- Finding Ultimate Campgrounds Points of Interest
- Finding iOverlander™ Points of Interest
- Finding Powersport Points of Interest
- Tripadvisor
- Viewing Recently Found Locations
- Viewing Current Location Information
- Adding a Shortcut
- Saving Locations
- Rider Awareness Features and Alerts
- Settings
- Device Information
- Device Maintenance
- Troubleshooting
- My device is not acquiring satellite signals
- My battery does not stay charged for very long
- My device does not connect to my phone
- My device does not appear as a removable drive on my computer
- My device does not appear as a portable device on my computer
- My device does not appear as either a portable device or a removable drive or volume on my computer
- Appendix
- Garmin PowerSwitch
- Wireless Cameras
- Installing a Memory Card for Maps and Data
- Data Management
- Viewing GPS Signal Status
- Purchasing Additional Maps
- Index

2
Connect the small ring end of the ground wire to the GND
terminal on the device.
3
Connect the small ring end of the included 12V cable to the
+12V terminal on the device.
4
Tighten the
3
/
8
in. nut on the +12V terminal to a maximum
torque specification of 4.52 N-m (40 lbf-in.).
You should confirm the nut cannot be loosened by hand.
NOTICE
Do not overtighten the +12V terminal to prevent damage to
the terminal.
5
Connect the large ring end of the 12V cable to the positive
terminal on the vehicle battery.
Pairing with a Garmin Navigation Device
You can pair your Garmin PowerSwitch device with a
compatible Garmin navigation device.
1
Turn on power to your Garmin PowerSwitch device, and
place your compatible Garmin navigation device within 1 m
(3.3 ft.) of it.
2
On your compatible navigation device, open the Garmin
PowerSwitch app.
3
Follow the on-screen instructions to complete the pairing and
setup process.
The main app dashboard appears. After the devices are paired,
they connect automatically when they are turned on and within
range.
Garmin PowerSwitch Specifications
Dimensions (D x W x H) 75 x 125 x 32 mm (2.95 x 4.92 x
1.26 in.)
Operating temperature range From -25° to 85°C (from -13° to 185°F)
Wireless frequency 2.4 GHz @ 10 dBm
Power input From 12 to 16 V using the included
vehicle power cable.
Maximum accessory output 30 A
Maximum system output 100 A
Current draw with all outputs
off
3 mA
Water rating IEC 60529 IPX7
1
1
The device withstands incidental exposure to water of up to 1 m for up to 30 min.
For more information, go to www.garmin.com/waterrating.
My Garmin PowerSwitch will not stay connected
• Verify the Garmin PowerSwitch device is receiving power.
• Verify that your vehicle's battery is supplying at least 12 V of
power.
The Garmin PowerSwitch device turns off automatically to
preserve your vehicle's battery if it is receiving less than 12 V.
• Verify that Bluetooth technology is enabled on your paired
navigation device or smartphone.
• Move the navigation device or smartphone closer to your
Garmin PowerSwitch device.
Wireless Cameras
Your device can display the video feed from one or more
connected wireless cameras.
Pairing the Camera with a Garmin Navigation Device
You can pair the camera with a compatible Garmin navigation
device. For more information about compatible Garmin devices,
go to the product page at garmin.com/bc40.
1
Update your navigation device to the latest software.
Your device may not support the BC 40 camera without the
latest software. For more information about updating the
software, see the owner's manual for your navigation device.
2
Install batteries in the camera.
The camera enters pairing mode automatically, and the LED
flashes blue while the camera is in pairing mode. The camera
remains in pairing mode for two minutes. If pairing mode
expires, you can remove and reinstall the batteries.
3
Bring the compatible Garmin navigation device outside your
vehicle and within 1.5 m (5 ft.) of the camera, and turn on the
navigation device.
The device detects your camera automatically and prompts
you to pair with it.
4
Select Yes.
TIP: If the navigation device does not detect the camera
automatically, you can select > Wireless Cameras > Add
New Camera to pair with it manually.
The device pairs with your camera.
5
Enter a name for the camera (optional).
You should use a descriptive name that clearly identifies the
location of the camera.
6
Select Done.
Viewing the Wireless Camera
WARNING
This device is intended to enhance situational awareness when
used properly. If used improperly, you could become distracted
by the display, which could lead to an accident causing serious
personal injury or death. Always view the display at a glance
when the vehicle is in motion to avoid becoming distracted.
From the home screen or the map, select .
Aligning the Guidance Lines
For the best reference, the guidance lines should be aligned to
reflect the outside edges of the vehicle. You should align the
guidance lines separately for each backup camera. When you
change the camera angle, you should immediately align the
guidance lines again.
1
Position your vehicle with the driver's side closely aligned to a
curb, driveway, or parking stall lines.
TIP: It can be helpful to position the vehicle in the center of a
parking stall, and then pull forward into the next stall. This
allows you to use the parking stall lines at the rear of the
vehicle as reference points for alignment.
Appendix 27