
User manual
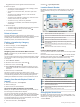

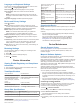
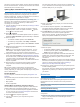
Table Of Contents
- Table of Contents
- Getting Started
- Installation
- Off-Road Navigation Features
- Using the Map
- Using the Apps
- Live Services, Traffic, and Smartphone Features
- Bluetooth Feature Status Icons
- Pairing Your Phone and Headset
- Smart Notifications
- Hands-Free Calling
- Setting Up Bluetooth Features for Your Apple® Device
- Setting Up Bluetooth Features for Your Smartphone with Android™
- Enabling or Disabling Bluetooth Features for Your Headset
- Disconnecting a Bluetooth Device
- Deleting a Paired Phone
- Street Navigation
- Finding and Saving Locations
- Finding a Location Using the Search Bar
- Points of Interest
- Finding a Location by Category
- Viewing Your Garmin Explore Points of Interest
- Location Search Results
- Changing the Search Area
- Finding Parking Near Your Current Location
- Finding Parking Near a Specified Location
- Search Tools
- Finding HISTORY Points of Interest
- Finding National Parks
- Finding Ultimate Campgrounds Points of Interest
- Finding iOverlander™ Points of Interest
- Finding Powersport Points of Interest
- Tripadvisor
- Viewing Recently Found Locations
- Viewing Current Location Information
- Adding a Shortcut
- Saving Locations
- Rider Awareness Features and Alerts
- Settings
- Device Information
- Device Maintenance
- Troubleshooting
- My device is not acquiring satellite signals
- My battery does not stay charged for very long
- My device does not connect to my phone
- My device does not appear as a removable drive on my computer
- My device does not appear as a portable device on my computer
- My device does not appear as either a portable device or a removable drive or volume on my computer
- Appendix
- Garmin PowerSwitch
- Wireless Cameras
- Installing a Memory Card for Maps and Data
- Data Management
- Viewing GPS Signal Status
- Purchasing Additional Maps
- Index

The device calculates a route to the location and guides you
using voice prompts and information on the map (Your Route on
the Map, page 15). A preview of the major roads in your route
appears at the edge of the map for several seconds.
If you need to stop at additional destinations, you can add the
locations to your route (Adding a Location to Your Route,
page 15).
Starting a Route by Using the Map
You can start a route by selecting a location from the map.
1
Select View Map.
2
Drag and zoom the map to display the area to search.
3
Select a location on the map.
4
Select Go!.
Your Route on the Map
As you travel, the device guides you to your destination using
voice prompts and information on the map. Instructions for your
next turn or exit, or other actions appear across the top of the
map.
Next action in the route. Indicates the next turn, exit, or other action
and the lane in which you should travel, if available.
Distance to the next action.
Name of the street or exit associated with the next action.
Route highlighted on the map.
Next action in the route. Arrows on the map indicate the location of
upcoming actions.
Vehicle speed.
Name of the road on which you are traveling.
Estimated arrival time.
TIP: You can touch this field to change the information it shows.
Map tools. Provides tools to show you more information about your
route and surroundings.
Map layers. Allows you to add map layers such as topographic and
BirdsEye imagery to your map view.
Map perspective. Allows you to change the map perspective
between track up, north up, and 3-D.
Active Lane Guidance
As you approach some turns, exits, or interchanges in your
route, a detailed simulation of the road appears beside the map,
if available. A colored line indicates the proper lane for the
turn.
Viewing Turns and Directions
While navigating a route, you can view upcoming turns, lane
changes, or other directions for your route.
1
From the map, select an option:
• To view upcoming turns and directions as you navigate,
select > Turns.
The map tool displays the next several turns or directions
beside the map. The list updates automatically as you
navigate the route.
• To view the complete list of turns and directions for the
entire route, select the text bar at the top of the map.
2
Select a turn or direction (optional).
Detailed information appears. An image of the junction may
appear for junctions on major roadways, if available.
Viewing the Entire Route on the Map
1
While navigating a route, select anywhere on the map.
2
Select .
Changing Your Active Route
Adding a Location to Your Route
Before you can add a location to your route, you must be
navigating a route (Starting a Route, page 14).
You can add locations to the middle or end of your route. For
example, you can add a fuel station as the next destination in
your route.
1
From the map, select > Search.
2
Search for a location.
3
Select a location.
4
Select Go!.
5
Select an option:
• To add the location as the next destination in your route,
select Add as Next Stop.
• To add the location to the end of your route, select Add as
Last Stop.
• To add the location and edit the order of destinations in
your route, select Add to Active Route.
The device re-calculates the route to include the added location
and guides you to the destinations in order.
Shaping Your Route
Before you can shape your route, you must start a route
(Starting a Route, page 14).
You can manually shape your route to change its course. This
allows you to direct the route to use a certain road or go through
a certain area without adding a destination to the route.
1
Touch anywhere on the map.
2
Select Shape Route.
TIP: You can select to zoom in on the map and select a
more precise location.
The device enters route shaping mode and recalculates the
route to travel through the selected location.
3
Select Go!.
Street Navigation 15