
User manual


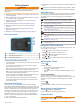
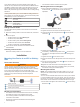
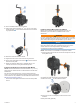
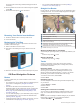
Table Of Contents
- Table of Contents
- Getting Started
- Installation
- Off-Road Navigation Features
- Using the Map
- Using the Apps
- Live Services, Traffic, and Smartphone Features
- Bluetooth Feature Status Icons
- Pairing Your Phone and Headset
- Smart Notifications
- Hands-Free Calling
- Setting Up Bluetooth Features for Your Apple® Device
- Setting Up Bluetooth Features for Your Smartphone with Android™
- Enabling or Disabling Bluetooth Features for Your Headset
- Disconnecting a Bluetooth Device
- Deleting a Paired Phone
- Street Navigation
- Finding and Saving Locations
- Finding a Location Using the Search Bar
- Points of Interest
- Finding a Location by Category
- Viewing Your Garmin Explore Points of Interest
- Location Search Results
- Changing the Search Area
- Finding Parking Near Your Current Location
- Finding Parking Near a Specified Location
- Search Tools
- Finding HISTORY Points of Interest
- Finding National Parks
- Finding Ultimate Campgrounds Points of Interest
- Finding iOverlander™ Points of Interest
- Finding Powersport Points of Interest
- Tripadvisor
- Viewing Recently Found Locations
- Viewing Current Location Information
- Adding a Shortcut
- Saving Locations
- Rider Awareness Features and Alerts
- Settings
- Device Information
- Device Maintenance
- Troubleshooting
- My device is not acquiring satellite signals
- My battery does not stay charged for very long
- My device does not connect to my phone
- My device does not appear as a removable drive on my computer
- My device does not appear as a portable device on my computer
- My device does not appear as either a portable device or a removable drive or volume on my computer
- Appendix
- Garmin PowerSwitch
- Wireless Cameras
- Installing a Memory Card for Maps and Data
- Data Management
- Viewing GPS Signal Status
- Purchasing Additional Maps
- Index

For some types of mounting material, drilling pilot holes is
necessary.
6
Securely fasten the mount to the surface using the supplied
screws .
7
Slide the fist microphone onto the mount.
Removing Your Device from the Mount
1
Press the release button on the top of the mount.
2
Lift out the device.
Replacing the Trim Ring
You can replace the trim ring on your device with one of the
included, colored trim rings.
1
Remove the device from the mount.
2
Pull back on the existing trim ring to remove it from the
device.
3
Place the new trim ring on the device and snap it into place.
Off-Road Navigation Features
Routes
A route is a path from your current location to one or more
destinations.
• For off-road use, you can set the device to calculate point-to-
point routes in a straight line (Straight Line Routes,
page 4).
• The device calculates a recommended route to your
destination based on the preferences you set, including the
route calculation mode (Changing the Route Calculation
Mode, page 16) and avoidances (Avoiding Delays, Tolls,
and Areas, page 16).
• You can start navigating to your destination quickly using the
recommended route, or you can select an alternate route
(Starting a Route, page 14).
• If there are specific roads you need to use or avoid, you can
customize the route (Shaping Your Route, page 15).
• You can add multiple destinations to a route (Adding a
Location to Your Route, page 15).
Straight Line Routes
For off-road use, the device guides you to your destination using
a straight line route. You can set multiple waypoints to navigate
a route through areas without roads.
Distance to the destination.
Route highlighted on the map.
Vehicle speed.
Map tools. Provides tools to show you more information about your
route and surroundings.
Map layers. Allows you to change the map orientation and add
topographic and BirdsEye imagery to your map view.
Map perspective. Allows you to change the map perspective
between track up, 2-D, and 3-D.
Skipping the Next Stop on Your Route
You can skip an upcoming location you previously added to your
route.
From the map, select > Yes.
Stopping the Route
From the map, select > Stop.
Tracks
A track is a recording of your path. The track log contains
information about the recorded path, including time, location,
and elevation information.
Recording Tracks
Tracking records your path. When you start tracking, your
device logs your location and updates the track line. If your
device is paired with a Garmin Explore
™
account, your device
periodically synchronizes recorded tracks with the app.
1
From the main screen, select Track.
2
Select Start.
Navigating a Track
You can navigate a saved track using the Garmin Explore app
on your device.
1
Select Explore > Tracks.
2
Select a track.
3
Select Go!.
Viewing Your Collections on the Map
You can view your Garmin Explore collections directly on the
map. You must enable the collections map layer to use this
feature.
NOTE: If you do not assign a collection category to your Garmin
Explore data, it appears as an unorganized collection.
1
Select View Map > > Collections.
4 Off-Road Navigation Features