
User manual


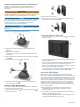

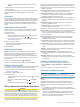
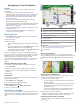

Table Of Contents
- Table of Contents
- Getting Started
- Vehicle Profiles
- Driver Awareness Features and Alerts
- Navigating to Your Destination
- Finding and Saving Locations
- Points of Interest
- Finding National Parks
- Finding Campgrounds
- Finding RV Services
- Finding a Location Using the Search Bar
- Finding an Address
- Finding a Location by Category
- Location Search Results
- Changing the Search Area
- Custom Points of Interest
- Parking
- Search Tools
- Foursquare
- TripAdvisor
- Viewing Recently Found Locations
- Viewing Current Location Information
- Adding a Shortcut
- Saving Locations
- Using the Map
- Live Services, Traffic, and Smartphone Features
- Traffic
- Voice Command
- Using the Apps
- Viewing the Owner's Manual on Your Device
- Trip Planner
- TracBack®
- Fusion-Link™ Wireless Remote Control App
- Logging Service History
- Viewing Previous Routes and Destinations
- Viewing the Weather Forecast
- Settings
- Navigation Settings
- Map and Vehicle Settings
- Connecting to a Wireless Network
- Enabling Bluetooth Wireless Technology
- Driver Assistance Settings
- Traffic Settings
- Display Settings
- Sound and Notification Settings
- Enabling or Disabling Location Services
- Setting the Text Language
- Date and Time Settings
- Device Settings
- Restoring Settings
- Device Information
- Device Maintenance
- Troubleshooting
- Appendix
- Backup Cameras
- Connecting a Dash Camera to the Powered Mount
- Data Management
- About Memory Cards
- Installing a Memory Card for Maps and Data
- Formatting the Memory Card
- Connecting the Device to Your Computer
- Transferring Data From Your Computer
- Transferring GPX Files From Your Computer
- Exporting GPX Files with the Garmin Drive App
- Importing GPX Files with the Garmin Drive App
- Exporting GPX Files with a Memory Card
- Importing GPX Files with a Memory Card
- Purchasing Additional Maps
- Purchasing Accessories
- Index

Getting Started
WARNING
See the Important Safety and Product Information guide in the
product box for product warnings and other important
information.
• Update the maps and software on your device (Updating
Maps and Software Using a Wi
‑
Fi Network, page 20).
• Mount the device in your vehicle and connect it to power
(Mounting and Powering the Device in Your Vehicle,
page 1).
• Adjust the volume (Adjusting Sound and Notification Volume,
page 19) and display brightness (Adjusting the Screen
Brightness, page 3).
• Set up a vehicle profile for your camper (Adding a Vehicle
Profile, page 3).
• Navigate to your destination (Starting a Route, page 5).
Device Overview
Microphone for hands-free calling and voice command
Volume control
Power key
Micro USB power and data port
Map and data memory card slot
Magnetic mount interface with 14-pin connector
Speaker
Mounting and Powering the Device in Your
Vehicle
WARNING
This product contains a lithium-ion battery. To prevent the
possibility of personal injury or product damage caused by
battery exposure to extreme heat, store the device out of direct
sunlight.
Both the device and its mount contain magnets. Under certain
circumstances, magnets may cause interference with some
internal medical devices and electronic devices, including
pacemakers, insulin pumps, or hard drives in laptop computers.
Keep the device away from medical devices and electronic
devices.
Before you use your device on battery power, you should charge
it.
1
Open the lever , press the suction cup to the windshield,
and flip the lever back toward the windshield.
The lever must be oriented toward the top of the windshield.
2
Plug the vehicle power cable into the port on the mount.
3
If necessary, loosen the thumbscrew on the suction cup arm
and the nut on the ball mount , and adjust the mount for
better viewing and operation.
4
Tighten the thumbscrew on the suction cup arm and the nut
on the ball mount.
5
Place the device onto the magnetic mount.
6
Plug the other end of the vehicle power cable into a power
outlet in your vehicle.
Getting Started 1