
User manual
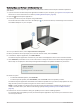

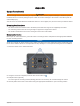
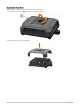
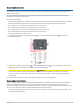
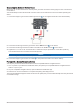
Table Of Contents
- Table of Contents
- Getting Started
- Vehicle Profiles
- Driver Awareness Features and Alerts
- Finding and Saving Locations
- Finding a Location Using the Search Bar
- Trendy Places
- Finding an Address
- Location Search Results
- Points of Interest
- Search Tools
- Viewing Recently Found Locations
- Viewing Current Location Information
- Adding a Shortcut
- Saving Locations
- Following a Route
- Using the Map
- Live Services, Traffic, and Smartphone Features
- Traffic
- Voice-Activated Features
- Using the Apps
- Settings
- Device Information
- Device Maintenance
- Troubleshooting
- Appendix
- Garmin PowerSwitch
- Installing a Memory Card for Maps and Data
- Data Management
- Viewing GPS Signal Status
- Purchasing Additional Maps
- Purchasing Accessories

Appendix
Garmin PowerSwitch
WARNING
Garmin strongly recommends having an experienced installer with the proper knowledge of electrical systems
install the device. Incorrectly wiring the power cable can result in damage to the vehicle or the battery and can
cause bodily injury.
You can use a connected Garmin PowerSwitch device to control lights, fans, and more from your Garmin device.
Mounting Considerations
• The device must be mounted close to the battery and within the range of the supplied power cable.
• The mounting surface must be strong enough to support the weight of the device.
• The location must allow room for the routing and connection of all cables.
Mounting the Device
Before you can mount the device, you must select a mounting location and purchase the appropriate hardware
for your mounting surface.
NOTICE
Avoid wires, gauges, air bags, air bag covers, HVAC, and other items when drilling pilot holes and attaching the
mount to the vehicle. Garmin is not responsible for any damages or consequences arising from the installation.
1 Place the mount on the selected location.
2 Using the mount as a template, mark the two screw locations .
3 Drill pilot holes (optional).
For some types of mounting material, drilling pilot holes is necessary. Do not drill through the mount.
4 Securely fasten the mount to the surface using the appropriate hardware for your mounting surface.
Appendix 51