RV 795 / CAMPER 795 / AVTEX TOURER THREE ® Owner’s Manual
© 2022 Garmin Ltd. or its subsidiaries All rights reserved. Under the copyright laws, this manual may not be copied, in whole or in part, without the written consent of Garmin. Garmin reserves the right to change or improve its products and to make changes in the content of this manual without obligation to notify any person or organization of such changes or improvements. Go to www.garmin.com for current updates and supplemental information concerning the use of this product.
Table of Contents Getting Started................................. 1 Garmin® Device Overview...................... 1 Mounting and Powering the Garmin Device in Your Vehicle............................ 2 Turning the Device On or Off.................. 3 Acquiring GPS Signals............................ 4 Status Bar Icons...................................... 4 Using the On-Screen Buttons................. 4 Adjusting the Volume.............................. 5 Using the Audio Mixer.........................
Avoiding Road Features.................... 22 Avoiding Environmental Zones........ 22 Custom Avoidances.......................... 22 Using the Map................................ 23 Map Tools.............................................. 24 Viewing a Map Tool...........................24 Up Ahead............................................... 24 Viewing Upcoming Locations........... 24 Customizing the Up Ahead Categories.......................................... 25 Cities Ahead.............................
Garmin PowerSwitch™ App.................. 39 Activating a Power Switch................ 40 Turning Off All Switches................... 40 Customizing a Button....................... 40 Assigning a Switch to a Control Input................................................... 41 Adding a Custom Layout.................. 41 Routines............................................. 42 Settings.......................................... 43 Map and Vehicle Settings..................... 43 Enabling Maps..................
Getting Started WARNING See the Important Safety and Product Information guide in the product box for product warnings and other important information. • Update the maps and software on your device (Map and Software Updates, page 46). • Mount the device in your vehicle and connect it to power (Mounting and Powering the Garmin Device in Your Vehicle, page 2). • Acquire GPS signals (Acquiring GPS Signals, page 4).
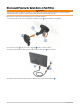
Mounting and Powering the Garmin Device in Your Vehicle WARNING This product contains a lithium-ion battery. To prevent the possibility of personal injury or product damage caused by battery exposure to extreme heat, store the device out of direct sunlight. Before you use your device on battery power, you should charge it. 1 Press the suction cup to the windshield, and flip the lever back toward the windshield. 2 Press the mount onto the suction cup ball until it snaps into place.
5 Plug the vehicle power adapter into a power outlet in your vehicle. 6 Fit the tab on the top of the mount into the slot on the back of the device, and press the bottom of the mount into the device until it clicks. Turning the Device On or Off • To turn the device on, press the power key , or connect the device to power. • To put the device in power saving mode, press the power key while the device is on.
Acquiring GPS Signals When you turn on your navigation device, the GPS receiver must collect satellite data and establish the current location. The time required to acquire satellite signals varies based on several factors, including how far you are from the location where you last used your navigation device, whether you have a clear view of the sky, and how long it has been since you last used your navigation device.
Adjusting the Volume 1 Select . 2 Select an option: • Use the slider bar to adjust the volume. • Select to mute the device. • Select a check box to enable or disable additional sound options. Using the Audio Mixer You can use the audio mixer to set the volume levels for different audio types, such as navigation prompts or phone calls. The level for each audio type is a percentage of the master volume. 1 Select . 2 Select Mixer. 3 Use the sliders to adjust the volume for each audio type.
Car Profile The car profile is a preloaded vehicle profile intended for use in an automobile without a trailer. While using the car profile, the device calculates standard automobile routes, and routing for large vehicles is not available. Some features and settings specific to large vehicles are not available while using the car profile. Switching the Vehicle Profile You can manually switch to another vehicle profile at any time. 1 From the status bar, select the vehicle profile icon, such as or .
Driver Awareness Features and Alerts CAUTION The driver alerts and speed limit features are for information only and do not replace your responsibility to abide by all posted speed limit signs and to use safe driving judgment at all times. Garmin is not responsible for any traffic fines or citations you receive for failing to follow all applicable traffic laws and signs. Your device provides features that can help encourage safer driving and increase efficiency, even when you are driving in a familiar area.
Red Light and Speed Cameras NOTICE Garmin is not responsible for the accuracy of or the consequences of using a red light or speed camera database. NOTE: This feature is not available for all regions or product models. Information about red light and speed camera locations is available in some areas for some product models. The device alerts you when you approach a reported speed or red light camera.
Restriction Warnings Height Weight Length Width Trailer height Trailer weight Trailer length Trailer width No boat trailers allowed No campers allowed No trailers allowed No propane No left turn No right turn No U turn Road Condition Warnings Risk of grounding Lateral wind Narrow road Sharp curve Steep down hill Tree overhang Driver Awareness Features and Alerts 9
Alerts Weigh station Road not verified for motorhomes Finding and Saving Locations The maps loaded in your device contain locations, such as restaurants, hotels, auto services, and detailed street information. The Where To? menu helps you find your destination by providing several methods to browse, search, and save this information. From the main menu, select Where To?. • To quickly search all locations on your device, select Search (Finding a Location Using the Search Bar, page 10).
Trendy Places NOTICE Garmin is not responsible for the accuracy or timeliness of the Tripadvisor or Michelin information. You are responsible for understanding and complying with any applicable rules, laws, or regulations associated with points of interest. ® The Trendy Places search feature includes both Tripadvisor and Michelin points of interest and ratings, providing a comprehensive list of attractions. You can filter the search results by categories, ratings, and distance from the route.
Plan Arrival Select to use the Plan Arrival tool. Select to view detailed information about the location. Select to create a route to the location using the feature(Starting a Route Using the Road Trip Routes Feature, page 18). Go! Select to start navigating to the location using the recommended route. Changing the Search Area By default, the device searches for locations near your current location.
Searching Within a Category After you have performed a search for a point of interest, certain categories may display a Quick Search list that shows the last four destinations you selected. 1 Select Where To? > Categories. 2 Select a category. 3 Select an option: • Select a destination from the quick search list on the right side of the screen. The quick search list provides a list of recently found locations in the selected category. • Select a subcategory, if necessary, and select a destination.
Exploring National Park Features and Amenities On North American product models, you can explore detailed information about the features and amenities available inside a national park, and navigate to specific locations in the park. For example, you can find campgrounds, landmarks, visitor centers, and popular attractions. 1 From the location search results, select a national park. A list of categories for park features and amenities appears. 2 Select a category. 3 Select a location, and select Go!.
Finding an Intersection You can search for an intersection or junction between two streets, highways, or other roads. 1 Select Where To? > Intersections. 2 Follow the on-screen instructions to enter street information. 3 Select the intersection. Finding a Location Using Coordinates You can find a location using latitude and longitude coordinates. 1 Select Where To? > Coordinates. 2 If necessary, select , and change the coordinate format or datum. 3 Select Coordinates.
Adding a Shortcut You can add shortcuts to the Where To? menu. A shortcut can point to a location, a category, or a search tool. The Where To? menu can contain up to 36 shortcut icons. 1 Select Where To? > Add Shortcut. 2 Select an item. Removing a Shortcut 1 2 3 4 Select Where To? > > Remove Shortcut(s). Select a shortcut to remove. Select the shortcut again to confirm. Select Done. Saving Locations Saving a Location 1 2 3 4 5 Search for a location (Finding a Location by Category, page 12).
Assigning Categories to a Saved Location You can add custom categories to organize your saved locations. NOTE: Categories appear in the saved locations menu after you have saved at least 12 locations. 1 Select Where To? > Saved. 2 Select a location. 3 Select . 4 Select > Edit > Categories. 5 Enter one or more category names, separated by commas. 6 If necessary, select a suggested category. 7 Select Done. Deleting a Saved Location NOTE: Deleted locations cannot be recovered. 1 Select Where To? > Saved.
Starting a Route by Using the Map You can start a route by selecting a location from the map. 1 Select View Map. 2 Drag and zoom the map to display the area to search. 3 If necessary, select to filter the displayed points of interest by category. Location markers (colored dots) appear on the map. 4 Select an option: • Select a location marker. • Select a point, such as a street, intersection, or address location. 5 Select Go!.
Your Route on the Map As you travel, the device guides you to your destination using voice prompts and information on the map. Instructions for your next turn or exit, or other actions appear across the top of the map. Distance to the next action. Next action in the route. Indicates the next turn, exit, or other action and the lane in which you should travel, if available. Name of the street or exit associated with the next action. Route highlighted on the map. Next action in the route.
Active Lane Guidance As you approach some turns, exits, or interchanges in your route, a detailed simulation of the road appears beside the map, if available. A colored line indicates the proper lane for the turn. Viewing Turns and Directions While navigating a route, you can view upcoming turns, lane changes, or other directions for your route. 1 From the map, select an option: • To view upcoming turns and directions as you navigate, select > Turns.
Changing Your Active Route Adding a Location to Your Route Before you can add a location to your route, you must be navigating a route (Starting a Route, page 17). You can add locations to the middle or end of your route. For example, you can add a fuel station as the next destination in your route. TIP: To create complex routes with multiple destinations or scheduled stops, you can use the route planner to plan, schedule, and save a route(Route Planner, page 36). 1 From the map, select > Where To?.
Avoiding Delays, Tolls, and Areas Avoiding Traffic Delays on Your Route Before you can avoid traffic delays, you must be receiving traffic information (Receiving Traffic Data Using Your Smartphone, page 33). By default, the device optimizes your route to avoid traffic delays automatically. If you have disabled this option in the traffic settings (Traffic Settings, page 45), you can view and avoid traffic delays manually. 1 While navigating a route, select > Traffic. 2 Select Alternate Route, if available.
Avoiding an Area 1 2 3 4 5 Select > Navigation > Custom Avoidances. If necessary, select Add Avoidance. Select Add Avoid Area. Select the upper-left corner of the area to avoid, and select Next. Select the lower-right corner of the area to avoid, and select Next. The selected area is shaded on the map. 6 Select Done. Disabling a Custom Avoidance You can disable a custom avoidance without deleting it. 1 Select > Navigation > Custom Avoidances. 2 Select an avoidance. 3 Select > Disable.
Map Tools Map tools provide quick access to information and device functions while you view the map. When you activate a map tool, it appears in a panel at the edge of the map. Stop: Stops navigation of the active route. Edit Route: Allows you to take a detour or skip locations in your route (Changing Your Active Route, page 21). Mute Navigation: Mutes the device audio. Cities Ahead: Displays upcoming cities and services along your active route or along a highway (Cities Ahead, page 25).
Customizing the Up Ahead Categories You can change the location categories that appear in the Up Ahead tool. 1 From the map, select > Up Ahead. 2 Select a category. 3 Select . 4 Select an option: • To move a category up or down in the list, select and drag the arrow next to the category name. • To change a category, select the category. • To create a custom category, select a category, select Custom Search, and enter the name of a business or category. 5 Select Save.
Viewing Customized Trip Information on the Map You can use the trip data map tool to show customized trip information on the map. 1 From the map, select > Trip Data. 2 Select an option: • Select a data field in the trip data tool , and select the information to show in the field. • Select the customizable map data field , and select the information to show in the field. Viewing Trip Data The trip data tool displays your speed and provides statistics about your trip. From the map, select Speed.
Viewing Upcoming Traffic NOTICE Garmin is not responsible for the accuracy or timeliness of the traffic information. Before you can use this feature, your device must be receiving traffic data (Traffic, page 33). You can view traffic incidents coming up along your route or along the road on which you are traveling. 1 While navigating a route, select > Traffic. The nearest upcoming traffic incident appears in a panel on the right side of the map. 2 Select the traffic incident to view additional details.
Live Services, Traffic, and Smartphone Features WARNING Do not read or interact with notifications while driving, because doing so can cause distraction that could lead to an accident resulting in serious personal injury or death. The Garmin Drive app allows your device to receive smart notifications and live information, such as live traffic data and weather information.
Disabling Bluetooth Features (iPhone ) ® By default, all compatible Bluetooth features are enabled when you pair your phone. You can disable specific Bluetooth features and remain connected to the other features. 1 Select > Wireless Networks. 2 Select an option: • To disable all Bluetooth features, clear the Bluetooth check box. • To disable hands-free calling, select the phone name, and clear the Phone calls check box.
Receiving Notifications WARNING Do not read or interact with notifications while driving, because doing so can cause distraction that could lead to an accident resulting in serious personal injury or death. Before you can use this feature, your device must be connected to a supported phone running the Garmin Drive app (Live Services, Traffic, and Smartphone Features, page 28). From most pages, a popup appears when the device receives a notification from your smartphone.
Going to an Address or Location Using the Garmin Drive App You can use the Garmin Drive app to search for an address, business, or point of interest, and send it to your Garmin device for navigation. 1 From the Garmin Drive app, select Where To?. 2 Select an option: • To search for an address near you, enter the house number and street name. • To search for an address in another city, enter the house number, street name, city, and state. • To search for a business name, enter all or part of the name.
Using the Call History Your call history is loaded from your phone to the device each time your phone and the device connect. It may take a few minutes for the call history to be available. Some phones do not support this feature. 1 Select > Phone > Call History. 2 Select a category. A list of calls appears, with the most recent calls at the top. 3 Select a call. Using In-Call Options In-call options are available when you answer a call. Some options may not be compatible with your phone.
Traffic NOTICE Garmin is not responsible for the accuracy or timeliness of the traffic information. Your device can provide information about traffic on the road ahead or on your route. You can set your device to avoid traffic when calculating routes, and to find a new route to your destination if a large traffic delay occurs on your active route (Traffic Settings, page 45). The traffic map allows you to browse the map for traffic delays in your area.
Starting a Route Going to a Saved Location Using Your Voice It is useful to start a route on your Garmin device each time you travel to a saved location, even though you may already know how to get there. Your device can help you avoid reported traffic delays and construction that may affect your route. You can say phrases like these to start a route to your saved locations (Saving Locations, page 16). • OK, Garmin, take me home. • OK, Garmin, take me to work. • OK, Garmin, start a route to school.
Changing Device Settings Using Your Voice You can say phrases like these to set device settings to a value from 0 to 10. • OK, Garmin, increase the volume. • OK, Garmin, set the volume to 0. • OK, Garmin, set the volume to 9. • OK, Garmin, decrease the brightness. • OK, Garmin, set the brightness to 5. Using the Apps Viewing the Owner's Manual on Your Device You can view the complete owner's manual on the device screen in many languages. 1 Select > Owner's Manual.
Viewing Weather Alerts Before you can use this feature, your device must be connected to a supported phone running the Garmin Drive app (Live Services, Traffic, and Smartphone Features, page 28). NOTE: This feature is not available in all areas. While you are traveling with your device, weather alerts may appear on the map. You can also view a map of weather alerts near your current location or near a selected city. 1 Select > Weather. 2 If necessary, select a city. 3 Select > Weather Alerts.
Changing Routing Options for a Route You can customize how the device calculates your route. 1 Select > Route Planner. 2 Select a saved route. 3 Select . 4 Select an option: • To add shaping points to your route, select , and select at least one location. • To change the calculation mode for the route, touch a route segment, and select a calculation mode. Navigating to a Saved Route 1 2 3 4 5 Select > Route Planner. Select a saved route. Select Go!. Select the first location to navigate to, and select OK.
Deleting Service Categories When you delete a service category, all service records in the category are also deleted. 1 Select > Service History. 2 Select > Delete Categories. 3 Select the service categories to delete. 4 Select Delete. Renaming Service Categories 1 2 3 4 Select > Service History. Select the category to be renamed. Select > Rename Category. Enter a name, and select Done. Editing a Service Record You can edit the comment, odometer reading, and date of a service record.
Viewing photoLive Traffic Cameras on the Map The photoLive map tool shows traffic cameras from the road ahead of you. 1 From the map, select > photoLive. The device shows the live image from the nearest traffic camera on the road ahead, along with the distance to the camera. When you pass the camera, the device loads the live image of the next camera on the road. 2 If no cameras are found for the road, select Find Cameras to view or save nearby traffic cameras (optional).
Opens the app settings menu Enters editing mode to customize the app layout and functions Turns off all outputs Power buttons Activates each connected output Displays input voltage Displays the total amperage of the selected Garmin PowerSwitch device Displays the device name Displays Garmin PowerSwitch device tabs and custom layout tabs Activating a Power Switch Before you can use the Garmin PowerSwitch app to activate a switch, you must install your Garmin PowerSwitch device in your vehicle and pair it w
Assigning a Switch to a Control Input Before you can use control input functions, you must connect a control input to your Garmin PowerSwitch device (Connecting a Control Input, page 53). You can assign one or more switches to turn on when the Garmin PowerSwitch device receives a signal from a control input. 1 Select . 2 Select your Garmin PowerSwitch device. 3 Select a control input. 4 Select one or more switches. Adding a Custom Layout You can add a custom layout tab to the Garmin PowerSwitch app.
Deleting a Custom Layout or Button 1 From the Garmin PowerSwitch app, select a custom layout tab. 2 Select . The app enters editing mode. 3 Select an option: • To delete a button, select on the button you want to delete. • To delete a layout tab, select on the layout tab. Routines Routines automate your Garmin PowerSwitch device. When you define a routine on your compatible Garmin navigation device, it turns switches on or off automatically when the conditions of the routine are met.
Settings Map and Vehicle Settings Select > Map Display. Map Vehicle Icon: Sets the icon that represents your position on the map. Driving Map View: Sets the perspective on the map. Map Detail: Sets the level of detail on the map. More detail may cause the map to draw slower. Map Theme: Changes the color of the map data. Map Layers: Sets the data that appears on the map page (Customizing the Map Layers, page 27). Auto Zoom: Automatically selects the zoom level for optimal use of your map.
Wireless Network Settings The wireless network settings allow you to manage Wi‑Fi networks, paired Bluetooth devices, and Bluetooth features. Select > Wireless Networks. Bluetooth: Enables Bluetooth wireless technology. Paired Device Name: The names of paired Bluetooth devices appear in the menu. You can select a device name to change Bluetooth feature settings for that device. Search for Devices: Searches for nearby Bluetooth devices.
Traffic Settings From the main menu, select > Traffic. Traffic: Enables the traffic feature. Current Provider: Sets the traffic provider to use for traffic data. The Auto option selects the best available traffic data automatically. Subscriptions: Lists the current traffic subscriptions. Traffic Alerts: Sets the traffic delay severity for which the device displays a traffic alert. Units and Time Settings To open the Units and Time settings page, from the main menu, select > Units & Time.
Device Information Viewing E-label Regulatory and Compliance Information 1 From the settings menu, swipe to the bottom of the menu. 2 Select Device > Regulatory > Regulatory. Specifications Operating temperature range From -20° to 55°C (from -4° to 131°F) Charging temperature range From 0° to 45°C (from 32° to 113°F) Radio frequency 2.4 GHz @ 16 dBm maximum 5.1 GHz @ 17 dBm maximum 5.2 GHz @ 17 dBm maximum EU SAR 0.543 W/kg torso; 0.
Connecting to a Wi‑Fi Network The first time you turn on the device, it prompts you to connect to a Wi‑Fi network and register your device. You can also connect to a Wi‑Fi network using the settings menu. 1 Select > Wireless Networks. 2 If necessary, select Wi-Fi to enable Wi‑Fi technology. 3 Select Search for Networks. The device displays a list of nearby Wi‑Fi networks. 4 Select a network. 5 If necessary, enter the password for the network, and select Done.
Updating Maps and Software with Garmin Express You can use the Garmin Express application to download and install the latest map and software updates for your device. 1 If you do not have the Garmin Express application installed on your computer, go to garmin.com/express and follow the on-screen instructions to install it (Installing Garmin Express, page 49). 2 Open the Garmin Express application. 3 Connect your device to your computer using a USB cable.
Installing Garmin Express The Garmin Express application is available for Windows and Mac computers. 1 On your computer, go to garmin.com/express. 2 Select an option: • To view the system requirements and verify the Garmin Express application is compatible with your computer, select System Requirements. • To install on a Windows computer, select Download for Windows. • To install on a Mac computer, select Download for Mac.
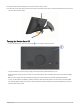
Removing the Mount from the Suction Cup 1 If necessary loosen the nut that secures the mount to the suction cup ball. 2 Turn the device mount to the right or left. 3 Apply pressure until the socket on the mount releases the ball on the suction cup. Removing the Suction Cup from the Windshield 1 Flip the lever on the suction cup toward you. 2 Pull the tab on the suction cup toward you.
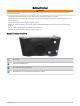
Appendix Garmin PowerSwitch WARNING Garmin strongly recommends having an experienced installer with the proper knowledge of electrical systems install the device. Incorrectly wiring the power cable can result in damage to the vehicle or the battery and can cause bodily injury. You can use a connected Garmin PowerSwitch device to control lights, fans, and more from your Garmin device. Mounting Considerations • The device must be mounted close to the battery and within the range of the supplied power cable.
Opening the Front Cover You must open the front cover to make electrical connections. 1 Lift the front cover latch and rotate it counter-clockwise. 2 Pull the front cover off of the device.
Connecting Accessories NOTICE Do not use the device to control or power a winch. Failure to follow this notice could cause damage to your vehicle or your device. Do not connect a power source to an accessory output terminal. Failure to follow this notice could cause damage to your vehicle or your device. Accessory requirements: • Verify the amperage rating of each accessory before wiring it to the Garmin PowerSwitch device.
Connecting the Device to Vehicle Power Before you can connect the device to vehicle power, you must remove the warning tag from the +12V terminal on the device. You should always confirm all electrical connections are secure and will not come loose while operating the device. 1 Connect the large ring end of the included ground wire to the negative terminal on the vehicle battery. 2 Connect the small ring end of the ground wire to the GND terminal on the device.
Garmin PowerSwitch Specifications Dimensions (D x W x H) 75 x 125 x 32 mm (2.95 x 4.92 x 1.26 in.) Operating temperature range From -25° to 85°C (from -13° to 185°F) Wireless frequency 2.4 GHz @ 13 dBm Power input From 12 to 16 V using the included vehicle power cable.
About Memory Cards You can purchase memory cards from an electronics supplier, or purchase pre-loaded Garmin mapping software (www.garmin.com). Memory cards can be used to store files such as maps and custom POIs. Connecting the Device to Your Computer You can connect the device to your computer using a USB cable. 1 Plug the small end of the USB cable into the port on the device. 2 Plug the larger end of the USB cable into a port on your computer.
support.garmin.