
User manual


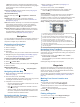

Table Of Contents
- Table of Contents
- Introduction
- Radio
- Navigation
- Waypoints
- Routes
- Tracks
- Applications
- Customizing the Device
- Adding an Application to the Home Screen
- Pages
- Profiles
- Custom Data Fields and Dashboards
- Adjusting the Backlight Brightness
- Display Settings
- Map Settings
- System Settings
- Setting the Device Tones
- Routing Settings
- Heading Settings
- Position Format Settings
- Changing the Units of Measure
- Time Settings
- Geocaching Settings
- Resetting Data and Settings
- Device Information
- Troubleshooting
- Appendix
- Index

CBRS/PRS channels in Australia and New Zealand. If the
battery level is too low to support transmissions using higher
power levels, the value of this setting decreases
automatically.
Squelch Tone Mode: Sets the squelch mode (Changing the
Squelch Tone Mode, page 2).
Advanced Radio Setup
From the radio app, select > Setup Radio > Advanced
Setup.
Headset Type: Sets the type of accessory headset or
microphone you are using with the device (Headsets and
Microphones, page 9).
VOX Level: Sets the sensitivity of a connected Voice Operated
Transmission (VOX) accessory. A lower VOX setting is
recommended for quiet environments, and a higher VOX
setting is recommended for noisy environments.
Repeater Channel: Enables the GMRS repeater channels in
the US, and the CBRS/PRS repeater channels in Australia
and New Zealand. GMRS repeater channels are not
available in Canada (Repeater Channels, page 3).
Navigation
You can navigate routes and tracks to a waypoint, geocache, or
any saved location in the device. You can use the map or the
compass to navigate to your destination.
Navigating to a Destination
1
From the home screen, select .
2
Select a category.
3
Select a destination.
4
Select Go.
The map opens, and your route is marked with a dashed line.
5
Navigate using the map (Navigating with the Map, page 4)
or compass (Navigating with the Compass, page 4).
Finding a Location Near Another Location
1
From the home screen, select Where To?.
2
Select > Search Near.
3
Select a criteria to center your search, such as A Waypoint.
4
Select a location.
Stopping Navigation
From the map or compass, select > Stop Navigation.
Navigating with the Map
1
Begin navigating to a destination (Navigating to a
Destination, page 4).
2
From the home screen, select Map.
A triangle represents your location on the map. As you travel,
the triangle moves and leaves a track log (trail).
3
Complete one or more actions:
• Use the Thumb Stick controller to move the cursor on the
map to view different areas.
• Hold , and use the Thumb Stick controller to zoom in
and out of the map.
• Select a location on the map (represented by a pin) with
the cursor, and press the Thumb Stick controller to view
information about the selected location.
Navigating with the Compass
When navigating to a destination, points to your destination,
regardless of the direction you are moving.
1
Begin navigating to a destination (Navigating to a
Destination, page 4).
2
From the home screen, select Compass.
3
Turn until points toward the top of the compass, and
continue moving in that direction to the destination.
Course Pointer
The course pointer is most useful when you are navigating to
your destination in a straight line, such as when you are
navigating on water. It can help you navigate back to the course
line when you go off-course to avoid obstacles or hazards.
To enable the course pointer, from the home screen, select
Setup > Heading > Go To Line (Pointer) > Course.
À
Course line pointer. Indicates the direction of the desired course line
from your starting point to your next waypoint.
Á
Course deviation indicator (CDI). Indicates the location of the
desired course line in relation to your location. If the CDI is aligned
with the course line pointer, you are on course.
Â
Course deviation distance. The dots indicate your distance off
course. The distance represented by each dot is indicated by the
scale in the upper-right corner.
Ã
To-and-from indicator. Indicates whether you are headed to or from
the next waypoint.
Navigating Using TracBack
®
While navigating, you can navigate back to the beginning of your
current track. This can be helpful when finding your way back to
camp or the trail head.
1
From the home screen, select Where To? > Tracks >
Current Track > Tracback.
The map displays your route with a dashed line, start point,
and end point.
2
Navigate using the map or the compass.
Waypoints
Waypoints are locations you record and store in the device.
Waypoints can mark where you are, where you are going, or
where you have been. You can add details about the location,
such as name, elevation, and depth.
You can add a .gpx file that contains waypoints by transferring
the file to the GPX folder (Transferring Files to Your Device,
page 10).
Marking Your Current Location as a
Waypoint
You can mark your current location as a waypoint.
1
From the home screen, select Mark Waypoint.
2
Select the symbol, the name, or the notes field to add details
about the waypoint (optional).
3
Select for more waypoint options (optional).
4
Select Done.
Finding a Waypoint
1
From the home screen, select Waypoint Manager.
2
If necessary, select to narrow the search.
4 Navigation