
User manual

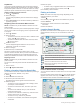

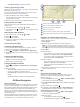

Table Of Contents
- Table of Contents
- Getting Started
- Vehicle Profiles
- Driver Awareness Features and Alerts
- Street Navigation
- Finding and Saving Locations
- Points of Interest
- Navigating to a Garmin Explore Location
- Finding a Location by Category
- Finding Campgrounds
- Finding Ultimate Campgrounds Points of Interest
- Finding RV Services
- Finding National Parks
- Finding iOverlander™ Points of Interest
- Finding HISTORY® Points of Interest
- Foursquare
- TripAdvisor®
- Navigating to Points of Interest Within a Venue
- Finding a Location Using the Search Bar
- Finding an Address
- Location Search Results
- Changing the Search Area
- Custom Points of Interest
- Parking
- Search Tools
- Viewing Recently Found Locations
- Viewing Current Location Information
- Adding a Shortcut
- Saving Locations
- Points of Interest
- Using the Street Map
- Off-Road Navigation
- inReach Remote
- Hands-Free Calling
- Traffic
- Voice Command
- Using the Apps
- Overlander Settings
- Device Information
- Device Maintenance
- Troubleshooting
- Appendix
- Index

• Select Reset Trip B to reset the odometer.
Viewing Upcoming Traffic
Before you can use this feature, your device must be receiving
traffic data (Traffic, page 15).
You can view traffic incidents coming up along your route or
along the road on which you are traveling.
1
While navigating a route, select > Traffic.
The nearest upcoming traffic incident appears in a panel on
the right side of the map.
2
Select the traffic incident to view additional details.
Viewing Traffic on the Map
The traffic map shows color-coded traffic flow and delays on
nearby roads.
1
From the main menu, select > > Traffic.
2
If necessary, select > Legend to view the legend for the
traffic map.
Searching for Traffic Incidents
1
From the main menu, select > > Traffic.
2
Select > Incidents.
3
Select an item in the list.
4
If there is more than one incident, use the arrows to view
additional incidents.
Customizing the Map
Customizing the Map Layers
You can customize which data appear on the map, such as
icons for points of interest and road conditions.
1
Select > Navigation > Map & Vehicle > Map Layers.
2
Select the check box next to each layer you want to show on
the map.
Changing the Map Data Field
1
From the map, select a data field.
NOTE: You cannot customize Speed.
2
Select a type of data to display.
Changing the Map Perspective
1
Select > Navigation > Map & Vehicle > Driving Map
View.
2
Select an option:
• Select Track Up to display the map in two dimensions (2-
D), with your direction of travel at the top.
• Select North Up to display the map in 2-D with north at
the top.
• Select 3-D to display the map in three dimensions.
Off-Road Navigation
Garmin Explore
The Garmin Explore website and mobile app allow you to plan
trips and use cloud storage for your waypoints, routes, and
tracks. Garmin Explore offers advanced planning both online
and offline, allowing you to share and sync data with your
device. You can use the included app to download maps for
offline access, and then navigate anywhere without using your
mobile data service.
The Garmin Explore app is included on your device. You can
also download the Garmin Explore app from the app store on
your smartphone, or you can go to explore.garmin.com.
Select to open the map settings menu.
Select to add waypoints and create routes.
Select to change the map orientation.
Select to view the map.
Select to manage waypoints, tracks, routes, and activities.
Select to view Garmin Explore account information and settings.
Logging In to a Garmin Explore Account
The first time you use your device, you are prompted to log in to
a Garmin Explore account.
1
Select Explore.
2
Read and agree to the End User License Agreement.
NOTE: If you do not agree with the license terms, you can
select to exit the Garmin Explore app. You cannot use the
Garmin Explore app until you accept the license agreements.
3
Select Next.
4
Select an option:
• If you want to sync your device data with your Garmin
Explore account automatically, select Sync My Data.
• If you want to create a Garmin Explore account without
synchronizing data, select Not Now.
5
Select an option:
• If you have a Garmin Explore account, enter your email
address and password, and select Next.
• If you do not have a Garmin Explore account, select
Create One.
6
Follow the on-screen instructions to create or log in to your
Garmin Explore account.
Map
Downloading Garmin Explore Maps
Before you can download Garmin Explore maps, you must
connect to a wireless network (Connecting to a Wireless
Network, page 17).
1
From the Explore app, select > Maps > Download Maps.
A list of maps for your location appears.
2
Select Show More Map Types to view additional map types
(optional).
3
Select a map type, and select .
4
If necessary, select Select Region or Select Waypoint to
download maps for a different region or waypoint location.
Updating Garmin Explore Maps
1
From the Explore app, select > Maps > Map Updates.
A list of map updates appears.
2
Select an option:
• To download a specific map, select .
• To download all map updates, select Update All.
12 Off-Road Navigation