OVERLANDER ™ Owner’s Manual
© 2019 Garmin Ltd. or its subsidiaries All rights reserved. Under the copyright laws, this manual may not be copied, in whole or in part, without the written consent of Garmin. Garmin reserves the right to change or improve its products and to make changes in the content of this manual without obligation to notify any person or organization of such changes or improvements. Go to www.garmin.com for current updates and supplemental information concerning the use of this product.
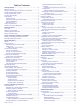
Table of Contents Getting Started............................................................... 1 Device Overview ......................................................................... 1 Mounting and Powering the Device in Your Vehicle ................... 1 Installing the Ball Mount Adapter ................................................ 1 Turning the Device On or Off ...................................................... 2 Acquiring GPS Signals .........................................................
Creating a Route ............................................................. 13 Library .................................................................................. 13 Viewing Your Library ....................................................... 13 Navigating to a Saved Location ...................................... 13 Creating a Collection ....................................................... 13 Viewing Collections .........................................................
Getting Started WARNING See the Important Safety and Product Information guide in the product box for product warnings and other important information. Before you use your device on battery power, you should charge it. 1 Press the mount onto the suction cup ball until it snaps into place. 1 Update the maps and software on your device (Updating Maps and Software Using a Wi‑Fi Network, page 18). 2 Set up a Garmin Explore™ account (Garmin Explore, page 12).
Turning the Device On or Off • To turn the device on, press the power key device to power. Select to view road navigation features and search for points of interest. , or connect the Select to view the Garmin Explore app, which provides off-road navigation information and detailed topographical maps. Select to open the app drawer. The app drawer contains shortcuts to all the apps installed on your device.
Vehicle Profiles Driver Awareness Features and Alerts WARNING Entering your vehicle profile characteristics does not guarantee that your vehicle's characteristics will be accounted for in all route suggestions or that you will receive the warning icons in all cases. Limitations may exist in the map data such that your device cannot account for these restrictions or road conditions in all cases. Always defer to all posted road signs and road conditions when making driving decisions.
alerts you when you approach a reported speed or red light camera. • You can use the Garmin Express™ software (garmin.com /express) to update the camera database stored on your device. You should update your device frequently to receive the most up-to-date camera information. Street Navigation Editing Your Home Location 1 Select > > Set Home Location. 2 Enter your home location. Your Route on the Map As you travel, the device guides you to your destination using voice prompts and information on the map.
• To view the complete list of turns and directions for the entire route, select the text bar at the top of the map. 2 Select a turn or direction (optional). Detailed information appears. An image of the junction may appear for junctions on major roadways, if available. Viewing the Entire Route on the Map 1 While navigating a route, select anywhere on the map. 2 Select . Arriving at Your Destination When you approach your destination, the device provides information to help you complete your route.
Avoiding Delays, Tolls, and Areas Avoiding Traffic Delays on Your Route Before you can avoid traffic delays, you must be receiving traffic information (Receiving Traffic Data Using a Traffic Receiver, page 15). By default, the device optimizes your route to avoid traffic delays automatically. If you have disabled this option in the traffic settings (Traffic Settings, page 17), you can view and avoid traffic delays manually. 1 While navigating a route, select > Traffic.
• Save your favorite locations to find them quickly in the future (Saving Locations, page 10). • Return to recently found locations (Viewing Recently Found Locations, page 9). Points of Interest A point of interest is a place that you may find useful or interesting. Points of interest are organized by category and can include popular travel destinations such as gas stations, restaurants, hotels, and entertainment venues.
TripAdvisor 5 Select an option: Your device includes TripAdvisor points of interest and ratings. TripAdvisor ratings appear automatically in the search results list for applicable points of interest. You can also search for nearby TripAdvisor points of interest and sort by distance or popularity. • To search using a suggested search term, select the term. • To search using the text you entered, select . 6 If necessary, select a location.
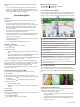
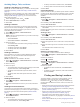
Drag the map to view additional search results. Additional search results. Select to view another location. Selected location summary. Select to view detailed information about the selected location. Go! Select to start navigating to the location using the recommended route. Select to view the search results in a list. Changing the Search Area By default, the device searches for locations near your current location.
A list of locations for the selected service appears, with the nearest locations at the top. 3 Select a location. 4 Select an option: • To navigate to the location, select Go!. • To view the phone number and other location details, select . Getting Directions to Your Current Location If you need to tell another person how to get to your current location, your device can give you a list of directions. 1 From the map, select the vehicle. 2 Select > Directions to Me. 3 Select a starting location.
2 Select a map tool. No Trailers Allowed The map tool appears in a panel at the edge of the map. 3 When you are done using the map tool, select . No Hazardous Materials Allowed Up Ahead No Water Pollutants Allowed The Up Ahead tool provides information about upcoming locations along your route or the road on which you are traveling. You can view upcoming points of interest, such as restaurants, fuel stations, or rest areas.
• Select Reset Trip B to reset the odometer. Viewing Upcoming Traffic Before you can use this feature, your device must be receiving traffic data (Traffic, page 15). You can view traffic incidents coming up along your route or along the road on which you are traveling. 1 While navigating a route, select > Traffic. The nearest upcoming traffic incident appears in a panel on the right side of the map. 2 Select the traffic incident to view additional details.
Filtering Map Data 1 Select Map > . 2 Select an option: • To filter collections map data, select Collections, and select an option. • To filter activities map data, select Activities, and select an option. Garmin Explore Map Settings From the Explore app, select Map > . Data Fields: Adds data fields for heading, elevation, speed, and GPS coordinates to the map. Scale Bar: Adds a distance scale to the map. Units: Sets the units of measure.
Calibrating Pitch and Roll You can set the angle of your vehicle to zero at any time. 1 Park your vehicle on a flat, level surface. 2 Adjust the position of your device in the mount so you can comfortably view the screen. 3 Select > > Pitch and Roll > Calibrate. The values for pitch and roll reset to 0 degrees. WARNING To maintain the best accuracy, you must calibrate pitch and roll each time you reposition your device.
6 If necessary, verify the code displayed on your phone Saving a Phone Number as a Preset matches the code displayed on your Overlander device. 7 Select Pair. NOTE: To view contacts and call logs on your Overlander device, you may need to go to the Bluetooth settings on your phone and enable the contact sharing permission for the paired Overlander device. For more information, see the owner's manual for your phone. You can save up to three contacts as presets on the dial pad.
Connect the device to vehicle power using the traffic receiver cable (Mounting and Powering the Device in Your Vehicle, page 1). NOTE: The traffic receiver cable has an integrated antenna for the built-in digital traffic receiver. Where available, the digital traffic receiver receives traffic data from FM radio stations using HD Radio™ technology. When you are within a traffic coverage area, your device can display traffic information and help you avoid traffic delays.
Vehicle: Sets the vehicle icon that represents your position on the map. Driving Map View: Sets the perspective on the map. Map Detail: Sets the level of detail on the map. More detail may cause the map to draw slower. Map Theme: Changes the color of the map data. Map Layers: Sets the data that appears on the map page (Customizing the Map Layers, page 12). Auto Zoom: Automatically selects the zoom level for optimal use of your map. When disabled, you must zoom in or out manually.
Device Information high-performance GPS antenna that provides the most accurate location data while navigating. Setting the Text Language You can select the language for text in the device software. > Language & input > Language. 1 Select Select a language. 2 Date and Time Settings Select > Date & Time. Automatic date & time: Automatically sets the time based on information from the connected network. Set date: Sets the month, day, and year on your device. Set time: Sets the time on your device.
3 Select an option: • When an update notification appears, swipe down from the top of the screen, and select An update is available.. • To manually check for updates, select > About device > System updates. The device displays available map and software updates. When an update is available, Update Available appears below Map or Software. 4 Select an option: • To install all available updates, select Download. • To install only map updates, select Map. • To install only software updates, select Software.
Changing the Fuse in the Vehicle Power Cable NOTICE When replacing the fuse, do not lose any of the small pieces and make sure they are put back in the proper position. The vehicle power cable does not work unless it is assembled correctly. If your device does not charge in your vehicle, you may need to replace the fuse located at the tip of the vehicle adapter. 1 Rotate the end piece counter clockwise to unlock it. TIP: You may need to use a coin to remove the end piece.
2 Turn on the Garmin navigation device, and bring it within 3 m (10 ft.) of the camera. 3 Select > Rear View. 4 Select an option: • If this is the first camera you are connecting to the navigation device, select Add New Camera. • If this is an additional camera you are connecting to the navigation device, select > Choose Camera > Add New Camera. 5 Follow the on-screen instructions. NOTE: The pairing code or password is located on the transmitter or the camera.
Index Symbols 2-D map view 12 3-D map view 12 A accessories 21 active lane guidance 4 addresses, finding 8 alarm volume 17 alerts 3, 13, 14 audio 17 proximity points 17 altimeter 14 answering calls 15 applications 12 apps 2 audio, proximity points 17 avoidances 6 area 6 deleting 6 disabling 6 road 6 road features 6 tolls 6 B backup camera 21.
sleep mode 2 smartphone 12 software updating 18, 19 version 18 SOS 14 canceling 14 sending 14 sound 17 specifications 18 speech recognition 16 speed cameras 3 storing data 12 suction cup 20 T theft, avoiding 19 time settings 18 tolls, avoiding 6 tools, maps 10 touchscreen 2 tracking 13 tracks 13 traffic 12, 15–17 alternate route 6 incidents 12, 16 map 12, 16 receiver 15 searching for delays 12, 16 travel history 18 trip information 11 resetting 11 viewing 11 trip log, viewing 11 TripAdvisor 8 troubleshooti
support.garmin.