
User Manual

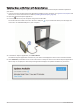
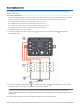
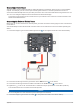
Table Of Contents
- Owner’s Manual
- Table of Contents
- Getting Started
- Vehicle Profiles
- Driver Awareness Features and Alerts
- Street Navigation
- Finding and Saving Locations
- Points of Interest
- Navigating to a Garmin Explore Location
- Finding a Location by Category
- Finding Campgrounds
- Finding Ultimate Campgrounds Points of Interest
- Finding RV Services
- Finding National Parks
- Finding iOverlander™ Points of Interest
- Finding HISTORY® Points of Interest
- Foursquare
- TripAdvisor®
- Navigating to Points of Interest Within a Venue
- Finding a Location Using the Search Bar
- Finding an Address
- Location Search Results
- Changing the Search Area
- Custom Points of Interest
- Parking
- Search Tools
- Viewing Recently Found Locations
- Viewing Current Location Information
- Adding a Shortcut
- Saving Locations
- Points of Interest
- Using the Street Map
- Off-Road Navigation
- inReach Remote
- Hands-Free Calling
- Traffic
- Voice Command
- Using the Apps
- Overlander Settings
- Device Information
- Device Maintenance
- Troubleshooting
- Appendix
- Garmin PowerSwitch
- Backup Cameras
- Connecting to a Wireless Display
- Data Management
- Purchasing Additional Maps
- Purchasing Accessories
- Quick Start Manual
- Important Safety and Product Information

Connecting a Control Input
You can connect to the control terminals to enable the Garmin PowerSwitch device to turn on customizable
outputs. For example, you can connect your vehicle ignition switch to a control input terminal to turn on
accessories automatically each time you start your vehicle. The control terminals detect a signal from 3.3 V to
18 V. You can configure output functions with the Garmin PowerSwitch app.
Connect the control wire from the control source in your vehicle to one of the two control terminals on the
Garmin PowerSwitch device.
Connecting the Device to Vehicle Power
Before you can connect the device to vehicle power, you must remove the warning tag from the +12V terminal
on the device.
You should always confirm all electrical connections are secure and will not come loose while operating the
device.
1 Connect the large ring end of the included ground wire to the negative terminal on the vehicle battery.
2 Connect the small ring end of the ground wire to the GND terminal on the device.
3 Connect the small ring end of the included 12V cable to the +12V terminal on the device.
4 Tighten the
3
/
8
in. nut on the +12V terminal to a maximum torque specification of 4.52 N-m (40 lbf-in.).
You should confirm the nut cannot be loosened by hand.
NOTICE
Do not overtighten the +12V terminal to prevent damage to the terminal.
5 Connect the large ring end of the 12V cable to the positive terminal on the vehicle battery.
Appendix 63