
User Manual

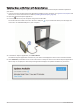
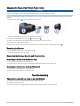
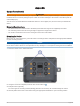
Table Of Contents
- Owner’s Manual
- Table of Contents
- Getting Started
- Vehicle Profiles
- Driver Awareness Features and Alerts
- Street Navigation
- Finding and Saving Locations
- Points of Interest
- Navigating to a Garmin Explore Location
- Finding a Location by Category
- Finding Campgrounds
- Finding Ultimate Campgrounds Points of Interest
- Finding RV Services
- Finding National Parks
- Finding iOverlander™ Points of Interest
- Finding HISTORY® Points of Interest
- Foursquare
- TripAdvisor®
- Navigating to Points of Interest Within a Venue
- Finding a Location Using the Search Bar
- Finding an Address
- Location Search Results
- Changing the Search Area
- Custom Points of Interest
- Parking
- Search Tools
- Viewing Recently Found Locations
- Viewing Current Location Information
- Adding a Shortcut
- Saving Locations
- Points of Interest
- Using the Street Map
- Off-Road Navigation
- inReach Remote
- Hands-Free Calling
- Traffic
- Voice Command
- Using the Apps
- Overlander Settings
- Device Information
- Device Maintenance
- Troubleshooting
- Appendix
- Garmin PowerSwitch
- Backup Cameras
- Connecting to a Wireless Display
- Data Management
- Purchasing Additional Maps
- Purchasing Accessories
- Quick Start Manual
- Important Safety and Product Information

Changing the Fuse in the Vehicle Power Cable
NOTICE
When replacing the fuse, do not lose any of the small pieces and make sure they are put back in the proper
position. The vehicle power cable does not work unless it is assembled correctly.
If your device does not charge in your vehicle, you may need to replace the fuse located at the tip of the vehicle
adapter.
1 Rotate the end piece counter clockwise to unlock it.
TIP: You may need to use a coin to remove the end piece.
2 Remove the end piece, the silver tip , and the fuse .
3 Insert a new fast-blow fuse that has the same current, such as 1 A or 2 A.
4 Place the silver tip in the end piece.
5 Push in the end piece and rotate it clockwise to lock it back into the vehicle power cable .
Resetting the Device
You can reset your device if it stops functioning.
Hold the power key for 12 seconds.
Removing the Device, Mount, and Suction Cup
Removing the Mount from the Suction Cup
1 Turn the device mount to the right or left.
2 Apply pressure until the socket on the mount releases the ball on the suction cup.
Removing the Suction Cup from the Windshield
1 Flip the lever on the suction cup toward you.
2 Pull the tab on the suction cup toward you.
Troubleshooting
The suction cup will not stay on my windshield
1 Clean the suction cup and windshield with rubbing alcohol.
2 Dry with a clean, dry cloth.
3 Mount the suction cup (Mounting and Powering the Device in Your Vehicle, page 3).
58 Troubleshooting