
User Manual


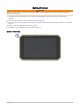

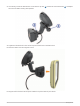
Table Of Contents
- Owner’s Manual
- Table of Contents
- Getting Started
- Vehicle Profiles
- Driver Awareness Features and Alerts
- Street Navigation
- Finding and Saving Locations
- Points of Interest
- Navigating to a Garmin Explore Location
- Finding a Location by Category
- Finding Campgrounds
- Finding Ultimate Campgrounds Points of Interest
- Finding RV Services
- Finding National Parks
- Finding iOverlander™ Points of Interest
- Finding HISTORY® Points of Interest
- Foursquare
- TripAdvisor®
- Navigating to Points of Interest Within a Venue
- Finding a Location Using the Search Bar
- Finding an Address
- Location Search Results
- Changing the Search Area
- Custom Points of Interest
- Parking
- Search Tools
- Viewing Recently Found Locations
- Viewing Current Location Information
- Adding a Shortcut
- Saving Locations
- Points of Interest
- Using the Street Map
- Off-Road Navigation
- inReach Remote
- Hands-Free Calling
- Traffic
- Voice Command
- Using the Apps
- Overlander Settings
- Device Information
- Device Maintenance
- Troubleshooting
- Appendix
- Garmin PowerSwitch
- Backup Cameras
- Connecting to a Wireless Display
- Data Management
- Purchasing Additional Maps
- Purchasing Accessories
- Quick Start Manual
- Important Safety and Product Information

3 If necessary, loosen the thumbscrew on the suction cup arm and the nut on the ball mount , and adjust
the mount for better viewing and operation.
4 Tighten the thumbscrew on the suction cup arm and the nut on the ball mount.
5 Place the device onto the magnetic mount.
6 Plug the other end of the vehicle power cable into a power outlet in your vehicle.
4 Getting Started