
User manual


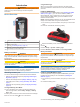
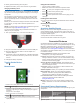
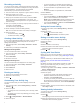
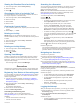
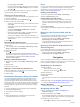
Table Of Contents
- Table of Contents
- Introduction
- Connected Features
- Activities
- Selecting an Activity
- Viewing Activity Data Screens
- Recording an Activity
- Creating a New Activity
- Pausing an Activity
- Customizing Your Activity Log
- Saving the Current Activity
- Saving a Location on an Activity
- Cycling with Your Device
- Viewing Activity Information
- Viewing the Elevation Plot of an Activity
- Changing the Color of an Activity Trail
- Clearing the Current Activity
- Deleting an Activity
- Deleting an Activity History
- Opening Track Manager
- Geocaches
- Navigation
- Waypoints
- Routes
- Garmin Adventures
- Camera and Photos
- Applications
- Fitness
- Customizing the Device
- Customizing the Keys
- Adjusting the Backlight Brightness
- Setting the Touchscreen Sensitivity
- Rotating the Screen
- Display Settings
- Configuring the Maps
- Custom Data Fields and Dashboards
- Customizing the Data Screens
- Adding a Shortcut to the Main Menu
- System Settings
- Appearance Settings
- Setting the Device Tones
- Routing Settings
- Heading Settings
- Altimeter Settings
- Position Format Settings
- Changing the Units of Measure
- Time Settings
- Geocaching Settings
- ANT+ Sensor Settings
- Fitness Settings
- Marine Settings
- Resetting Data and Settings
- Setting the Home Screen to Classic Mode
- Device Information
- Appendix
- Index

Introduction
WARNING
See the Important Safety and Product Information guide in the
product box for product warnings and other important
information.
Device Overview
À
Camera lens (not available on all models)
Á
Power, menu, apps, and backlight key
Â
Battery cover D-ring
Ã
User key (Customizing the Keys, page 12)
Ä
microSD
™
card slot (under battery door)
Å
Mini-USB port (under weather cap)
Battery Information
WARNING
The temperature rating for the device may exceed the usable
range of some batteries. Alkaline batteries can rupture at high
temperatures.
Do not use a sharp object to remove batteries.
CAUTION
Contact your local waste disposal department to properly
recycle the batteries.
NOTICE
Alkaline batteries lose a significant amount of their capacity as
the temperature decreases. Use lithium batteries when
operating the device in below freezing conditions.
Maximizing the Battery Life
You can do several things to extend the life of the batteries.
• Reduce the backlight brightness (Adjusting the Backlight
Brightness, page 12).
• Reduce the backlight timeout (Display Settings, page 12).
• Use battery save mode (Turning On Battery Save Mode,
page 1).
• Decrease the map drawing speed (Configuring the Maps,
page 12).
Turning On Battery Save Mode
You can use battery save mode to prolong the battery life.
From the app drawer, select Setup > Display > Battery
Save > On.
In battery save mode, the screen shuts off when the backlight
times out. You can select to turn on the screen.
Long-Term Storage
When you do not plan to use the device for several months,
remove the batteries. Stored data is not lost when batteries are
removed.
Installing AA Batteries
Instead of the optional NiMH battery pack (Installing the NiMH
Battery Pack, page 1), you can use two alkaline, NiMH, or
lithium batteries. This is useful when you are on the trail and
cannot charge the NiMH battery pack. Use NiMH or lithium
batteries for best results.
NOTE: Standard alkaline batteries are not recommended for the
Oregon 750 models when using the camera feature.
1
Turn the D-ring counter-clockwise, and pull up to remove the
cover.
2
Insert two AA batteries, observing polarity.
3
Replace the battery cover, and turn the D-ring clockwise.
4
Hold .
5
Select Setup > System > Battery Type.
6
Select Alkaline, Lithium, NiMH, or Precharged NiMH.
Battery Information
WARNING
The temperature rating for the device may exceed the usable
range of some batteries. Alkaline batteries can rupture at high
temperatures.
Do not use a sharp object to remove batteries.
CAUTION
Contact your local waste disposal department to properly
recycle the batteries.
NOTICE
Alkaline batteries lose a significant amount of their capacity as
the temperature decreases. Use lithium batteries when
operating the device in below freezing conditions.
Installing the NiMH Battery Pack
The device operates using the optional NiMH battery pack (not
included with all models) or two AA batteries (Installing AA
Batteries, page 1).
1
Turn the D-ring counter-clockwise, and pull up to remove the
cover.
2
Locate the battery pack
À
.
3
Insert the battery pack, observing polarity.
Introduction 1