Oregon 700 Series ® Owner’s Manual June 2016 190-02075-00_0A
All rights reserved. Under the copyright laws, this manual may not be copied, in whole or in part, without the written consent of Garmin. Garmin reserves the right to change or improve its products and to make changes in the content of this manual without obligation to notify any person or organization of such changes or improvements. Go to www.garmin.com for current updates and supplemental information concerning the use of this product.
Table of Contents Device Overview ......................................................................... 1 Battery Information ................................................................. 1 Installing AA Batteries ............................................................ 1 Installing the NiMH Battery Pack ........................................... 1 Turning On the Device ................................................................ 2 Home Screen ...............................................
Rotating the Screen .................................................................. 12 Display Settings ........................................................................ 12 Configuring the Maps ................................................................ 12 Map Settings ........................................................................ 12 Advanced Map Settings ....................................................... 12 Custom Data Fields and Dashboards ....................................
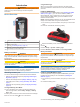
Introduction WARNING See the Important Safety and Product Information guide in the product box for product warnings and other important information. Device Overview À Á Â Ã Ä Å Long-Term Storage When you do not plan to use the device for several months, remove the batteries. Stored data is not lost when batteries are removed. Installing AA Batteries Instead of the optional NiMH battery pack (Installing the NiMH Battery Pack, page 1), you can use two alkaline, NiMH, or lithium batteries.
4 Gently press the battery pack into place. 5 Replace the battery cover, and turn the D-ring clockwise. Charging the Battery Pack NOTICE To prevent corrosion, thoroughly dry the USB port, the weather cap, and the surrounding area before charging or connecting to a computer. Do not attempt to use the device to charge a battery that was not provided by Garmin . Attempting to charge a battery that was not provided by Garmin can damage the device and void the warranty.
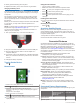
Feature Connected to a Paired Smartphone with the Garmin Connect Mobile App Connected to a Wi‑Fi Network EPO downloads Yes Yes Live geocache data Yes Yes Weather Yes Yes Phone notifications Yes* No Connect IQ Yes No LiveTrack Yes No ® *The device receives phone notifications from a paired iOS phone directly, and through the Garmin Connect Mobile app on an Android™ phone.
Recording an Activity You can record an activity, including the track and sensor data. If your device is connected to a smartphone running the Garmin Connect Mobile app, recorded activities are uploaded automatically to your Garmin Connect account. 1 From the home screen, swipe left or right to select an activity. 2 Select the activity icon or name. The default data screen for the activity appears. 3 Swipe up from the bottom of the screen, and select Start.
Viewing the Elevation Plot of an Activity Searching for a Geocache 1 From the app drawer, select Activity History. 2 Select an activity. 3 Select . You can search the geocaches loaded on your device. If you are connected to geocaching.com, you can search live geocache data and download geocaches. NOTE: You can download detailed information for more than three geocaches per day with a premium membership. Go to www.geocaching.com for more information. 1 From the app drawer, select Geocaching. > .
• To stop logging, select Done. • To enter a comment about looking for the cache or about the cache itself, select Edit Comment, enter a comment, and select . If you are connected to geocaching.com, the log is uploaded to your geocaching.com account automatically. Filtering the Geocache List You can filter your geocache list based on certain factors, such as the level of difficulty. 1 From the app drawer, select Geocaching > .
• Select and to zoom in and out of the map. • Select a location on the map (represented by a pin), and select the information bar at the top of the screen to view information about the selected location. Navigating Using TracBack navigating on water. It can help you navigate back to the course line when you go off-course to avoid obstacles or hazards. To enable the course pointer, from the app drawer, select Setup > Heading > Go To Line (Pointer) > Course (CDI).
3 Select plot type. 3 Select Resetting the Elevation Plot 1 From the app drawer, select Altimeter. 2 Select > Reset > Clear Current Activity > Clear. Increasing the Accuracy of a Waypoint Location Calibrating the Barometric Altimeter You can manually calibrate the barometric altimeter if you know the correct elevation or the correct barometric pressure. 1 Go to a location where the elevation or barometric pressure is known. 2 Select > Altimeter. 3 Select > Altimeter Setup > Calibrate Altimeter.
Editing a Route Sending Files to BaseCamp You can add, remove, or rearrange points on a route. 1 From the app drawer, select Route Planner. 2 Select a route. 3 Select Edit Route. 4 Select a point. 5 Select an option: • To view the point on the map, select Review. • To change the order of the points on the route, select Move Up or Move Down. • To insert an additional point on the route, select Insert. The additional point is inserted before the point you are editing.
A white frame appears on the screen. The device focuses on the object inside of the frame. When the photo is in focus, the frame turns green. 6 Release to take a photo. Applications Sending and Receiving Data Wirelessly Before you can share data wirelessly, you must be within 3 m (10 ft.) of a compatible device. Your device can send and receive data when paired with another compatible device using Bluetooth or ANT+ wireless technology.
Controlling a VIRB Action Camera ® Before you can use the VIRB remote function, you must enable the remote control setting on your VIRB camera. For more information, see the owner's manual for your VIRB camera. 1 Turn on your VIRB camera, and enable the remote control setting. 2 On your device, from the app drawer, select VIRB Remote. 3 Wait while the device connects with your VIRB camera. 4 Select an option: • To record video, drag the slider bar up. • To take a photo, select .
Customizing the Device Customizing the Keys You can customize some device key actions to provide quick access to menus, settings, apps, or other device functions. 1 From the app drawer, select Setup > System > Configure Keys. 2 Select Power Key or User Key. 3 Select Single Tap, Double Tap, or Hold. 4 Select an option. Adjusting the Backlight Brightness You can adjust the backlight brightness to maximize the battery life. 1 Swipe down from the top of the screen. 2 Select or .
multiple actions simultaneously. If the shortcut does not appear in the list, you can create it (Creating a Shortcut, page 13). 1 From the app drawer, select Setup > Shortcuts. 2 Select the shortcut. 3 Select Add to Menu. 4 Select Main Menu, Drawer, or Favorites. Creating a Shortcut 1 From the app drawer, select Setup > Shortcuts > Create Shortcut. 2 Select Name, and enter a name. 3 Select Icon, and select an icon. 4 Select an option: • To add a shortcut to a specific device setting. select Setup.
Calibrate Altimeter: Allows you to calibrate the barometric altimeter when you know the correct elevation or the correct barometric pressure (Calibrating the Barometric Altimeter, page 8). Position Format Settings NOTE: You should not change the position format or the map datum coordinate system unless you are using a map or chart that specifies a different position format. From the app drawer, select Setup > Position Format. Position Format: Sets the position format in which a location reading appears.
1 From the app drawer, select Setup. 2 Select a category to restore. 3 Select > Restore Defaults. Restoring Default Values for Specific Page Settings You can restore the default values for settings for the map, compass, trip computer, and elevation plot. 1 Open the page for which you will restore the settings. 2 Select > Restore Defaults. Restoring All Default Settings You can reset all settings back to the factory default settings. From the app drawer, select Setup > Reset > Reset All Settings > Reset.
3 In the battery compartment, slide the card holder À to the left and lift up. Disconnecting the USB Cable If your device is connected to your computer as a removable drive or volume, you must safely disconnect your device from your computer to avoid data loss. If your device is connected to your Windows computer as a portable device, it is not necessary to safely disconnect. 1 Complete an action: • For Windows computers, select the Safely Remove Hardware icon in the system tray, and select your device.
Ambient Pressure: The uncalibrated environmental pressure. Ascent - Average: The average vertical distance of ascent since the last reset. Ascent - Maximum: The maximum rate of ascent in feet per minute or meters per minute since the last reset. Ascent - Total: The total elevation distance ascended since the last reset. Automotive Turn: The direction of the next turn in the route. You must be navigating for this data to appear. Average Cadence: The average cadence for the current activity.
Speed - Overall Avg.: The average speed while moving and stopped since the last reset. Stopwatch Timer: The stopwatch time for the current activity. Sunrise: The time of sunrise based on your GPS position. Sunset: The time of sunset based on your GPS position. Temperature: The temperature of the air. Your body temperature affects the temperature sensor. Temperature - Water: The temperature of the water. Your device must be connected to a NMEA 0183 device capable of acquiring the water temperature.
Index A accessories 11, 15 activities 3–5, 11 custom 4 addresses, finding 7 adventures 9 alarms clock 10 marine 14 proximity 10 tones 13 almanac hunting and fishing 10 sunrise and sunset times 10 altimeter 7, 8, 13 ANT+ sensors 14 pairing 11 ANT+ sensors, pairing 11 applications 2, 3 area calculation 10 Auto Lap 14 B backlight 1, 12 barometer 8 BaseCamp 9, 10, 15 battery 1, 16 charging 2 installing 1 maximizing 1, 12 storage 1 Bluetooth technology 2 C calendar 10 calibrating altimeter 8 compass 7 camera 9
www.garmin.