
User manual

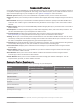
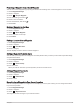
Table Of Contents
- Table of Contents
- Introduction
- inReach Features
- Viewing the Main Pages
- Connected Features
- Navigation
- Where To? Page
- Waypoints
- Saving Your Current Location as a Waypoint
- Saving a Location on the Map as a Waypoint
- Navigating to a Waypoint
- Finding a Waypoint
- Editing a Waypoint
- Deleting a Waypoint
- Changing the Photo for a Waypoint
- Increasing the Accuracy of a Waypoint Location
- Projecting a Waypoint from a Saved Waypoint
- Moving a Waypoint on the Map
- Finding a Location Near a Waypoint
- Setting a Waypoint Proximity Alarm
- Adding a Waypoint to a Route
- Repositioning a Waypoint to Your Current Location
- Routes
- Recordings
- Courses
- Weather
- Main Menu Applications
- Customizing the Main Menu
- Garmin Adventures
- Setting an Alarm
- Calculating the Size of an Area
- BirdsEye Imagery
- Camera and Photos
- Dog Tracking
- Using the Flashlight
- Geocaches
- Using the inReach Remote
- Marking and Starting Navigation to a Man Overboard Location
- Selecting a Profile
- Setting a Proximity Alarm
- Satellite Page
- Sending and Receiving Data Wirelessly
- Using the VIRB Remote
- Customizing the Device
- Custom Data Fields and Dashboards
- Rotating the Screen
- Setup Menu
- System Settings
- Display Settings
- Bluetooth Settings
- Wi‑Fi Settings
- Routing Settings
- Turning On Expedition Mode
- Setting the Device Tones
- Camera Settings
- Geocaching Settings
- Wireless Sensors
- Fitness Settings
- Marine Settings
- Menu Settings
- Position Format Settings
- Changing the Units of Measure
- Time Settings
- Accessibility Settings
- Profiles
- Resetting Data and Settings
- Device Information
- Appendix
- Index

Heading Settings
From the compass, select , and select Heading Setup.
Display: Sets the type of directional heading shown on the compass.
North Reference: Sets the north reference used on the compass.
Go To Line (Pointer): Sets the behavior of the pointer that appears on the map. Bearing points in the direction of
your destination. Course (CDI) shows your relationship to the course line leading to the destination.
Compass: Automatically switches from an electronic compass to a GPS compass when you are traveling at a
higher rate of speed for a period of time.
Calibrate Compass: Allows you to calibrate the compass if you experience irregular compass behavior, for
example, after moving long distances or after extreme temperature changes (Calibrating the Compass,
page 14).
Course Pointer
The course pointer is most useful when you are navigating to your destination in a straight line, such as when
you are navigating on water. It can help you navigate back to the course line when you go off-course to avoid
obstacles or hazards.
To enable the course pointer, from the compass, select > Heading Setup > Go To Line (Pointer) > Course
(CDI).
Course line pointer. Indicates the direction of the desired course line from your starting point to your next
waypoint.
Course deviation indicator (CDI). Indicates the location of the desired course line in relation to your
location. If the CDI is aligned with the course line pointer, you are on course.
Course deviation distance. The dots indicate your distance off course. The distance represented by each
dot is indicated by the scale in the upper-right corner.
To-and-from indicator. Indicates whether you are headed to or from the next waypoint.
Trip Computer
The trip computer displays your current speed, average speed, trip odometer, and other helpful statistics. You
can customize the trip computer layout, dashboard, and data fields.
Viewing the Main Pages 15