
User manual


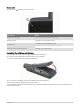

Table Of Contents
- Table of Contents
- Introduction
- inReach Features
- Viewing the Main Pages
- Connected Features
- Navigation
- Where To? Page
- Waypoints
- Saving Your Current Location as a Waypoint
- Saving a Location on the Map as a Waypoint
- Navigating to a Waypoint
- Finding a Waypoint
- Editing a Waypoint
- Deleting a Waypoint
- Changing the Photo for a Waypoint
- Increasing the Accuracy of a Waypoint Location
- Projecting a Waypoint from a Saved Waypoint
- Moving a Waypoint on the Map
- Finding a Location Near a Waypoint
- Setting a Waypoint Proximity Alarm
- Adding a Waypoint to a Route
- Repositioning a Waypoint to Your Current Location
- Routes
- Recordings
- Courses
- Weather
- Main Menu Applications
- Customizing the Main Menu
- Garmin Adventures
- Setting an Alarm
- Calculating the Size of an Area
- BirdsEye Imagery
- Camera and Photos
- Dog Tracking
- Using the Flashlight
- Geocaches
- Using the inReach Remote
- Marking and Starting Navigation to a Man Overboard Location
- Selecting a Profile
- Setting a Proximity Alarm
- Satellite Page
- Sending and Receiving Data Wirelessly
- Using the VIRB Remote
- Customizing the Device
- Custom Data Fields and Dashboards
- Rotating the Screen
- Setup Menu
- System Settings
- Display Settings
- Bluetooth Settings
- Wi‑Fi Settings
- Routing Settings
- Turning On Expedition Mode
- Setting the Device Tones
- Camera Settings
- Geocaching Settings
- Wireless Sensors
- Fitness Settings
- Marine Settings
- Menu Settings
- Position Format Settings
- Changing the Units of Measure
- Time Settings
- Accessibility Settings
- Profiles
- Resetting Data and Settings
- Device Information
- Appendix
- Index

Charging the Battery Pack
NOTICE
To prevent corrosion, thoroughly dry the USB port, the weather cap, and the surrounding area before charging or
connecting to a computer.
Do not attempt to use the device to charge a battery that was not provided by Garmin
®
. Attempting to charge a
battery that was not provided by Garmin can damage the device and void the warranty.
Before you can connect the USB cable to your device, you may need to remove optional mount accessories.
NOTE: The device does not charge when outside the approved temperature range (Specifications, page 60).
You can charge the battery using a standard wall outlet or a USB port on your computer.
1 Pull up the weather cap from the USB port .
2 Plug the small end of the USB cable into the USB port on your device.
3 Plug the large end of the USB cable into an AC adapter or a computer USB port.
4 If necessary, plug the AC adapter into a standard wall outlet.
When you connect the device to a power source, the device turns on.
5 Charge the battery completely.
TIP: The battery gauge appears in the status bar.
Charging the Device More Quickly
1 Connect your device to an AC adapter.
2 Plug the AC adapter into a standard wall outlet.
3 Hold the power button until the battery gauge appears.
4 Hold the power button again until the screen turns off.
The device goes into a low power, battery charging mode.
5 Charge the device completely.
NOTE: You can view the battery gauge by pressing the power button to turn on the screen.
Long-Term Storage
When you do not plan to use the device for several months, you should charge the battery to at least 50% before
you store the device. You should store the device in a cool, dry place with temperatures around the typical
household level. After storage, you should fully recharge the device before using it.
4 Introduction