MONTANA 700 SERIES ® Owner’s Manual
© 2020 Garmin Ltd. or its subsidiaries All rights reserved. Under the copyright laws, this manual may not be copied, in whole or in part, without the written consent of Garmin. Garmin reserves the right to change or improve its products and to make changes in the content of this manual without obligation to notify any person or organization of such changes or improvements. Go to www.garmin.com for current updates and supplemental information concerning the use of this product.
Table of Contents Introduction......................................1 Device Overviews.................................... 1 Montana 700i/750i Device Overview............................................... 1 Montana 700 Device Overview........... 2 Status LED........................................... 3 Installing the Lithium-ion Battery........... 3 Charging the Battery Pack.................. 4 Charging the Device More Quickly..... 4 Long-Term Storage............................. 4 Using the Power Button..
Saving a Location on the Map as a Waypoint............................................ 21 Navigating to a Waypoint.................. 21 Finding a Waypoint............................ 22 Editing a Waypoint............................ 22 Deleting a Waypoint.......................... 22 Changing the Photo for a Waypoint............................................ 22 Increasing the Accuracy of a Waypoint Location............................................. 22 Projecting a Waypoint from a Saved Waypoint........
chirp................................................... 42 Removing Live Geocache Data from the Device.......................................... 42 Removing Your Device Registration From Geocaching.com..................... 42 Using the inReach Remote................... 43 Marking and Starting Navigation to a Man Overboard Location...................... 43 Selecting a Profile................................. 43 Setting a Proximity Alarm..................... 43 Editing or Deleting a Proximity Alarm..........
Introduction WARNING See the Important Safety and Product Information guide in the product box for product warnings and other important information.
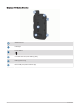
Montana 700 Device Overview GNSS antenna Flashlight Power button microSD card slot (under battery pack) Battery pack D-ring Micro-USB port (under weather cap) 2 Introduction
Status LED The status LED indicates the device status. LED Activity Status Double flashing green You have an unread inReach message. Flashing green The device is in expedition mode. Flashing red Alternating red and green flashes ® An inReach message failed to send. The device is below 10-percent battery power. The device is in SOS mode. Installing the Lithium-ion Battery 1 Locate the Lithium-ion battery pack included in the product box.
Charging the Battery Pack NOTICE To prevent corrosion, thoroughly dry the USB port, the weather cap, and the surrounding area before charging or connecting to a computer. Do not attempt to use the device to charge a battery that was not provided by Garmin . Attempting to charge a battery that was not provided by Garmin can damage the device and void the warranty. ® Before you can connect the USB cable to your device, you may need to remove optional mount accessories.
Using the Power Button By default, you can use the power button to turn the device on and off, turn off the screen, and open the status page. You can customize the power button functions (Customizing the Power Button, page 48). • Press to turn on the device. • Press to open the status page. • Press twice to turn off the screen. TIP: You can press to turn the screen back on. • Hold to turn off the device.
Activating the Device WARNING Before you can use the inReach features of your Montana 700i/750i device, you must activate it (inReach Features, page 7). 1 2 3 4 Create an account, and select a satellite subscription at explore.garmin.com. Turn on the device. Select Next. Follow the on-screen instructions. NOTE: You must enter the device IMEI number and authorization code to complete the online portion of activation before you go outdoors.
Status Icons ANT+ sensor status ® GPS signal strength Charging battery Charging complete Bluetooth technology status Wi‑Fi status Sending, receiving, or searching for inReach messages and tracking points Unread inReach messages inReach tracking status Touchscreen locked inReach Features WARNING Messaging, tracking, and SOS functions require an active satellite subscription. Always test your device before you use it outdoors.
Sending a Text Message 1 Select inReach > Messages > New Message. 2 Select an option: • To start with a pre-written message, select Send Quick Text. NOTE: You can add and edit quick text messages on the Garmin Explore website. • To write a custom message, select Type Message. 3 Select To to choose recipients from your contacts list, or enter each recipient's contact information. 4 After you have finished your message, select Send Message. Replying to a Message 1 2 3 4 Select inReach > Messages.
Including Location Coordinates in a Message If you are sending a message to a recipient who may not have internet access, you can include your location coordinates in the message. For example, if your recipient has an older model cell phone that does not support viewing maps or is outside of a mobile data coverage area and cannot view a web page. 1 Select inReach > Messages > New Message > Send Location. 2 Enter one or more recipients. 3 If necessary, enter a message. 4 Select Send Message.
SOS During an emergency, you can use your Montana 700i/750i device to contact the Garmin International Emergency Response Coordination Center (IERCC) to request help. Pressing the SOS button sends a message to the Garmin IERCC, and they notify the appropriate emergency responders of your situation. You can communicate with the Garmin IERCC during your emergency while you wait for help to arrive. You should only use the SOS function in a real emergency situation.
Canceling an SOS Request If you no longer need assistance, you can cancel an SOS request after it is sent to the emergency response service. 1 Lift the protective cap, and hold the SOS button. 2 Select Cancel SOS. 3 When prompted to confirm your cancellation request, select Cancel SOS. Your device transmits the cancellation request. When you receive a confirmation message from the emergency response service, the device returns to normal operation.
Viewing Plan Details 1 Select inReach > inReach Utilities. 2 Select . Viewing Data Use You can view the number of messages, preset messages, and track points sent during the current billing cycle. The data use counter resets automatically at the beginning of each billing cycle. 1 Select inReach > inReach Utilities. 2 Select . Viewing the Main Pages The information needed to operate this device is found on the main pages.
Map Settings From the map, select , and select Map Setup. Configure Maps: Enables or disables the maps currently loaded on the device (Enabling Maps, page 21). Orientation: Adjusts how the map is shown on the page (Changing the Map Orientation, page 13). Dashboard: Sets a dashboard to display on the map. Each dashboard shows different information about your route or your location. Guidance Text: Sets when the guidance text is shown on the map.
Compass Settings From the compass, select . Sight 'N Go: Allows you to point the device at an object in the distance, and navigate using the object as a reference point (Navigating with Sight 'N Go, page 14). Stop Navigation: Stops navigation of the current route. Change Dashboard: Changes the theme and information displayed on the dashboard. Set Scale: Sets the scale for the distance between the dots on the course deviation indicator when navigating with Sight 'N Go.
Heading Settings From the compass, select , and select Heading Setup. Display: Sets the type of directional heading shown on the compass. North Reference: Sets the north reference used on the compass. Go To Line (Pointer): Sets the behavior of the pointer that appears on the map. Bearing points in the direction of your destination. Course (CDI) shows your relationship to the course line leading to the destination.
Trip Computer Settings From the trip computer, select . Reset: Resets all the trip computer values to zero. For accurate information, reset the trip information before beginning a trip. Change Dashboard: Changes the theme and information displayed on the dashboard. NOTE: Your customized settings are remembered by the dashboard. Your settings are not lost when you change profiles (Profiles, page 53). Lock Data Fields: Locks the data fields. You can unlock the data fields to customize them.
Connected Features Connected features are available for your Montana device when you connect the device to a wireless network or a compatible smartphone using Bluetooth technology. Some features require you to install the Garmin Connect™ app or Garmin Explore app on your smartphone. Go to garmin.com/apps for more information. Bluetooth sensors: Allows you to connect Bluetooth compatible sensors, such as a heart rate monitor.
Pairing a Smartphone with Your Device 1 Bring your compatible smartphone within 10 m (33 ft.) of your device. 2 On your compatible smartphone, enable Bluetooth technology, and download and open the Garmin Explore or Garmin Connect app. 3 On your Montana device, select Setup > Pair Phone > Pair. 4 From the app, select the devices option and follow the on-screen instructions to pair your device. Phone Notifications Phone notifications require a compatible smartphone to be in range and paired with the device.
Connect IQ Features You can add Connect IQ features to your device from Garmin and other providers using the Connect IQ app. You can customize your device with data fields, widgets, and apps. Data Fields: Allow you to download new data fields that present sensor, activity, and history data in new ways. You can add Connect IQ data fields to built-in features and pages. Widgets: Provide information at a glance, including sensor data and notifications.
Disconnecting or Removing a Wireless Headset 1 Select Setup > Bluetooth > Audio Device. 2 Select your headset. 3 Select an option: • To temporarily disconnect a headset without deleting it from the paired devices list, select Disconnect Device. • To delete a headset from the paired devices list, select Remove. Navigation You can use the GPS navigation features on your device to navigate a saved activity, route, or course. • Your device records your path as an activity. Activities use corridor navigation.
Navigating a Driving Route Before you can navigate street routes, you must have City Navigator maps or other maps with street routes installed. 1 Select Profile Change > Driving. 2 Select a destination. 3 Navigate using the map. Turns appear in the text bar along the top of the map. Audible tones signal turns in the route. Optional Maps You can use additional maps with the device, such as BirdsEye satellite imagery, City Navigator, and Garmin HuntView™ Plus detailed maps.
Finding a Waypoint 1 2 3 4 Select Waypoint Manager. Select a waypoint from the list. If necessary, select to narrow the search. Select an option: • Select Spell Search to search using the name of the waypoint. • Select Select Symbol to search using the symbol of the waypoint. • Select Search Near to search near a recently found location, another waypoint, your current location, or a point on the map. • Select Sort to view the list of waypoints based on nearest distance or alphabetical order.
Projecting a Waypoint from a Saved Waypoint You can save a new waypoint by projecting the distance and bearing from a saved waypoint to a new location. 1 Select Waypoint Manager. 2 Select a waypoint. 3 Select > Project Waypoint. 4 Enter the bearing, and select . 5 Select a unit of measure. 6 Enter the distance, and select . 7 Select Save. Moving a Waypoint on the Map 1 2 3 4 5 Select Waypoint Manager. Select a waypoint. Select > Move Waypoint. Select a location on the map. Select Move.
Routes A route is a sequence of waypoints or locations that leads you to your final destination. Routes are saved as GPX files on the device. Creating a Route 1 2 3 4 5 6 7 Select Route Planner > Create Route > Add Point. Select a category. Select the first point in the route. Select Add. Select Add Point to add additional points to the route. Select Done. Edit the route name if necessary, and select to save the route.
Adding Points to a Route 1 2 3 4 While navigating a route, select a location on the map. Select the information bar at the top of the screen. Select Go. Select an option: • To add the point as an intermediate destination in the current route, select Add as Via Point. • To change the current route destination to the new point, select Set as New Destination. Viewing the Active Route 1 While navigating a route, select Active Route. 2 Select a point in the route to view additional details.
Deleting a Route 1 Select Route Planner. 2 Select a route. 3 Select > Delete. Recordings Your device records your path as an activity. Activities contain information about points along your recorded path, including time and location for each point. Activities are saved as FIT files on the device. Recording Settings Select Setup > Recording. Record Method: Sets the recording method. The Auto option records points at a variable rate to create an optimum representation of your path.
Viewing the Current Activity By default, the device automatically starts recording your path as an activity when it is turned on and has acquired satellite signals. You can pause and start recording manually. 1 Select to open the status page. 2 Select Activity Recording. 3 Select an option: • To control the current activity recording, select . • To view data fields for the activity, select . • To view the current activity on the map, select . • To view the elevation plot for the current activity, select .
Clearing the Current Activity 1 Select to open the status page. 2 Select Activity Recording. 3 Select > > Clear. History History includes date, time, distance, calories, average speed or pace, ascent, descent, and optional wireless sensor information. NOTE: History is not recorded while the timer is stopped or paused. When the device memory is full, a message appears. The device does not automatically delete or overwrite your history.
Deleting a Saved Activity 1 Select Recorded Activities. 2 Select an activity. 3 Select > Delete. Courses A course can have multiple destinations, and can be navigated point to point or on routable roads. Courses are saved as FIT files on the device. Creating a Course 1 2 3 4 5 6 7 8 9 Select Course Planner > Create Course. Select a course creation method. Select Add Point. Select a category. Select the first point in the course. Select Add. Select Add Point to add additional points to the course.
Editing a Course 1 2 3 4 5 6 Select Course Planner. Select a course. Select a field to edit, such as the name of the course or the course color. Select Edit Course. Select a point. Select an option: • To view the point on the map, select Review. • To edit the name of the point, select Edit Name. • To edit the symbol used to represent the point, select Edit Icon. • To change the order of the points on the course, select Move Up or Move Down.
Deleting a Course 1 Select Course Planner. 2 Select a course. 3 Select > Delete. Weather Active Weather: While your Montana device is connected to your smartphone or to a Wi‑Fi network and has an active internet connection, it can receive detailed weather information from the internet. This feature provides hourly and daily forecasts and live graphical weather maps. inReach Weather: Your Montana 700i/750i can receive weather information through your inReach subscription.
Viewing an Active Weather Forecast While your Montana device is connected to your smartphone or to a Wi‑Fi network and has an active internet connection, it can receive detailed weather information from the internet. 1 Select Active Weather. The device automatically downloads a weather forecast for your current location. 2 Select a day to view an hourly forecast, if available. 3 Select a time interval to view detailed weather information.
Main Menu Applications Select . NOTE: Some applications do not appear in the main menu by default. You may need to add applications to the main menu before you can select them (Customizing the Main Menu, page 34). Active Route: Displays your active route and all upcoming waypoints (Routes, page 24). Active Weather: Displays the current temperature, temperature forecast, weather forecast, weather radar, cloud cover, and wind conditions (Viewing an Active Weather Forecast, page 32).
Notifications: Alerts you to incoming calls, texts, social network updates, and more, based on your smartphone notification settings (Phone Notifications, page 18). Photo Viewer: Displays saved photos (Viewing Photos, page 37). Profile Change: Allows you to change the device profile to customize your settings and data fields for a particular activity or trip (Selecting a Profile, page 43).
Customizing and Sharing the Main Menu You can customize the main menu, save your customization as a new profile, and share the profile with other Montana devices. This allows you to display the same main menu settings on multiple devices. This can be useful if you share multiple devices with other users in your organization. 1 Customize the main menu by adding, moving, and deleting items as needed (Customizing the Main Menu, page 34). 2 Create a new profile (Creating a Custom Profile, page 53).
Starting an Adventure Before you can start an adventure, you must send an adventure from BaseCamp to your device (Sending Files to and from BaseCamp, page 35). When you start a saved adventure, the device follows the saved track and displays shortcuts to related information along the track, such as photos and waypoints. 1 Select Adventures. NOTE: You may need to add this application to the main menu before you can select it (Customizing the Main Menu, page 34). 2 Select an adventure. 3 Select Start.
Downloading BirdsEye Imagery Before you can download BirdsEye imagery directly to your device, you must connect to a wireless network (Connecting to a Wireless Network, page 18). 1 Select BirdsEye Direct > Download Imagery. 2 Select an option: • To download BirdsEye imagery files for a specific location or area, select Location, and select a category. NOTE: The location defaults to your current location. • To edit the name of the downloaded imagery files, select Name.
Navigating to a Photo 1 Select Photo Viewer. 2 Select a photo. 3 Select > View Information > Go. Deleting a Photo 1 Select Photo Viewer. 2 Select a photo. 3 Select > Delete Photo > Delete. Viewing a Slideshow 1 Select Photo Viewer. 2 Select a photo. 3 Select > View Slideshow. Dog Tracking The dog tracking features allow you to see information transmitted from your compatible handheld dog tracking device on your Montana device.
Dog Status Icons Icons on the dog list page indicate the status and location of your dogs. Sitting Running On point Treed Unknown1 Using the Flashlight NOTE: Using the flashlight can reduce battery life. You can reduce the brightness or flash frequency to extend the life of the battery. 1 Select Flashlight > . NOTE: You may need to add this application to the main menu before you can select it (Customizing the Main Menu, page 34). 2 If necessary, use the brightness slider to adjust the brightness.
Downloading Geocaches Using a Computer You can load geocaches manually onto your device using a computer (Transferring Files to Your Device, page 59). You can place the geocache files into a GPX file and import them into the GPX folder on the device. With a premium membership to geocaching.com, you can use the "pocket query" feature to load a large group of geocaches onto your device as a single GPX file. 1 Connect the device to your computer using a USB cable. 2 Go to www.geocaching.com.
Filtering the Geocache List You can filter your geocache list based on certain factors, such as the level of difficulty. 1 Select Geocaching > > Filter. 2 Select one or more options to filter: • To filter by a geocache category, such as puzzle or event, select Type. • To filter by the physical size of the geocache container, select Cache Size. • To filter by Unattempted, Did Not Find, or Found geocaches, select Status.
Logging the Attempt After you have attempted to find a geocache, you can log your results. You can verify some geocaches at www.geocaching.com. 1 Select Geocaching > Log. 2 Select Found, Did Not Find, Needs Repair, or Unattempted. 3 Select an option: • To stop logging, select Done. • To begin navigation to the geocache nearest you, select Find Next Closest. • To enter a comment about looking for the cache or about the cache itself, select Edit Comment, enter a comment, and select Done.
Using the inReach Remote The inReach remote function allows you to control a compatible inReach device using your Montana 700 device. 1 Turn on the inReach device. 2 On your Montana 700 device, select inReach Remote. NOTE: You may need to add this application to the main menu before you can select it (Customizing the Main Menu, page 34). 3 If necessary, select Yes. 4 Wait while the Montana 700 device connects to your inReach device.
Editing or Deleting a Proximity Alarm 1 Select Proximity Alarms. 2 Select an alarm. 3 Select an option: • To edit the radius, select Change Radius. • To view the alarm on a map, select View Map. • To delete the alarm, select Delete. Setting the Proximity Alarm Tones You can customize tones for proximity alarms. 1 Select Proximity Alarms > > Alarm Tones Setup. 2 Select a tone for each audible alarm type. Disabling All Proximity Alarms Select Proximity Alarms > > Disable All Alarms.
Using the VIRB Remote Before you can use the VIRB remote function, you must enable the remote setting on your VIRB camera. See the VIRB Series Owner's Manual for more information. The VIRB remote function allows you to control your VIRB action camera using your device. 1 Turn on your VIRB camera. 2 On your Montana device, select VIRB Remote. NOTE: You may need to add this application to the main menu before you can select it (Customizing the Main Menu, page 34).
Rotating the Screen Rotate your device to view in horizontal (landscape) or vertical (portrait) mode. NOTE: While using the inReach features of your Montana 700i/750i device, you should use the device in vertical (portrait) mode, with the antenna pointed toward the sky.
Setup Menu Select Setup. System: Allows you to customize system settings (System Settings, page 48). Display: Adjusts the backlight and display settings (Display Settings, page 49). Bluetooth: Pairs your device to a smartphone or audio device, and allows you to customize the Bluetooth settings (Bluetooth Settings, page 49). Wi-Fi: Allows you to connect to wireless networks (Wi‑Fi Settings, page 49).
System Settings Select Setup > System. Satellite: Allows you to adjust the satellite system settings (Satellite Settings, page 48). Language: Sets the text language on the device and the language for voice prompts. NOTE: Changing the text language does not change the language of user-entered data or map data. Power Key: Allows you to assign shortcuts to the power key (Customizing the Power Button, page 48).
Display Settings Select Setup > Display. Backlight Timeout: Sets the length of time before the backlight turns off. Orientation Lock: Locks the screen orientation in portrait or landscape mode, or allows the screen to change orientation automatically based on the device orientation. Auto Lock Screen: Sets the screen to lock automatically. Battery Save: Saves the battery power and prolongs the battery life by turning off the screen when the backlight times out (Turning On Battery Save Mode, page 49).
Routing Settings The available routing settings vary based on whether Direct Routing is enabled or disabled. Select Setup > Routing. Direct Routing: Enables or disables direct routing. Direct routing calculates the most direct route possible to the destination. Activity: Sets an activity while routing. The device calculates routes optimized for the type of activity you are doing. Lock On Road: Locks the blue triangle, which represents your position on the map, onto the nearest road.
Geocaching Settings Select Setup > Geocaching. Geocaching Live: Allows you to remove live geocache data from your device and remove your device registration from geocaching.com (Removing Live Geocache Data from the Device, page 42, Removing Your Device Registration From Geocaching.com, page 42). Geocache Style: Sets the device to display the geocache list using names or codes. chirp Setup: Allows you to enable chirp searching and program a chirp accessory (chirp, page 42).
Marking Laps by Distance You can use Auto Lap to automatically mark the lap at a specific distance. This feature is helpful for comparing your performance over different parts of an activity. 1 Select Setup > Fitness > Auto Lap. 2 Enter a value, and select . ® Setting Your Fitness User Profile The device uses information that you enter about yourself to calculate accurate data.
Position Format Settings NOTE: You should not change the position format or the map datum coordinate system unless you are using a map or chart that specifies a different position format. Select Setup > Position Format. Position Format: Sets the position format in which a location reading appears. Map Datum: Sets the coordinate system on which the map is structured. Map Spheroid: Shows the coordinate system the device is using. The default coordinate system is WGS 84.
Editing a Profile Name 1 2 3 4 Select Setup > Profiles. Select a profile. Select Edit Name. Enter the new name. Deleting a Profile NOTE: Before you can delete the active profile, you must activate a different profile. You cannot delete a profile while it is active. 1 Select Setup > Profiles. 2 Select a profile. 3 Select Delete. Setting the Mount Profiles You can assign a profile to be used for each of the mounting options. 1 Select Setup > Profiles > > Set Mount Profiles. 2 Select a mounting option.
Setting Up Garmin Express 1 Connect the device to your computer using a USB cable. 2 Go to garmin.com/express. 3 Follow the on-screen instructions. Getting More Information You can find more information about this product on the Garmin website. • Go to support.garmin.com for additional manuals, articles, and software updates. • Go to buy.garmin.com, or contact your Garmin dealer for information about optional accessories and replacement parts.
Installing AA Batteries Instead of the included lithium-ion battery pack (Installing the Lithium-ion Battery, page 3), you can use three AA batteries with an optional AA battery pack (not included). This is useful when you are on the trail and cannot charge the lithium-ion battery pack. Garmin recommends lithium AA batteries for best results. NOTE: The optional AA battery pack is compatible with the Montana 700 device only.
NOTICE To prevent corrosion, remove the batteries from the battery pack when not in use, and store the battery pack in a dry location. Device Care NOTICE Do not store the device where prolonged exposure to extreme temperatures can occur, because it can cause permanent damage. Never use a hard or sharp object to operate the touchscreen, or damage may result. Avoid chemical cleaners, solvents, sunscreen, and insect repellents that can damage plastic components and finishes.
Installing a Memory Card WARNING Do not use a sharp object to remove user-replaceable batteries. You can install a microSD memory card, up to 32 GB, in the handheld device for additional storage or pre-loaded maps. 1 Turn the D-ring counter-clockwise, and pull up to remove the battery pack. 2 Slide the card holder to and lift up. 3 Place the memory card with the gold contacts facing down. 4 Close the card holder. 5 Slide the card holder to to lock it. 6 Replace the battery pack.
Transferring Files to Your Device 1 Connect the device to your computer. On Windows computers, the device appears as a removable drive or a portable device, and the memory card may appear as a second removable drive. On Mac computers, the device and memory card appear as mounted volumes. NOTE: Some computers with multiple network drives may not display device drives properly. See your operating system documentation to learn how to map the drive. 2 On your computer, open the file browser. 3 Select a file.
Specifications Montana 700i/750i battery type Rechargeable lithium-ion battery Montana 700 Rechargeable lithium-ion battery or three AA batteries (NiMH, alkaline, or lithium). Lithium recommended. NOTE: The optional AA battery pack is not included. Battery life Up to 18 hr. in GPS mode Up to 2 wk.
Appendix Data Fields Some data fields require you to be navigating or require wireless accessories to display data. 24 hr. Max. Temperature: The maximum temperature recorded in the last 24 hours from a compatible temperature sensor. 24 hr. Min. Temperature: The minimum temperature recorded in the last 24 hours from a compatible temperature sensor. Accuracy of GPS: The margin of error for your exact location. For example, your GPS location is accurate to within +/- 3.65 m (12 ft.).
Elevation - Minimum: The lowest elevation reached since the last reset. ETA at Destination: The estimated time of day when you will reach the final destination (adjusted to the local time of the destination). You must be navigating for this data to appear. ETA at Next: The estimated time of day when you will reach the next waypoint on the route (adjusted to the local time of the waypoint). You must be navigating for this data to appear.
Speed - Maximum: The highest speed reached since the last reset. Speed - Moving Avg.: The average speed while moving since the last reset. Speed - Overall Avg.: The average speed while moving and stopped since the last reset. Stopwatch Timer: The stopwatch time for the current activity. Sunrise: The time of sunrise based on your GPS position. Sunrise/Sunset: The time of the next sunrise or sunset based on your GPS position. Sunset: The time of sunset based on your GPS position.
Tips for Pairing ANT+ Accessories with Your Garmin Device • Verify that the ANT+ accessory is compatible with your Garmin device. • Before you pair the ANT+ accessory with your Garmin device, move 10 m (33 ft.) away from other ANT+ accessories. • Bring the Garmin device within range 3 m (10 ft.) of the ANT+ accessory. • After you pair the first time, your Garmin device automatically recognizes the ANT+ accessory each time it is activated.
Fitness Goals Knowing your heart rate zones can help you measure and improve your fitness by understanding and applying these principles. • Your heart rate is a good measure of exercise intensity. • Training in certain heart rate zones can help you improve cardiovascular capacity and strength. If you know your maximum heart rate, you can use the table (Heart Rate Zone Calculations, page 65) to determine the best heart rate zone for your fitness objectives.
Index A accessories 51, 55, 63, 64 activities 5, 26–29 addresses, finding 20 adventures 35, 36 alarms clock 33, 36 marine 52 proximity 23, 43, 44 tones 44 altimeter 16 ANT+ sensors 51 pairing 64 applications 17, 19 area calculation 33, 36 Auto Lap 52 B backlight 5, 49 barometer 16 BaseCamp 35 battery charging 4 installing 3, 56 level 3 maximizing 5, 49, 50, 64 storage 4 BirdsEye imagery 33 Bluetooth sensors 51 Bluetooth technology 7, 17, 18, 49 C calculator 33 calendar 33 calibrating, altimeter 16 came
trip information, viewing 15 trip planner.
support.garmin.