INREACH MINI 2 ® Owner’s Manual
© 2022 Garmin Ltd. or its subsidiaries All rights reserved. Under the copyright laws, this manual may not be copied, in whole or in part, without the written consent of Garmin. Garmin reserves the right to change or improve its products and to make changes in the content of this manual without obligation to notify any person or organization of such changes or improvements. Go to www.garmin.com for current updates and supplemental information concerning the use of this product.
Table of Contents Introduction......................................1 Getting Started........................................ 1 Device Overview...................................... 2 Buttons..................................................... 2 Turning On the Device......................... 3 Viewing the Main Menu.......................3 Power Menu......................................... 3 Viewing the Widget Glances............... 4 Widget Glances.................................... 4 Status Icons.......
inReach Remote Settings..................... 19 System Settings.................................... 19 Time Settings.................................... 19 Units Settings.................................... 20 Device Information......................... 20 Product Updates................................... 20 Setting Up Garmin Express............... 20 Getting More Information................. 20 Viewing E-Label Regulatory and Compliance Information.......................
Introduction WARNING See the Important Safety and Product Information guide in the product box for product warnings and other important information. Getting Started When using your device the first time, you should complete these tasks to set it up and get to know the basic features. 1 Press and hold to turn on the device. 2 Follow the on-screen instructions to select your language and begin activating your device. 3 From your computer or smartphone, go to explore.garmin.
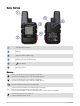
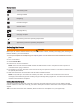
Device Overview Internal Iridium antenna ® Buttons USB port (under weather cap) SOS button (under protective cap) Power button Mounting screw Buttons Press to scroll through menus, pages, and settings. From the home page, press to view the widget glances. Press to scroll through menus, pages, and settings. From the home page, press to view the widget glances. Press to cancel or return to the previous page. OK Press to choose an option or to acknowledge a message.
Turning On the Device Press and hold . Viewing the Main Menu 1 From the home page, press OK to open the main menu. 2 Press or to scroll through the menu options. Power Menu The Power menu displays the device battery life. It also allows you to adjust settings and turn off the device. Press to open the power menu. : Displays the current battery level. Lock Buttons: Locks the device buttons to prevent inadvertent button presses. Mute Sounds: Mutes all device tones.
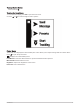
Viewing the Widget Glances Widget glances provide quick access to messages, tracking, navigation, weather, and more (Widget Glances, page 4). 1 From the home page, press or . The device scrolls through the widget glances and displays summary data for each. 2 Press OK to view more information. 3 Press OK to open the options menu (if available). Widget Glances From the home page, press or to scroll through the widget glances. Home page: Displays the date, time, and status icons (Status Icons, page 5).
Status Icons Transmitting data Tracking enabled Navigating Unread messages Sounds muted Charging battery Charging complete Approaching minimum operating temperature Approaching maximum operating temperature Activating the Device WARNING Before you can use the inReach features of your inReach Mini 2 device, including messaging, SOS, tracking, and inReach Weather, you must activate it. 1 From your computer or smartphone, go to explore.garmin.com to create an account and activate a service plan.
Pairing Your Smartphone To get the most out of your inReach device, you should pair it with the Garmin Explore app. The app allows you to create, manage, and view recorded user data, such as waypoints, courses, and activities. 1 Bring your compatible phone within 10 m (33 ft.) of your device. 2 From the home page on your device, press OK to open the main menu. 3 Select Settings > Phone. 4 Select the Status toggle switch to turn on Bluetooth technology. 5 Select Pair Phone.
inReach Features WARNING Before you can use the inReach features of your inReach Mini 2 device, including messaging, SOS, tracking, and inReach Weather, you must have an active satellite subscription. Always test your device before you use it outdoors. Ensure you have a clear view of the sky when using the messaging, tracking, and SOS functions, because these features require satellite access to operate properly. NOTICE Some jurisdictions regulate or prohibit the use of satellite communications devices.
Posting to Social Media You can link your Facebook™ and Twitter™ accounts to your MapShare™ web page. Go to explore.garmin.com to complete the setup. 1 From the home page, press OK to open the main menu. 2 Select Send Message. 3 Select one or more options: • To post to your Facebook account, select . • To post to your MapShare web page, select . • To post to your Twitter account, select . 4 Select Next.
Viewing Message Details 1 2 3 4 5 From the home page, press or to scroll through the widget glances. Select Messages, and select a conversation. Select a message. Press OK to open the options menu. Select View Details. Navigating to a Message Location When you receive a message from another device with inReach technology, the message may include location information. For these messages, you can navigate to the location from which the message was sent.
inReach Tracking You can use the tracking feature on your inReach Mini 2 device to record track points and transmit them over the Iridium satellite network at the specified send interval. Track points appear on the Garmin Explore website and the MapShare tracking page. Starting Tracking 1 From the home page, press OK to open the main menu. 2 Select Start Tracking. Your track line and track points appear on your MapShare web page for friends and family to follow your trip.
SOS WARNING Before you can use the SOS function, you must have an active satellite subscription. Always test your device before you use it outdoors. Ensure you have a clear view of the sky when using the SOS function, because this feature requires satellite access to operate properly. NOTICE Some jurisdictions regulate or prohibit the use of satellite communications devices.
Sending a Custom SOS Message After pressing the SOS button to initiate an SOS rescue, you can reply with a custom message. 1 From the home page, press or to scroll through the widget glances. 2 Select SOS > Reply to compose a custom SOS message. 3 Select an option: • To start with a pre-written message, press or to scroll through the quick text messages. • To write a custom message, select Type Message. 4 When you have finished your message, select . 5 Press OK to send the message.
Panning and Zooming the Map 1 2 3 4 5 From the home page, press or to scroll through the widget glances. Select Navigation, and scroll to the map. Press OK to open the options menu. Select Pan/Zoom Map. Select an option: • To toggle between panning up and down, panning left and right, or zooming, press OK. • To pan or zoom the map, press and . • To quit, press . Changing the Map Orientation 1 2 3 4 From the home page, press or to scroll through the widget glances.
Waypoints Waypoints are locations you record and store in the device. Waypoints can mark where you are, where you are going, or where you have been. Saving Your Current Location as a Waypoint 1 From the home page, press OK to open the main menu. 2 Select Mark Waypoint. Saving a Message Location as a Waypoint When you send a message or when you receive a message from another device with inReach technology, the message may include location information.
Navigating Using TracBack ® You can navigate back to the beginning of your path. NOTE: This can be helpful if you get lost and need to find your way back to camp or the trail head. 1 From the home page, press OK to open the main menu. 2 Select Navigate > TracBack. 3 Press OK to open the options menu. 4 Select Go. Courses A course can have multiple destinations, and can be navigated point to point or on routable roads. You can create and save courses in the Garmin Explore app.
Navigating to the Start of Your Current Activity While recording an activity, you can navigate back to the beginning of your path. This can be helpful when finding your way back to camp or the trail head. 1 From the home page, press OK to open the main menu. 2 Select Navigate > Activities > Current Activity > Back to Start. Navigating a Saved Activity 1 From the home page, press OK to open the main menu. 2 Select Navigate > Activities. 3 Select an activity, and select Go.
Setting the Weather Location 1 2 3 4 5 From the home page, press or to scroll through the widget glances. Select Weather. Press OK to open the options menu. Select Change Location. Select your current location or a previously used waypoint. Requesting an inReach Weather Forecast For best results, you should ensure your device has a clear view of the sky when you request an inReach weather forecast. 1 From the home page, press or to scroll through the widget glances. 2 Select Weather.
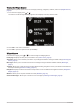
Viewing Plan Details You can view the details of your current data plan and check for data plan updates. 1 From the home page, press OK to open the main menu. 2 Select Service Plan > Plan Details. Viewing Data Use You can view the number of messages, preset messages, and track points sent during the current billing cycle. The data use counter resets automatically at the beginning of each billing cycle. 1 From the home page, press OK to open the main menu. 2 Select Service Plan > Data Use.
Phone Settings From the home page, press OK to open the main menu. Select Settings > Phone. Status: Enables Bluetooth wireless technology. Connected Device: Displays the name of the currently connected device from the list of paired devices. This option is available only after a device is paired. Pair Phone: Allows you to pair your device with a compatible Bluetooth enabled smartphone. This setting allows you to use Bluetooth connected features using the Garmin Explore app.
Units Settings From the home page, press OK to open the main menu. Select Settings > System > Units. Position Format: Sets the format used for geographical position coordinates and the coordinate system used by the map (Position Format Settings, page 20). Speed/Distance: Sets the unit of measure for distance. Wind Speed: Sets the unit of measure for wind speed. Temperature: Sets the temperature unit of measure to Fahrenheit (°F) or Celsius (°C). Pressure: Sets the unit of measure for pressure.
Attaching the Spine Mount Adapter 1 Remove the short screw from the carabiner strap . 2 Secure the spine mount adapter over the back of the device using the long screw included with the device. TIP: The spine mount adapter fits over the carabiner strap. You can attach the adapter over the strap or remove the strap.
Attaching a Lanyard 1 Insert the loop of the lanyard through the slot in the device. 2 Thread the other end of the lanyard through the loop, and pull it tight. 3 If necessary, attach the lanyard to your clothing or backpack to tether it during an activity. Locking and Unlocking the Buttons You can lock the buttons to prevent inadvertent button presses. 1 Press to open the power menu. 2 Select Lock Buttons. 3 Press to unlock the buttons.
Troubleshooting Maximizing Battery Life • • • • • Reduce the backlight timeout (System Settings, page 19). Reduce the frequency of the tracking Send Interval setting (Tracking Settings, page 18). Use the Standard level of detail for activity recordings (Tracking Settings, page 18). Turn off Bluetooth wireless technology (Phone Settings, page 19). Turn off ANT+ wireless technology (inReach Remote Settings, page 19).
Charging the inReach Device NOTICE To prevent corrosion, thoroughly dry the USB port, the weather cap, and the surrounding area before charging or connecting to a computer. NOTE: The device does not charge when it is outside the approved temperature range (Specifications, page 25). 1 Lift the weather cap . 2 3 4 5 Plug the small end of the power cable into the charging port on the device. Plug the other end of the power cable into a compatible AC power adapter.
Specifications Battery type Rechargeable, built-in lithium-ion battery Battery capacity 1,250 mAh Water rating IEC 60529 IPX71 Operating temperature range From -20° to 60°C (from -4° to 140°F) Charging temperature range From 0° to 45°C (from 32° to 113°F) Wireless frequency/protocol 1.6 GHz @ 31.8 dBm maximum 2.4 GHz @ -5.8 dBm maximum EU SAR (limb) 0.79 W/kg simultaneous EU SAR (body) 0.
Index A accessories 20 activities 15, 16 deleting 16 ANT+ 19 applications 6 B battery 22 charging 24 life 25 maximizing 23 Bluetooth technology 5, 6, 19 buttons 1, 2 locking 22 C calibrating, compass 13 charging 1, 24 cleaning the device 22 compass 4, 12, 13 contact 9 adding 9 deleting 9 editing 9 contacts, adding 8 courses 15 deleting 15 navigating 15 customizing the device 18 D data 17 data use 18 G Garmin Express 20 updating software 20 glances 4 GPS 5, 12 navigation 12, 13 position format 20 p
support.garmin.