
User manual

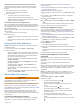

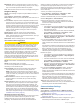


Table Of Contents
- Table of Contents
- Introduction
- Customizing the Chartplotter
- Home Screen
- Customizing Pages
- Presets
- Setting the Vessel Type
- Adjusting the Backlight
- Adjusting the Color Mode
- Turning On the Chartplotter Automatically
- Enabling Screen Lock
- Automatically Turning Off the System
- ActiveCaptain App
- Communication with Wireless Devices
- Charts and 3D Chart Views
- Navigation Chart and Fishing Chart
- Premium Charts
- Automatic Identification System
- Chart Menu
- Supported Maps
- Garmin Quickdraw Contours Mapping
- Mapping a Body of Water Using the Garmin Quickdraw Contours Feature
- Adding a Label to a Garmin Quickdraw Contours Map
- Garmin Quickdraw Community
- Garmin Quickdraw Contours Settings
- Navigation with a Chartplotter
- Basic Navigation Questions
- Destinations
- Waypoints
- Marking Your Present Location as a Waypoint
- Creating a Waypoint at a Different Location
- Marking an SOS Location
- Projecting a Waypoint
- Viewing a List of all Waypoints
- Editing a Saved Waypoint
- Moving a Saved Waypoint
- Browsing for and Navigating to a Saved Waypoint
- Deleting a Waypoint or an MOB
- Deleting All Waypoints
- Routes
- Creating and Navigating a Route From Your Present Location
- Creating and Saving a Route
- Viewing a List of Routes and Auto Guidance Paths
- Editing a Saved Route
- Browsing for and Navigating a Saved Route
- Browsing for and Navigating Parallel to a Saved Route
- Initiating a Search Pattern
- Deleting a Saved Route
- Deleting All Saved Routes
- Auto Guidance
- Tracks
- Showing Tracks
- Setting the Color of the Active Track
- Saving the Active Track
- Viewing a List of Saved Tracks
- Editing a Saved Track
- Saving a Track as a Route
- Browsing for and Navigating a Recorded Track
- Deleting a Saved Track
- Deleting All Saved Tracks
- Retracing the Active Track
- Clearing the Active Track
- Managing the Track Log Memory During Recording
- Configuring the Recording Interval of the Track Log
- Boundaries
- Deleting All Saved Waypoints, Tracks, Routes, and Boundaries
- Sailing Features
- Sonar Fishfinder
- Stopping the Transmission of Sonar Signals
- Changing the Sonar View
- Traditional Sonar View
- Garmin ClearVü Sonar View
- SideVü Sonar View
- Panoptix Sonar Views
- Selecting the Transducer Type
- Selecting a Sonar Source
- Creating a Waypoint on the Sonar Screen
- Pausing the Sonar Display
- Viewing Sonar History
- Sonar Sharing
- Adjusting the Level of Detail
- Adjusting the Color Intensity
- Sonar Recordings
- Traditional, Garmin ClearVü, and SideVü Sonar Setup
- Setting the Zoom Level on the Sonar Screen
- Setting the Scroll Speed
- Adjusting the Range of the Depth or Width Scale
- Sonar Noise Rejection Settings
- Sonar Appearance Settings
- Sonar Alarms
- Advanced Sonar Settings
- Traditional, Garmin ClearVü, and SideVü Transducer Installation Settings
- Sonar Frequencies
- Turning On the A-Scope
- Panoptix Sonar Setup
- Zooming in a Panoptix LiveVü or LiveScope Sonar View
- Adjusting the RealVü Viewing Angle and Zoom Level
- Adjusting the RealVü Sweep Speed
- LiveVü Forward and FrontVü Sonar Menu
- LiveVü and FrontVü Appearance Settings
- RealVü Appearance Settings
- LiveScope and Perspective Sonar Menu
- LiveScope and Perspective Sonar Setup
- LiveScope and Perspective Appearance Settings
- Panoptix Transducer Installation Settings
- Radar
- Radar Interpretation
- Transmitting Radar Signals
- Adjusting the Radar Range
- MotionScope™ Doppler Radar Technology
- Enabling a Guard Zone
- MARPA
- Echo Trails
- Radar Settings
- Selecting a Different Radar Source
- Changing the Radar Mode
- Autopilot
- Force® Trolling Motor Control
- Digital Selective Calling
- Gauges and Graphs
- inReach® Messages
- Digital Switching
- Dometic® Optimus® Features
- Tide, Current, and Celestial Information
- Warning Manager
- Media Player
- Opening the Media Player
- Selecting the Media Device and Source
- Playing Music
- Adjusting the Volume
- VHF Radio
- Radio
- DAB Playback
- SiriusXM Satellite Radio
- Setting the Device Name
- Updating the Media Player Software
- SiriusXM Weather
- SiriusXM Equipment and Subscription Requirements
- Weather Data Broadcasts
- Weather Warnings and Weather Bulletins
- Changing the Weather Chart
- Viewing Precipitation Information
- Forecast Information
- Viewing Fish Mapping Data
- Viewing Sea Conditions
- Viewing Sea Temperature Information
- Visibility Information
- Viewing Buoy Reports
- Weather Overlay
- Viewing Weather Subscription Information
- Viewing Video
- Selecting a Video Source
- Networked Video Devices
- Configuring the Video Appearance
- Garmin VIRB® Action Cameras
- HDMI Out Video Considerations
- Pairing the GC™ 100 Camera with a Garmin Chartplotter
- Device Configuration
- Sharing and Managing User Data
- Appendix
- Index

Controlling the VIRB Action Camera Video Playback
You can view VIRB action camera video and images using the
chartplotter.
NOTE: The VIRB playback on the chartplotter is shown in the
same quality as the live view on the chartplotter. To view the
high-resolution video, view the video on a computer or
television.
1
From the VIRB® screen, select .
2
Wait a few seconds for the thumbnail images to load.
3
Select a video or image.
4
Control the playback using the on-screen buttons or menu
options:
• To stop the video, select .
• To pause the video, select .
• To replay the video, select .
• To play the video, select .
• To skip ahead or back in the video, drag the slider.
Deleting a VIRB Video
You can delete a video or image from the VIRB action camera.
1
Open the VIRB video or image to delete.
2
Select Menu > Delete File.
Starting a VIRB Video Slideshow
You can view a slideshow of the videos and images on the VIRB
action camera.
1
From the VIRB® screen, select .
2
Wait a few seconds for the thumbnail images to load.
3
Select a video or image.
4
Select Menu > Start Slideshow.
To stop the slideshow, selcet Menu > Stop Slideshow.
VIRB Action Camera Settings
NOTE: Not all options and settings apply to all camera models.
Select A/V, Gauges, Controls > VIRB® > Menu.
Name: Allows you to enter a new name for the VIRB action
camera.
Recording: Starts and stops recording.
Take Photo: Takes a still photograph.
Playback: Allows you to view video recordings and photos.
Freeze: Pauses the camera image.
Sleep: Puts the VIRB action camera into a low power mode to
conserve battery power. Not available on the VIRB 360
camera.
Video Setup: Sets up the video (VIRB Action Camera Video
Setup Settings, page 58).
Edit Overlays: Adjusts the data shown on the screen
(Customizing the Data Overlays, page 5).
VIRB Action Camera Video Setup Settings
NOTE: Not all options and settings apply to all camera models.
Select A/V, Gauges, Controls > VIRB® > Menu > Video
Setup.
Aspect: Sets the video aspect ratio.
Video Mode: Sets the video mode. For example, you can select
the Slow-Mo option to shoot slow motion videos.
Video Size: Sets the size or pixel dimensions of videos.
Video FPS: Sets the frames per second.
Video Timestamp: Adds the date and time a video was
recorded.
Photo Timestamp: Adds the date and time a photo was taken.
Photo Size: Sets the size or pixel dimensions of photos.
Field of View: Sets the zoom level.
Lens Mode: Sets which lens or lenses the camera uses while
shooting video.
Mirror: Allows you to flip or mirror the video.
Rotation: Allows you to rotate the camera angle.
Adding the VIRB Action Camera Controls to Other
Screens
Before you can control a VIRB action camera with the
chartplotter, you must connect the devices using a wireless
connection (Connecting a Wireless Device to the Chartplotter,
page 8).
You can add the VIRB action camera control bar to other
screens. This allows you to start and stop recording from other
functions in the chartplotter.
1
Open the screen to which you want to add the VIRB action
camera control bar.
2
Select Menu > Edit Overlays > Bottom Bar > VIRB Bar.
When viewing a screen that has the VIRB action camera
controls, you can select to open the full screen view of the
VIRB action camera.
HDMI Out Video Considerations
NOTICE
To prevent corrosion due to moisture, you must use Garmin
GPSMAP accessory cables when connecting the chartplotter to
the video display. Using different cables voids your warranty.
The GPSMAP A12/12x3 chartplotter models have HDMI out
capability to duplicate the chartplotter screen on another device,
such as a television or monitor.
The Garmin GPSMAP HDMI accessory cable is 4.5 m (15 ft.)
long. If you need a longer cable, you should use an active HDMI
cable only. You need an HDMI coupler to connect the two HDMI
cables.
You must make all cable connections in a dry environment.
Item Description
GPSMAP A12/12x3 chartplotter
GPSMAP HDMI cable (HDMI OUT)
Display with an HDMI In port, such as a computer or television
Dry environment, protected from moisture
Pairing the GC
™
100 Camera with a Garmin
Chartplotter
Before you can connect a wireless device to the chartplotter
wireless network, you must configure the chartplotter wireless
network.
1
With the camera within an unobstructed 76 m (250 ft.) of the
chartplotter, quickly press three times.
2
On the chartplotter, select Settings > Communications >
Wireless Devices > Garmin Camera > Start.
3
Follow the on-screen instructions.
58 Viewing Video