
User manual

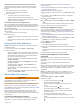


Table Of Contents
- Table of Contents
- Introduction
- Customizing the Chartplotter
- Home Screen
- Customizing Pages
- Presets
- Setting the Vessel Type
- Adjusting the Backlight
- Adjusting the Color Mode
- Turning On the Chartplotter Automatically
- Enabling Screen Lock
- Automatically Turning Off the System
- ActiveCaptain App
- Communication with Wireless Devices
- Charts and 3D Chart Views
- Navigation Chart and Fishing Chart
- Premium Charts
- Automatic Identification System
- Chart Menu
- Supported Maps
- Garmin Quickdraw Contours Mapping
- Mapping a Body of Water Using the Garmin Quickdraw Contours Feature
- Adding a Label to a Garmin Quickdraw Contours Map
- Garmin Quickdraw Community
- Garmin Quickdraw Contours Settings
- Navigation with a Chartplotter
- Basic Navigation Questions
- Destinations
- Waypoints
- Marking Your Present Location as a Waypoint
- Creating a Waypoint at a Different Location
- Marking an SOS Location
- Projecting a Waypoint
- Viewing a List of all Waypoints
- Editing a Saved Waypoint
- Moving a Saved Waypoint
- Browsing for and Navigating to a Saved Waypoint
- Deleting a Waypoint or an MOB
- Deleting All Waypoints
- Routes
- Creating and Navigating a Route From Your Present Location
- Creating and Saving a Route
- Viewing a List of Routes and Auto Guidance Paths
- Editing a Saved Route
- Browsing for and Navigating a Saved Route
- Browsing for and Navigating Parallel to a Saved Route
- Initiating a Search Pattern
- Deleting a Saved Route
- Deleting All Saved Routes
- Auto Guidance
- Tracks
- Showing Tracks
- Setting the Color of the Active Track
- Saving the Active Track
- Viewing a List of Saved Tracks
- Editing a Saved Track
- Saving a Track as a Route
- Browsing for and Navigating a Recorded Track
- Deleting a Saved Track
- Deleting All Saved Tracks
- Retracing the Active Track
- Clearing the Active Track
- Managing the Track Log Memory During Recording
- Configuring the Recording Interval of the Track Log
- Boundaries
- Deleting All Saved Waypoints, Tracks, Routes, and Boundaries
- Sailing Features
- Sonar Fishfinder
- Stopping the Transmission of Sonar Signals
- Changing the Sonar View
- Traditional Sonar View
- Garmin ClearVü Sonar View
- SideVü Sonar View
- Panoptix Sonar Views
- Selecting the Transducer Type
- Selecting a Sonar Source
- Creating a Waypoint on the Sonar Screen
- Pausing the Sonar Display
- Viewing Sonar History
- Sonar Sharing
- Adjusting the Level of Detail
- Adjusting the Color Intensity
- Sonar Recordings
- Traditional, Garmin ClearVü, and SideVü Sonar Setup
- Setting the Zoom Level on the Sonar Screen
- Setting the Scroll Speed
- Adjusting the Range of the Depth or Width Scale
- Sonar Noise Rejection Settings
- Sonar Appearance Settings
- Sonar Alarms
- Advanced Sonar Settings
- Traditional, Garmin ClearVü, and SideVü Transducer Installation Settings
- Sonar Frequencies
- Turning On the A-Scope
- Panoptix Sonar Setup
- Zooming in a Panoptix LiveVü or LiveScope Sonar View
- Adjusting the RealVü Viewing Angle and Zoom Level
- Adjusting the RealVü Sweep Speed
- LiveVü Forward and FrontVü Sonar Menu
- LiveVü and FrontVü Appearance Settings
- RealVü Appearance Settings
- LiveScope and Perspective Sonar Menu
- LiveScope and Perspective Sonar Setup
- LiveScope and Perspective Appearance Settings
- Panoptix Transducer Installation Settings
- Radar
- Radar Interpretation
- Transmitting Radar Signals
- Adjusting the Radar Range
- MotionScope™ Doppler Radar Technology
- Enabling a Guard Zone
- MARPA
- Echo Trails
- Radar Settings
- Selecting a Different Radar Source
- Changing the Radar Mode
- Autopilot
- Force® Trolling Motor Control
- Digital Selective Calling
- Gauges and Graphs
- inReach® Messages
- Digital Switching
- Dometic® Optimus® Features
- Tide, Current, and Celestial Information
- Warning Manager
- Media Player
- Opening the Media Player
- Selecting the Media Device and Source
- Playing Music
- Adjusting the Volume
- VHF Radio
- Radio
- DAB Playback
- SiriusXM Satellite Radio
- Setting the Device Name
- Updating the Media Player Software
- SiriusXM Weather
- SiriusXM Equipment and Subscription Requirements
- Weather Data Broadcasts
- Weather Warnings and Weather Bulletins
- Changing the Weather Chart
- Viewing Precipitation Information
- Forecast Information
- Viewing Fish Mapping Data
- Viewing Sea Conditions
- Viewing Sea Temperature Information
- Visibility Information
- Viewing Buoy Reports
- Weather Overlay
- Viewing Weather Subscription Information
- Viewing Video
- Selecting a Video Source
- Networked Video Devices
- Configuring the Video Appearance
- Garmin VIRB® Action Cameras
- HDMI Out Video Considerations
- Pairing the GC™ 100 Camera with a Garmin Chartplotter
- Device Configuration
- Sharing and Managing User Data
- Appendix
- Index

• If the media device is a GXM antenna, select Menu >
Presets > Add Current Channel.
Parental Controls
The parental control feature allows you to limit access to any
SiriusXM channels, including those with mature content. When
the parental control feature is enabled, you must enter a
passcode to tune to the locked channels. You can also change
the 4-digit passcode.
Unlocking SiriusXM Parental Controls
1
From the media screen, select Browse > Parental > Unlock.
2
Enter your passcode.
The default passcode is 0000.
Setting Parental Controls on SiriusXM Radio Channels
Before you can set parental controls, the parental controls must
be unlocked.
The parental control feature allows you to limit access to any
SiriusXM channels, including those with mature content. When
enabled, the parental control feature requires you to enter a
passcode to tune to the locked channels.
Select Browse > Parental > Lock/Unlock.
A list of channels appears. A checkmark indicates a locked
channel.
NOTE: When you view the channels after setting parental
controls, the display changes:
• indicates a locked channel.
• indicates an unlocked channel.
Clearing All Locked Channels on a SiriusXM Radio
Before you can clear all locked channels, the parental controls
must be unlocked.
1
From the media screen, select Browse > Parental > Clear
All Locked.
2
Enter your passcode.
Restoring Default Parental Control Settings Values
This process deletes all the settings information you have
entered. When you restore the parental control settings to their
default values, the passcode value is reset to 0000.
1
From the media menu, select Installation > Factory
Defaults.
2
Select Yes.
Changing a Parental Passcode on a SiriusXM Radio
Before you can change the passcode, the parental controls must
be unlocked.
1
From the media screen, select Browse > Parental > Change
PIN.
2
Enter your passcode and select Done.
3
Enter a new passcode.
4
Confirm the new passcode.
Setting the Device Name
1
From the media screen, select Menu > Installation > Set
Device Name.
2
Enter a device name.
3
Select Select or Done.
Updating the Media Player Software
You can update the software on compatible connected stereos
and accessories.
1
Go to www.fusionentertainment.com/marine, and download
the software update onto a USB flash drive.
Software updates and instructions are available on your
device product page.
2
Insert the USB flash drive into the USB port of the stereo.
3
On the chartplotter media screen, select Menu > Installation
> Update Software.
4
Select the item to update.
SiriusXM Weather
WARNING
The weather information provided through this product is subject
to service interruptions and may contain errors, inaccuracies, or
outdated information, and consequently should not be relied
upon exclusively. Always use common sense while navigating,
and check alternate weather information sources prior to making
safety-related decisions. You acknowledge and agree that you
shall be solely responsible for use of the weather information
and all decisions taken with respect to navigating in weather.
Garmin will not be responsible for any consequences of using
SiriusXM weather information.
NOTE: SiriusXM data is not available in all regions.
A Garmin SiriusXM satellite weather receiver and antenna
receives satellite weather data and shows it on various Garmin
devices, including the Navigation chart on a compatible
chartplotter. The weather data for each feature comes from
reputable weather data centers such as the National Weather
Service and the Hydrometeorological Prediction Center. For
more information, go to www.siriusxm.com/sxmmarine.
SiriusXM Equipment and Subscription
Requirements
To use satellite weather, you must have a compatible satellite
weather receiver. To use SiriusXM satellite radio, you must have
a compatible satellite radio receiver. Go to www.garmin.com for
more information. You must also have a valid subscription to
receive satellite weather and radio. For more information, refer
to the instructions for your satellite weather and radio
equipment.
Weather Data Broadcasts
Weather data is broadcast at different intervals for each weather
feature. For example, radar is broadcast at five-minute intervals.
When the Garmin receiver is turned on, or when a different
weather feature is selected, the receiver must receive new data
before it can be shown. You might experience a delay before
weather data or a different feature appears on the chart.
NOTE: Any weather feature can change in appearance if the
source that provides the information changes.
Weather Warnings and Weather Bulletins
When a marine weather warning, weather watch, weather
advisory, weather bulletin, or other weather statement is issued,
shading indicates the area to which the information applies. The
aqua lines on the chart indicate the boundaries of marine
forecasts, coastal forecasts, and offshore forecasts. Weather
bulletins may consist of either weather watches or weather
advisories.
To view information about the warning or bulletin, select the
shaded area.
Color Marine Weather Group
Cyan Flash Flood
Blue Flood
Red Marine
Yellow Severe Storm
Red Tornado
SiriusXM Weather 53