
User manual


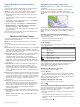


Table Of Contents
- Table of Contents
- Introduction
- Customizing the Chartplotter
- Home Screen
- Customizing Pages
- Presets
- Setting the Vessel Type
- Adjusting the Backlight
- Adjusting the Color Mode
- Turning On the Chartplotter Automatically
- Enabling Screen Lock
- Automatically Turning Off the System
- ActiveCaptain App
- Communication with Wireless Devices
- Charts and 3D Chart Views
- Navigation Chart and Fishing Chart
- Premium Charts
- Automatic Identification System
- Chart Menu
- Supported Maps
- Garmin Quickdraw Contours Mapping
- Mapping a Body of Water Using the Garmin Quickdraw Contours Feature
- Adding a Label to a Garmin Quickdraw Contours Map
- Garmin Quickdraw Community
- Garmin Quickdraw Contours Settings
- Navigation with a Chartplotter
- Basic Navigation Questions
- Destinations
- Waypoints
- Marking Your Present Location as a Waypoint
- Creating a Waypoint at a Different Location
- Marking an SOS Location
- Projecting a Waypoint
- Viewing a List of all Waypoints
- Editing a Saved Waypoint
- Moving a Saved Waypoint
- Browsing for and Navigating to a Saved Waypoint
- Deleting a Waypoint or an MOB
- Deleting All Waypoints
- Routes
- Creating and Navigating a Route From Your Present Location
- Creating and Saving a Route
- Viewing a List of Routes and Auto Guidance Paths
- Editing a Saved Route
- Browsing for and Navigating a Saved Route
- Browsing for and Navigating Parallel to a Saved Route
- Initiating a Search Pattern
- Deleting a Saved Route
- Deleting All Saved Routes
- Auto Guidance
- Tracks
- Showing Tracks
- Setting the Color of the Active Track
- Saving the Active Track
- Viewing a List of Saved Tracks
- Editing a Saved Track
- Saving a Track as a Route
- Browsing for and Navigating a Recorded Track
- Deleting a Saved Track
- Deleting All Saved Tracks
- Retracing the Active Track
- Clearing the Active Track
- Managing the Track Log Memory During Recording
- Configuring the Recording Interval of the Track Log
- Boundaries
- Deleting All Saved Waypoints, Tracks, Routes, and Boundaries
- Sailing Features
- Sonar Fishfinder
- Stopping the Transmission of Sonar Signals
- Changing the Sonar View
- Traditional Sonar View
- Garmin ClearVü Sonar View
- SideVü Sonar View
- Panoptix Sonar Views
- Selecting the Transducer Type
- Selecting a Sonar Source
- Creating a Waypoint on the Sonar Screen
- Pausing the Sonar Display
- Viewing Sonar History
- Sonar Sharing
- Adjusting the Level of Detail
- Adjusting the Color Intensity
- Sonar Recordings
- Traditional, Garmin ClearVü, and SideVü Sonar Setup
- Setting the Zoom Level on the Sonar Screen
- Setting the Scroll Speed
- Adjusting the Range of the Depth or Width Scale
- Sonar Noise Rejection Settings
- Sonar Appearance Settings
- Sonar Alarms
- Advanced Sonar Settings
- Traditional, Garmin ClearVü, and SideVü Transducer Installation Settings
- Sonar Frequencies
- Turning On the A-Scope
- Panoptix Sonar Setup
- Zooming in a Panoptix LiveVü or LiveScope Sonar View
- Adjusting the RealVü Viewing Angle and Zoom Level
- Adjusting the RealVü Sweep Speed
- LiveVü Forward and FrontVü Sonar Menu
- LiveVü and FrontVü Appearance Settings
- RealVü Appearance Settings
- LiveScope and Perspective Sonar Menu
- LiveScope and Perspective Sonar Setup
- LiveScope and Perspective Appearance Settings
- Panoptix Transducer Installation Settings
- Radar
- Radar Interpretation
- Transmitting Radar Signals
- Adjusting the Radar Range
- MotionScope™ Doppler Radar Technology
- Enabling a Guard Zone
- MARPA
- Echo Trails
- Radar Settings
- Selecting a Different Radar Source
- Changing the Radar Mode
- Autopilot
- Force® Trolling Motor Control
- Digital Selective Calling
- Gauges and Graphs
- inReach® Messages
- Digital Switching
- Dometic® Optimus® Features
- Tide, Current, and Celestial Information
- Warning Manager
- Media Player
- Opening the Media Player
- Selecting the Media Device and Source
- Playing Music
- Adjusting the Volume
- VHF Radio
- Radio
- DAB Playback
- SiriusXM Satellite Radio
- Setting the Device Name
- Updating the Media Player Software
- SiriusXM Weather
- SiriusXM Equipment and Subscription Requirements
- Weather Data Broadcasts
- Weather Warnings and Weather Bulletins
- Changing the Weather Chart
- Viewing Precipitation Information
- Forecast Information
- Viewing Fish Mapping Data
- Viewing Sea Conditions
- Viewing Sea Temperature Information
- Visibility Information
- Viewing Buoy Reports
- Weather Overlay
- Viewing Weather Subscription Information
- Viewing Video
- Selecting a Video Source
- Networked Video Devices
- Configuring the Video Appearance
- Garmin VIRB® Action Cameras
- HDMI Out Video Considerations
- Pairing the GC™ 100 Camera with a Garmin Chartplotter
- Device Configuration
- Sharing and Managing User Data
- Appendix
- Index

Viewing Boat Data on a Garmin Nautix
™
Device
You can connect a Garmin Nautix device to the chartplotter to
view charplotter data on the Garmin Nautix device.
NOTE: You can connect a Garmin Nautix device to multiple
compatible devices for better coverage on larger vessels.
1
Bring the a Garmin Nautix device within range (3 m) of the
chartplotter.
The device automatically looks for all compatible devices
within range.
2
If necessary, from the wearable device menu, select Device
Connections > Pair New Device.
3
On the chartplotter, select Settings > Communications >
Wireless Devices > Connect IQ™ Apps > Boat Data >
Enable Connections > New Connection.
The chartplotter begins searching for and connecting to the
wearable device.
After the devices are paired, they connect automatically when
they are turned on and within range.
Charts and 3D Chart Views
The charts and 3D chart views that are available depend on the
map data and accessories used.
NOTE: 3D chart views are available with premium charts, in
some areas.
You can access the charts and 3D chart views by selecting
Charts.
Nav. Chart: Shows navigation data available on your pre-loaded
maps and from supplemental maps, if available. The data
includes buoys, lights, cables, depth soundings, marinas, and
tide stations in an overhead view.
Fishing Chart: Provides a detailed view of the bottom contours
and depth soundings on the chart. This chart removes
navigational data from the chart, provides detailed
bathymetric data, and enhances bottom contours for depth
recognition. This chart is best for offshore deep-sea fishing.
NOTE: The Fishing chart is available with premium charts, in
some areas.
Perspective 3D: Provides a view from above and behind the
boat (according to your course) and provides a visual
navigation aid. This view is helpful when navigating tricky
shoals, reefs, bridges, or channels, and is beneficial when
trying to identify entry and exit routes in unfamiliar harbors or
anchorages.
3D Chart: Shows a detailed, three-dimensional view from above
and behind the boat (according to your course) and provides
a visual navigation aid. This view is helpful when navigating
tricky shoals, reefs, bridges, or channels, and when trying to
identify entry and exit routes in unfamiliar harbors or
anchorages.
Fish Eye 3D: Provides an underwater view that visually
represents the sea floor according to the chart information.
When a sonar transducer is connected, suspended targets
(such as fish) are indicated by red, green, and yellow
spheres. Red indicates the largest targets and green
indicates the smallest.
Relief Shading: Provides high resolution elevation shading of
lakes and coastal waters. This chart can be helpful for fishing
and diving.
NOTE: The Relief Shading chart is available with premium
charts, in some areas.
Navigation Chart and Fishing Chart
NOTE: The Fishing chart is available with premium charts, in
some areas.
The Nav. Chart is optimized for navigation. You can plan a
course, view map information, and use the chart as a
navigational aid. To open the Nav. Chart, select Charts > Nav.
Chart.
The Fishing Chart provides a detailed view with more bottom
detail and fishing content. This chart is optimized for use when
fishing. To open the Fishing Chart, select Charts > Fishing
Chart.
Zooming In and Out Using the Touchscreen
You can quickly zoom in and out of many screens, such as the
charts and sonar views.
• Pinch two fingers together to zoom out.
• Spread two fingers apart to zoom in.
Chart Symbols
This table contains some of the common symbols you might see
on the detailed charts.
Icon Description
Buoy
Information
Marine services
Tide station
Current station
Overhead photo available
Perspective photo available
Other features common to most charts include depth contour
lines, intertidal zones, spot soundings (as depicted on the
original paper chart), navigational aids and symbols,
obstructions, and cable areas.
Measuring a Distance on the Chart
1
From a chart, select a location.
2
Select Measure.
A push pin appears on the screen at your present location.
The distance and angle from the pin is listed in the corner.
TIP: To reset the pin and measure from the current location of
the cursor, select Set Reference.
Creating a Waypoint on the Chart
1
From a chart, select a location or object.
2
Select .
Viewing Location and Object Information on a Chart
You can view information, such as tide, current, celestial, chart
notes, or local services, about a location or an object on the
Navigation chart or the Fishing chart.
1
From the Navigation chart or Fishing chart, select a location
or object.
A list of options appears along the top of the chart. The
options that appear vary based on the location or object you
selected.
2
If necessary, select .
Charts and 3D Chart Views 9