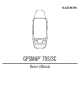
GPSMAP 79S/SC ® Owner’s Manual
© 2021 Garmin Ltd. or its subsidiaries All rights reserved. Under the copyright laws, this manual may not be copied, in whole or in part, without the written consent of Garmin. Garmin reserves the right to change or improve its products and to make changes in the content of this manual without obligation to notify any person or organization of such changes or improvements. Go to www.garmin.com for current updates and supplemental information concerning the use of this product.
Table of Contents Introduction..................................... 1 Getting Started........................................ 1 Device Overview...................................... 2 Installing Batteries.............................. 3 Connecting the Device to External Power................................................... 4 Buttons.................................................... 5 Turning On the Device........................ 5 Locking the Buttons............................
Geocaches............................................ 21 Downloading Geocaches Using a Computer........................................... 21 Searching for a Geocache................ 22 Filtering the Geocache List.............. 22 Saving a Custom Geocache Filter............................................... 22 Editing a Custom Geocache Filter............................................... 22 Viewing Geocache Details................ 22 Navigating to a Geocache................
Introduction WARNING See the Important Safety and Product Information guide in the product box for product warnings and other important information. Getting Started When using your device the first time, you should complete these tasks to set it up and get to know the basic features. 1 Install the batteries (Installing Batteries, page 3). 2 Press and hold to turn on the device. 3 Acquire satellites (Acquiring Satellite Signals, page 6). 4 Calibrate the compass (Calibrating the Compass, page 8).
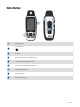
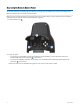
Device Overview GNSS antenna Power button Buttons Micro-USB port (under weather cap) Serial port (under weather cap) microSD card slot (under batteries) ® Battery compartment Mounting spine Battery cover D-ring 2 Introduction
Installing Batteries NOTICE To prevent damage, thoroughly wipe dry and air dry the device and battery compartment before installing the batteries or turning on the device. The handheld device operates using two AA batteries (not included). Use lithium batteries with 1.5 V nominal voltage for best results. Do not use lithium batteries with a higher voltage. 1 Turn the D-ring counter-clockwise, and pull up to remove the cover. 2 Insert two AA batteries, observing polarity.
Connecting the Device to External Power NOTICE To prevent corrosion, thoroughly dry the USB port, the serial port, the weather cap, and the surrounding area before connecting to a computer or external cable. Before you can connect the device to external power using a USB cable, you must change the serial interface setting to Garmin Spanner (Serial Interface Settings, page 25). 1 Lift the weather cap .
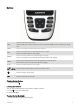
Buttons FIND Press to open the search menu. Hold to mark your current location as a man overboard (MOB) location and activate naviga tion. MARK Press to save your current location as a waypoint. QUIT Press to cancel or return to the previous menu or page. Press to scroll through the main pages. ENTER Press to choose options and acknowledge messages. Press to control the current activity recording (from the main pages). MENU Press to open the options menu for the page that is currently open.
Adjusting the Backlight 1 Press to open the status page. 2 Use and to adjust the brightness. TIP: You can select NV to reduce the backlight intensity for compatibility with night vision goggles. Acquiring Satellite Signals It may take 30 to 60 seconds to acquire satellite signals. 1 Go outdoors to an open area. 2 If necessary, turn on the device. 3 Wait while the device searches for satellites. flashes while the device determines your GNSS location. in the status bar shows the satellite signal strength.
Measuring Distance on the Map You can measure the distance between multiple locations. 1 Press PAGE to scroll to the map page. 2 Press MENU. 3 Select Measure Distance. 4 Press , , , and to move the map cursor to a location. The measured distance appears. 5 Press ENTER to select additional locations on the map. Map Page Settings Press PAGE to scroll to the map page, and press MENU. Show Dashboard: Allows you to show or hide the dashboard after setting one to display on the map (Map Settings, page 7).
Changing the Map Orientation 1 2 3 4 Press PAGE to scroll to the map page. Press MENU. Select Map Setup > Orientation. Select an option: • Select North Up to show north at the top of the page. • Select Track Up to show your current direction of travel at the top of the page. • Select Automotive Mode to show an automotive perspective with the direction of travel at the top. Advanced Map Settings Press PAGE to scroll to the map page, and press MENU. Select Map Setup > Advanced Setup.
Using the Course Pointer The course pointer is most useful when you are navigating to your destination in a straight line, such as when you are navigating on water. It can help you navigate back to the course line when you go off-course to avoid obstacles or hazards. 1 Press PAGE to scroll to the compass page. 2 Press MENU. 3 Select Heading Setup > Go To Line (Pointer) > Course (CDI) to enable the course pointer. Course line pointer.
Projecting a Waypoint from Your Current Location You can save a new waypoint by projecting the distance from your current location. For example, if you would like to navigate to a location you observe on the other side of a river or stream, you can project a waypoint from your current location to the observed location, and then navigate to the new location after you cross the river or stream. 1 Press PAGE to scroll to the compass page. 2 Press MENU. 3 Select Sight 'N Go.
Setting the North Reference You can set the directional reference used in calculating heading information. 1 Press PAGE to scroll to the compass page. 2 Press MENU. 3 Select Heading Setup > North Reference. 4 Select an option: • To set geographic north as the heading reference, select True. • To set the magnetic declination for your location automatically, select Magnetic. • To set grid north (000 degrees) as the heading reference, select Grid.
Stopping Navigation 1 Press FIND. 2 Select Stop Navigation. Finding a Location Near Another Location 1 2 3 4 Press FIND. Press MENU. Select Search Near, and select an option. Select a location. Waypoints Waypoints are locations you record and store in the device. Waypoints can mark where you are, where you are going, or where you have been. Saving Your Current Location as a Waypoint 1 Press MARK. 2 If necessary, select a field to edit information about the waypoint, such as the name or location.
Editing a Waypoint 1 2 3 4 5 Press MENU twice to open the main menu. Select Waypoint Manager. Select a saved waypoint. Select an item to edit, such as the name or location. Enter the new information, and select Done. Deleting a Waypoint 1 2 3 4 5 Press MENU twice to open the main menu. Select Waypoint Manager. Select a waypoint. Press MENU. Select Delete. Changing the Photo for a Waypoint 1 2 3 4 5 6 7 Press MENU twice to open the main menu. Select Waypoint Manager. Select a waypoint. Press MENU.
Projecting a Waypoint from a Saved Waypoint You can save a new waypoint by projecting the distance and bearing from a saved waypoint to a new location. 1 Press MENU twice to open the main menu. 2 Select Waypoint Manager. 3 Select a waypoint. 4 Press MENU. 5 Select Project Waypoint. 6 Enter the bearing, and select Done. 7 Select a unit of measure. 8 Enter the distance, and select Done. 9 Select Save. Moving a Waypoint on the Map 1 2 3 4 5 6 7 Press MENU twice to open the main menu. Select Waypoint Manager.
Adding a Waypoint to a Route 1 2 3 4 5 6 Press MENU twice to open the main menu. Select Waypoint Manager. Select a waypoint. Press MENU. Select Add to Route. Select a route. Repositioning a Waypoint to Your Current Location You can change the position of a waypoint. For example, if you move your vehicle, you can change the location to your current position. 1 Press MENU twice to open the main menu. 2 Select Waypoint Manager. 3 Select a waypoint. 4 Press MENU. 5 Select Reposition Here.
Viewing the Active Route 1 2 3 4 Begin navigating a route (Navigating a Saved Route, page 15). Press MENU twice to open the main menu. Select Active Route. Select a point in the route to view additional details. Editing a Route You can add, remove, or rearrange points on a route. 1 Press MENU twice to open the main menu. 2 Select Route Planner. 3 Select a route. 4 Select Edit Route. 5 Select a point. 6 Select an option: • To view the point on the map, select Review.
Recordings Your device records your path as an activity. Activities contain information about points along your recorded path, including time and location for each point. Recording Settings Press MENU twice to open the main menu. Select Setup > Recording. Record Method: Sets the recording method. The Auto option records points at a variable rate to create an optimum representation of your path. You can also record points at specific time or distance intervals. Interval: Sets the recording rate.
Viewing the Current Activity By default, the device automatically starts recording your path as an activity when it is turned on and has acquired satellite signals. You can pause and start recording manually. 1 Press MENU twice to open the main menu. 2 Select Recording Controls. 3 Press and to view an option: • To control the current activity recording, select . • To view data fields for the activity, select . • To view the current activity on the map, select .
Stopping the Current Activity 1 From the main pages, press ENTER. 2 Select Stop. 3 Select an option: • To resume recording, select Resume. • To save the activity, select . TIP: You can view the saved activity by pressing MENU twice to view the main menu, and selecting Recorded Activities. • To delete the activity and reset the trip computer, select . Saving the Current Activity 1 Press MENU twice to open the main menu. 2 Select Recording Controls > .
Reversing an Activity You can switch the start and end points of your activity to navigate the activity in reverse. 1 Press MENU twice to open the main menu. 2 Select Recorded Activities. 3 Select an activity. 4 Press MENU. 5 Select Copy Reversed. Navigating a Saved Activity 1 2 3 4 5 Press MENU twice to open the main menu. Select Recorded Activities. Select an activity. Select . Select Go. Deleting a Saved Activity 1 2 3 4 5 20 Press MENU twice to open the main menu. Select Recorded Activities.
Main Menu Tools Press MENU twice to open the main menu. Recording Controls: Allows you to view details about the current activity and control the current activity recording (Viewing the Current Activity, page 18). Waypoint Manager: Displays all waypoints saved to the device (Waypoints, page 12). Geocaching: Displays a list of downloaded geocaches (Geocaches, page 21). Recorded Activities: Displays your current activity and a list of recorded activities (Recordings, page 17).
Searching for a Geocache You can search the geocaches loaded on your device. NOTE: You can download detailed information for a limited number of geocaches per day. You can purchase a premium subscription to download more. Go to www.geocaching.com for more information. 1 Press MENU twice to open the main menu. 2 Select Geocaching > . 3 Press MENU. 4 Select an option: • To search the geocaches loaded on your device by name, select Spell Search, and enter a search term.
Navigating to a Geocache 1 2 3 4 Press MENU twice to open the main menu. Select Geocaching. Select a geocache. Select Go. Using Hints and Clues to find a Geocache You can use hints or clues, such as a description or coordinates, to help you find a geocache. 1 While navigating to a geocache, select MENU > Geocache. 2 Select an option: • To view details about the geocache, select Description. • To view a clue about a geocache location, select Hint.
Selecting a Profile When you change activities, you can change the setup of the device by changing the profile. 1 Press MENU twice to open the main menu. 2 Select Profile Change. 3 Select a profile. Calculating the Size of an Area 1 2 3 4 Press MENU twice to open the main menu. Select Area Calculation > Start. Walk around the perimeter of the area you want to calculate. Select Calculate when finished.
System Settings Press MENU twice to open the main menu. Select Setup > System. Satellite: Sets the satellite system options (Satellite Settings, page 25). Text Language: Sets the text language on the device. NOTE: Changing the text language does not change the language of user-entered data or map data, such as street names. Interface: Sets the format of the serial interface (Serial Interface Settings, page 25).
Turning On Battery Save Mode You can use battery save mode to prolong the battery life. 1 Press MENU twice to open the main menu. 2 Select Setup > Display > Battery Save > On. In battery save mode, the screen shuts off when the backlight times out. You can press screen. to turn on the Changing the Color Mode 1 Press MENU twice to open the main menu. 2 Select Setup > Display > Appearance.
Geocaching Settings Press MENU twice to open the main menu. Select Setup > Geocaching. Geocache Style: Sets the device to display the geocache list using names or codes. Filter Setup: Allows you to create and save custom filters for geocaches (Saving a Custom Geocache Filter, page 22). Found Geocaches: Allows you to edit the number of geocaches found. This number automatically increases when you log a find (Logging the Attempt, page 23).
Changing the Page Sequence 1 2 3 4 Press MENU twice to open the main menu. Select Setup > Menus > Page Sequence > Edit Page Sequence. Select a page. Select an option: • To move the page up or down in the list, select Move. • To add a new page to the page sequence, select Insert, and select a category. • To remove a page from the page sequence, select Remove. TIP: You can press PAGE to view the page sequence. Configuring the Page Ribbon Display 1 Press MENU twice to open the main menu.
Changing the Units of Measure 1 Press MENU twice to open the main menu. 2 Select Setup > Units. 3 Select an option: • To change the unit of measure for speed and distance, select Speed/Distance. • To change the unit of measure for vertical speed, select Vertical Speed. • To change the unit of measure for elevation, select Elevation > Elevation. • To change the unit of measure for depth, select Elevation > Depth. • To change the unit of measure for temperature, select Temperature. 4 Select a unit of measure.
Deleting a Profile NOTE: You cannot delete a profile while it is in use. 1 Press MENU twice to open the main menu. 2 Select Setup > Profiles. 3 Select a profile. 4 Select Delete. Resetting Data and Settings 1 Press MENU twice to open the main menu. 2 Select Setup > Reset. 3 Select an option: • To reset data specific to a trip, such as distance and averages, select Reset Trip Data. • To delete all saved waypoints, select Delete All Waypoints.
Getting More Information You can find more information about this product on the Garmin website. • Go to support.garmin.com for additional manuals, articles, and software updates. • Go to buy.garmin.com, or contact your Garmin dealer for information about optional accessories and replacement parts. Attaching a Lanyard 1 Insert the loop of the lanyard through the slot in the device. 2 Thread the other end of the lanyard through the loop, and pull it tight.
Data Management NOTE: The device is not compatible with Windows 95, 98, Me, Windows NT , and Mac OS 10.3 and earlier. ® ® ® File Types The handheld device supports these file types: • GPX route, track, and waypoint files. • GPX geocache files (Downloading Geocaches Using a Computer, page 21). • JPEG photo files. • GPI custom POI files from the Garmin POI Loader. Go to www.garmin.com/products/poiloader. • FIT files for exporting to Garmin Connect.
Transferring Files to Your Device 1 Connect the device to your computer. On Windows computers, the device appears as a removable drive or a portable device, and the memory card may appear as a second removable drive. On Mac computers, the device and memory card appear as mounted volumes. NOTE: Some computers with multiple network drives may not display device drives properly. See your operating system documentation to learn how to map the drive. 2 On your computer, open the file browser. 3 Select a file.
Specifications Battery type Two AA batteries (1.5 V or lower alkaline, NiMH, or lithium) or optional NiMH battery pack Battery life Up to 19 hr. Water rating IEC 60529 IPX6 (unit level only) and IPX71 Operating temperature range From -20° to 60°C (from -4° to 140°F) Compass-safe distance 17.5 cm (7 in.) Viewing E-label Regulatory and Compliance Information The label for this device is provided electronically.
Appendix Data Fields Some data fields require you to be navigating to display data. Accuracy of GPS: The margin of error for your exact location. For example, your GPS location is accurate to within +/- 3.65 m (12 ft.). Activity Distance: The distance traveled for the current track or activity. Alarm Timer: The current time of the countdown timer. Automotive Turn: The direction of the next turn in the route. You must be navigating for this data to appear.
Last Lap Time: The stopwatch time for the last completed lap. Location (lat/lon): The current position in latitude and longitude, regardless of the selected position format setting. Location (selected): The current position using the selected position format setting. Location of Dest.: The position of your final destination. You must be navigating for this data to appear. None: This is a blank data field. Odometer: A running tally of the distance traveled for all trips.
Waypoint at Next: The next point on the route. You must be navigating for this data to appear. Optional Accessories Optional accessories, such as mounts, maps, fitness accessories, and replacement parts, are available at http://buy.garmin.com or from your Garmin dealer. Troubleshooting Maximizing Battery Life You can do several things to extend the life of the batteries. • Reduce the backlight brightness (Adjusting the Backlight, page 6). • Reduce the backlight timeout (Display Settings, page 25).
Index A accessories 31, 37 activities 17–20 alarms clock 21 marine 27 proximity 14, 23 tones 26 area calculation 21, 24 B backlight 5, 25, 26 battery 31 installing 3 maximizing 25, 26, 37 brightness 6 buttons 1, 2, 5 locking 5 C calculator 21 calendar 21 charging 1 chirp 27 cleaning the device 31 compass 6, 8, 9, 11 calibrating 8 navigating 8 settings 10 computer, connecting 32 customizing the device 24, 27, 28 D dashboards 11 data sharing 19 storing 33 transferring 32, 33 data fields 24, 35 deleting
support.garmin.