
Installation instructions


Connecting the Hydraulic Lines to the Pump
Refer to the layout diagrams beginning on Single-Helm with
Power Assist Layout for assistance.
1
Disconnect the necessary lines from the hydraulic system.
2
Add a T-connector to the starboard and port lines of the
system between the helm and the steering cylinder.
NOTE: If the boat has a power-assist module, add the T-
connectors between the power-assist module and the
steering cylinder.
3
Complete an action:
• If the boat does not have a power-assist module, add
enough hydraulic hose to connect the return fitting on the
helm to the pump fitting labeled with a T.
• If the boat has a power-assist module, a return line should
already exist between the helm and the power-assist
module. Add a T-connector to the return line of the system
between the power-assist module and the helm.
4
Add hydraulic hose to the unused fitting on each T-connector,
with enough hose to connect the T-connector to the pump
fittings.
5
Connect the starboard line T-connector to a pump fitting
labeled with a C1 or C2.
6
Connect the port line T-connector to the pump fitting labeled
with a C1 or C2 that you did not use in step 4.
7
Complete an action:
• If the boat does not have a power-assist module, connect
the return fitting on the helm to the pump fitting labeled
with a T.
• If the boat has a power-assist module, connect the return
line T-connector to the pump fitting labeled with a T.
8
Install the Shadow Drive in the port or starboard hydraulic
line between the helm and the T-connector (Installing the
Shadow Drive).
9
Install a shut-off valve (not included) on each hydraulic line
that connects directly to the pump.
10
Insert, tighten, and seal the included plugs in the unused
pump fittings, if they are not already in place.
Connecting the Pump to Power
WARNING
When connecting the power cable, do not remove the in-line
fuse holder. To prevent the possibility of injury or product
damage caused by fire or overheating, the appropriate fuse
must be in place as indicated in the product specifications. In
addition, connecting the power cable without the appropriate
fuse in place will void the product warranty.
You should connect the pump power cable directly to the boat
battery, if possible. Although it is not recommended, if you
connect the power cable to a terminal block or other source,
connect it through a 40 A fuse.
If you plan to route the pump through a breaker or a switch near
the helm, you should use an appropriately sized relay and
control wire. Do not extend the pump power cable in this case.
1
Route the connector-terminated end of the power cable to the
pump, but do not connect it to the pump.
2
Route the bare-wire end of the power cable to the boat
battery.
If the cable is not long enough, it can be extended by splicing
a larger wire (Power Cable Extensions).
Observe the cautions at the beginning of this section about
extending the power cable.
3
Connect the black wire (-) to the negative (-) terminal of the
battery.
4
Connect the red wire (+) to the positive (+) terminal of the
battery.
5
Leave the power cable disconnected from the pump at this
time.
You should connect the power cable to the pump only after
you install all of the other autopilot components to avoid
unwanted activity from the pump.
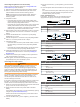
Power Cable Extensions
If necessary, the power cable can be extended using the
appropriate wire gauge for the length of the extension.
Item Description
À
Fuse
Á
Battery
Â
9 ft. (2.7 m) no extension
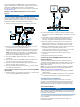
Item Description
À
Splice
Á
10 AWG (5.26 mm²) extension wire
Â
Fuse
Ã
8 in. (20.3 cm)
Ä
Battery
Å
8 in. (20.3 cm)
Æ
Up to 15 ft. (4.6 m)
Item Description
À
Splice
Á
8 AWG (8.36 mm²) extension wire
Â
Fuse
Ã
8 in. (20.3 cm)
Ä
Battery
Å
8 in. (20.3 cm)
Æ
Up to 23 ft. (7 m)
Item Description
À
Splice
Á
6 AWG ( 13.29 mm²) extension wire
Â
Fuse
Ã
8 in. (20.3 cm)
Ä
Battery
Å
8 in. (20.3 cm)
Æ
Up to 36 ft. (11 m)
7