
User manual


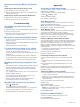


Table Of Contents
- Table of Contents
- Getting Started
- Vehicle Profiles
- Dash Cam
- Driver Awareness Features and Alerts
- Navigating to Your Destination
- Finding and Saving Locations
- Points of Interest
- Finding Trucking Points of Interest
- Finding a Location Using the Search Bar
- Finding a Location by Category
- Location Search Results
- Changing the Search Area
- Custom Points of Interest
- Parking
- Search Tools
- Viewing Recently Found Locations
- Viewing Current Location Information
- Adding a Shortcut
- Saving Locations
- Using the Map
- Hands-Free Calling
- Traffic
- Using the Apps
- Garmin fleet Settings
- Device Information
- Device Maintenance
- Troubleshooting
- Appendix
- Index

• Install the device in the mount, and connect the mount to
vehicle power.
• Connect the device to an optional power adapter accessory,
such as a wall power adapter.
You can purchase an approved Garmin AC-DC adapter
suitable for home or office use from a Garmin dealer or
www.garmin.com. The device may charge slowly when
connected to a third-party adapter.
Device Maintenance
Garmin Support Center
Go to support.garmin.com for help and information, such as
product manuals, frequently asked questions, videos, and
customer support.
Updating Maps and Software Using a Wi‑Fi
Network
NOTICE
Map and software updates may require the device to download
large files. Regular data limits or charges from your internet
service provider apply. Contact your internet service provider for
more information about data limits or charges.
You can update the maps and software by connecting your
device to a Wi‑Fi network that provides access to the internet.
This allows you to keep your device up to date without
connecting it to a computer.
1
Connect the device to a Wi‑Fi network (Connecting to a
Wireless Network, page 15).
While connected to a Wi‑Fi network, the device checks for
available updates automatically and displays a notification
when an update is available.
2
Select an option:
• When an update notification appears, swipe down from
the top of the screen, and select An update is available..
• To manually check for updates, select > About device
> System updates.
The device displays available map and software updates.
When an update is available, Update Available appears
below Map or Software.
3
Select an option:
• To install all available updates, select Download.
• To install only map updates, select Map.
• To install only software updates, select Software.
4
Read the license agreements, and select Accept All to
accept the agreements.
NOTE: If you do not agree with the license terms, you can
select Reject. This stops the update process. You cannot
install updates until you accept the license agreements.
5
Using a USB cable, connect the device to external power,
and select Continue (Charging the Device, page 16).
For the best results, a USB wall charger that provides at least
1 A power output is recommended. Many USB power
adapters for smartphones, tablets, or portable media devices
may be compatible.
6
Keep the device connected to external power and within
range of the Wi‑Fi network until the update process is
complete.
TIP: If a map update is interrupted or canceled before it
completes, your device may be missing map data. To repair
missing map data, you must update the maps again.
Device Care
NOTICE
Avoid dropping your device.
Do not store the device where prolonged exposure to extreme
temperatures can occur, because it can cause permanent
damage.
Never use a hard or sharp object to operate the touchscreen, or
damage may result.
Do not expose the device to water.
Cleaning the Outer Casing
NOTICE
Avoid chemical cleaners and solvents that can damage plastic
components.
1
Clean the outer casing of the device (not the touchscreen)
using a cloth dampened with a mild detergent solution.
2
Wipe the device dry.
Cleaning the Touchscreen
1
Use a soft, clean, lint-free cloth.
2
If necessary, lightly dampen the cloth with water.
3
If using a dampened cloth, turn off the device and disconnect
the device from power.
4
Gently wipe the screen with the cloth.
Avoiding Theft
• Remove the device and mount from sight when not in use.
• Remove the residue left on the windshield by the suction cup.
• Do not keep your unit in the glove compartment.
• Register your device using the Garmin Express software
(garmin.com/express).
Changing the Fuse in the Vehicle Power
Cable
NOTICE
When replacing the fuse, do not lose any of the small pieces
and make sure they are put back in the proper position. The
vehicle power cable does not work unless it is assembled
correctly.
If your device does not charge in your vehicle, you may need to
replace the fuse located at the tip of the vehicle adapter.
1
Rotate the end piece
À
counter clockwise to unlock it.
TIP: You may need to use a coin to remove the end piece.
2
Remove the end piece, the silver tip
Á
, and the fuse
Â
.
3
Insert a new fast-blow fuse that has the same current, such
as 1 A or 2 A.
4
Place the silver tip in the end piece.
5
Push in the end piece and rotate it clockwise to lock it back
into the vehicle power cable
Ã
.
Resetting the Device
You can reset your device if it stops functioning.
Hold the power key for 12 seconds.
Device Maintenance 17