
User manual

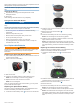
Table Of Contents
- Table of Contents
- Introduction
- Training
- My Stats
- Performance Measurements
- Personal Records
- Training Zones
- Navigation
- Connected Features
- Wireless Sensors
- History
- Customizing Your Device
- Connect IQ Downloadable Features
- Profiles
- About Training Settings
- Phone Settings
- System Settings
- Setting Up Extended Display Mode
- Device Information
- Troubleshooting
- Appendix
- Index

Avoid chemical cleaners, solvents, and insect repellents that can
damage plastic components and finishes.
Secure the weather cap tightly to prevent damage to the USB
port.
Cleaning the Device
1
Wipe the device using a cloth dampened with a mild
detergent solution.
2
Wipe it dry.
After cleaning, allow the device to dry completely.
Caring for the Heart Rate Monitor
NOTICE
You must unsnap and remove the module before washing the
strap.
A build up of sweat and salt on the strap can decrease the ability
of the heart rate monitor to report accurate data.
• Go to www.garmin.com/HRMcare for detailed washing
instructions.
• Rinse the strap after every use.
• Machine wash the strap after every seven uses.
• Do not put the strap in a dryer.
• When drying the strap, hang it up or lay it flat.
• To prolong the life of your heart rate monitor, unsnap the
module when not in use.
User Replaceable Batteries
WARNING
See the Important Safety and Product Information guide in the
product box for product warnings and other important
information.
Replacing the Heart Rate Monitor Battery
1
Use a small Phillips screwdriver to remove the four screws on
the back of the module.
2
Remove the cover and battery.
3
Wait 30 seconds.
4
Insert the new battery with the positive side facing up.
NOTE: Do not damage or lose the O-ring gasket.
5
Replace the back cover and the four screws.
NOTE: Do not overtighten.
After you replace the heart rate monitor battery, you may need
to pair it with the device again.
Replacing the Speed Sensor Battery
The device uses one CR2032 battery. The LED flashes red to
indicate a low battery level after two revolutions.
1
Locate the circular battery cover on the front of the sensor.
2
Twist the cover counter-clockwise until the cover is loose
enough to remove.
3
Remove the cover and the battery .
4
Wait 30 seconds.
5
Insert the new battery into the cover, observing polarity.
NOTE: Do not damage or lose the O-ring gasket.
6
Twist the cover clockwise so that the marker on the cover
aligns with the marker on the case.
NOTE: The LED flashes red and green for a few seconds
after battery replacement. When the LED flashes green and
then stops flashing, the device is active and ready to send
data.
Replacing the Cadence Sensor Battery
The device uses one CR2032 battery. The LED flashes red to
indicate a low battery level after two revolutions.
1
Locate the circular battery cover on the back of the
sensor.
2
Twist the cover counter-clockwise until the marker points to
unlocked and the cover is loose enough to remove.
3
Remove the cover and the battery .
4
Wait 30 seconds.
5
Insert the new battery into the cover, observing polarity.
NOTE: Do not damage or lose the O-ring gasket.
6
Twist the cover clockwise until the marker points to locked.
NOTE: The LED flashes red and green for a few seconds
after battery replacement. When the LED flashes green and
then stops flashing, the device is active and ready to send
data.
Device Information 23