
User manual

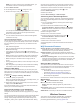
Table Of Contents
- Table of Contents
- Introduction
- Training
- My Stats
- Performance Measurements
- Personal Records
- Training Zones
- Navigation
- Connected Features
- Wireless Sensors
- History
- Customizing Your Device
- Connect IQ Downloadable Features
- Profiles
- About Training Settings
- Phone Settings
- System Settings
- Setting Up Extended Display Mode
- Device Information
- Troubleshooting
- Appendix
- Index

3
Select Previous Record > .
NOTE: This does not delete any saved activities.
Deleting a Personal Record
1
Select > My Stats > Personal Records.
2
Select a personal record.
3
Select > .
Training Zones
• Heart rate zones (Setting Your Heart Rate Zones, page 15)
• Power zones (Setting Your Power Zones, page 16)
Navigation
Navigation features and settings also apply to navigating
courses (Courses, page 10) and segments (Segments,
page 3).
• Locations and finding places (Locations, page 10)
• Planning a course (Courses, page 10)
• Route settings (Route Settings, page 12)
• Map settings (Map Settings, page 12)
Locations
You can record and store locations in the device.
Marking Your Location
Before you can mark a location, you must locate satellites.
If you want to remember landmarks or return to a certain spot,
you can mark a location.
1
Go for a ride.
2
Select Navigation > > Mark Location > .
Saving Locations from the Map
1
Select Navigation > Browse Map.
2
Browse the map for the location.
3
Select the location.
Location information appears at the top of the map.
4
Select the location information.
5
Select > .
Navigating to a Location
1
Select Navigation.
2
Select an option:
• Select Browse Map to navigate to a location on the map.
• Select Search to navigate to a point of interest, city,
address, intersection, or known coordinates.
TIP: You can select to narrow your search area.
• Select Saved Locations to navigate to a saved location.
TIP: You can select to enter specific search
information.
• Select Recent Finds to navigate to one of the last 50
locations you have found.
• Select > Select Search Area to narrow your search
area.
3
Select a location.
4
Select Ride.
5
Follow the on-screen instructions to your destination.
Navigating Back to Start
At any point during your ride, you can return to the starting point.
1
Go for a ride.
2
At any time, swipe down from the top of the screen, and on
the controls widget, select Back to Start.
3
Select Along Same Route or Most Direct Route.
4
Select Ride.
The device navigates you back to the starting point of your
ride.
Stopping Navigation
1
Scroll to the map.
2
Select > .
Editing Locations
1
Select Navigation > Saved Locations.
2
Select a location.
3
Select the information bar at the top of the screen.
4
Select .
5
Select an attribute.
For example, select Change Elevation to enter a known
altitude for the location.
6
Enter the new information, and select .
Deleting a Location
1
Select Navigation > Saved Locations.
2
Select a location.
3
Select the location information at the top of the screen.
4
Select > Delete Location > .
Projecting a Location
You can create a new location by projecting the distance and
bearing from a marked location to a new location.
1
Select Navigation > Saved Locations.
2
Select a location.
3
Select the location information at the top of the screen.
4
Select > Project Location.
5
Enter the bearing and distance to the projected location.
6
Select .
Courses
Following a previously recorded activity: You can follow a
saved course simply because it is a good route. For example,
you can save and follow a bike friendly commute to work.
Racing against a previously recorded activity: You can also
follow a saved course, trying to match or exceed previously
set performance goals. For example, if the original course
was completed in 30 minutes, you can race against a Virtual
Partner trying to complete the course in under 30 minutes.
Following an existing ride from Garmin Connect: You can
send a course from Garmin Connect to your device. Once it
10 Navigation