EDGE 830 ® Owner’s Manual
© 2019 Garmin Ltd. or its subsidiaries All rights reserved. Under the copyright laws, this manual may not be copied, in whole or in part, without the written consent of Garmin. Garmin reserves the right to change or improve its products and to make changes in the content of this manual without obligation to notify any person or organization of such changes or improvements. Go to www.garmin.com for current updates and supplemental information concerning the use of this product.
Table of Contents Introduction.....................................................................1 Device Overview ......................................................................... 1 Home Screen Overview ......................................................... 1 Viewing Widgets .................................................................... 1 Using the Touchscreen .......................................................... 1 Locking the Touchscreen ............................................
Pedal-Based Power ............................................................. 17 Cycling Dynamics ................................................................ 17 Using Cycling Dynamics ................................................. 17 Updating the Vector Software Using the Edge Device ........ 17 Situational Awareness .............................................................. 17 Using Electronic Shifters ........................................................... 17 Using an eBike .............
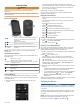
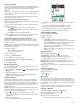
Introduction WARNING See the Important Safety and Product Information guide in the product box for product warnings and other important information. Always consult your physician before you begin or modify any exercise program. Device Overview Select to enter sleep mode and wake the device. Hold to turn the device on and off and lock the touchscreen. Select to mark a new lap. Select to start and stop the activity timer. Electrical contacts Charge using an Edge external battery pack accessory.
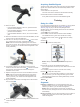
Installing the Out-Front Mount NOTE: If you do not have this mount, you can skip this task. 1 Select a secure location to mount the Edge device where it does not interfere with the safe operation of your bike. 2 Use the hex key to remove the screw from the handlebar connector . 2 Plug the small end of the USB cable into the USB port on the device. 3 Plug the large end of the USB cable into an AC adapter or a computer USB port. 4 Plug the AC adapter into a standard wall outlet.
Acquiring Satellite Signals The device may need a clear view of the sky to acquire satellite signals. The time and date are set automatically based on the GPS position. 1 Go outdoors to an open area. The front of the device should be oriented toward the sky. 2 Wait while the device locates satellites. It may take 30–60 seconds to locate satellite signals. Training Going for a Ride 3 Select an option: • If the handlebar diameter is 25.4 mm, place the thicker pad around the handlebar.
Strava™ Segments You can download Strava segments to your Edge 830 device. Follow Strava segments to compare your performance with your past rides, friends, and pros who have ridden the same segment. To sign up for a Strava membership, go to the segments widget in your Garmin Connect account. For more information, go to www.strava.com. The information in this manual applies to both Garmin Connect segments and Strava segments.
During a rest lap, the timer continues to run and data is recorded. 5 Select the workout step duration. For example, select Distance to end the step after a specific distance. 6 If necessary, enter a custom value for the duration. 7 Select the workout step target type. For example, select Heart Rate Zone to maintain a consistent heart rate during the step. 8 If necessary, select a target zone or enter a custom range. For example, you can select a heart rate zone.
• To add an open-ended warm up to your workout, select Warm Up > On. • To add an open-ended cool down to your workout, select Cool Down > On. Starting an Interval Workout 1 Select Training > Intervals > Do Workout. 2 Select to start the activity timer. 3 When your interval workout has a warm up, select to begin the first interval. 4 Follow the on-screen instructions. When you complete all of the intervals, a message appears.
Functional threshold power (FTP): The device uses your user profile information from the initial setup to estimate your FTP. For a more accurate rating, you can conduct a guided test. HRV stress test: The HRV (heart rate variability) stress test requires a Garmin chest heart rate monitor. The device records your heart rate variability while standing still for 3 minutes. It provides your overall stress level. The scale is 1 to 100, and a lower score indicates a lower stress level.
fitness level. The optimal range is determined based on your individual fitness level and training history. The range adjusts as your training time and intensity increase or decrease. Getting Your Training Load Estimate Before you can view your training load estimate, you must put on the heart rate monitor, install the power meter, and pair them with your device (Pairing Your Wireless Sensors, page 16). If your device was packaged with a heart rate monitor, the device and sensor are already paired.
> My Stats > Recovery > Enable. 1 Select 2 Go for a ride. 3 After your ride, select Save Ride. The recovery time appears. The maximum time is 4 days, and the minimum time is 6 hours. Getting Your FTP Estimate The device uses your user profile information from the initial setup to estimate your functional threshold power (FTP). For a more accurate FTP value, you can conduct an FTP test using a paired power meter and heart rate monitor (Conducting an FTP Test, page 9). Select > My Stats > FTP.
3 Select Previous Record > . NOTE: This does not delete any saved activities. Deleting a Personal Record > My Stats > Personal Records. 1 Select Select a personal record. 2 3 Select > . Training Zones • Heart rate zones (Setting Your Heart Rate Zones, page 15) • Power zones (Setting Your Power Zones, page 16) Navigation Navigating Back to Start At any point during your ride, you can return to the starting point.
is saved to your device, you can follow the course or race against the course. Planning and Riding a Course You can create and ride a custom course. A course is a sequence of waypoints or locations that leads you to your final destination. 1 Select Navigation > Courses > Course Creator > Add First Location. 2 Select an option: • To select your current location on the map, select Current Location. • To select a saved location, select Saved, and select a location.
Using ClimbPro The ClimbPro feature helps you manage your effort for the upcoming climbs on a course. Before your ride, you can view details about the climbs, including when they occur, average gradient, and total ascent. The climb categories, based on length and gradient, are indicated by color. 1 Enable the ClimbPro feature for the activity profile (Updating Your Activity Profile, page 19). 2 Review the climbs and course details for the course (Viewing Course Details, page 11).
Course, segment, and workout downloads from Garmin Connect: Allows you to search for activities on Garmin Connect using your smartphone and send them to your device. Device to device transfers: Allows you to wirelessly transfer files to another compatible Edge device. Find my Edge: Locates your lost Edge device that is paired with your smartphone and currently within range. GroupTrack: Allows you to keep track of other riders in your group using LiveTrack directly on screen and in real time.
NOTE: If you have more than one compatible device, you must select a device for the GroupTrack session. 5 Select Start LiveTrack. 6 On the Edge device, select , and go for a ride. 7 Scroll to the map to view your connections. an audio prompt, the Garmin Connect app mutes the primary audio of the smartphone to play the announcement. You can customize the volume levels on the Garmin Connect app. 1 From the Garmin Connect app, select or . 2 Select Garmin Devices. 3 Select your device.
Putting On the Heart Rate Monitor NOTE: If you do not have a heart rate monitor, you can skip this task. You should wear the heart rate monitor directly on your skin, just below your sternum. It should be snug enough to stay in place during your activity. 1 Snap the heart rate monitor module onto the strap. The Garmin logos on the module and the strap should be right-side up.
default setting excludes zero values that occur when you are not pedaling. You can change the value of this setting (Data Recording Settings, page 21). Pairing Your Wireless Sensors The sensor may be tilted when installed on an asymmetrical hub. This does not affect operation. 3 Rotate the wheel to check for clearance. The sensor should not contact other parts of your bike. NOTE: The LED flashes green for five seconds to indicate activity after two revolutions.
Pedal-Based Power Vector measures pedal-based power. Vector measures the force you apply a few hundred times every second. Vector also measures your cadence or rotational pedaling speed. By measuring the force, the direction of force, the rotation of the crank arm, and time, Vector can determine power (watts). Because Vector independently measures left and right leg power, it reports your left-right power balance. NOTE: The Vector S system does not provide left-right power balance.
3 Select an option: • If your ride has data from one sensor, select Time in HR Zone or Time in Power Zone. • If your ride has data from both sensors, select Time in Zone, and select Heart Rate Zones or Power Zones. For information about data averaging for cadence and power, see Data Averaging for Cadence or Power, page 16. Data Management NOTE: The device is not compatible with Windows 95, 98, Me, Windows NT , and Mac OS 10.3 and earlier. ® ® Deleting a Ride > History > Rides > .
Customizing Your Device Connect IQ Downloadable Features You can add Connect IQ features to your device from Garmin and other providers using the Connect IQ Mobile app. Data Fields: Allow you to download new data fields that present sensor, activity, and history data in new ways. You can add Connect IQ data fields to built-in features and pages. Widgets: Provide information at a glance, including sensor data and notifications.
5 6 7 8 Select Layout and Data Fields. Swipe left or right to change the layout. Select . Select an option. • Tap a data field, then tap another data field to rearrange them. • Double-tap a data field to change it. 9 Select . Rearranging Data Screens > Activity Profiles. 1 Select Select a profile. 2 3 Select Data Screens > . 4 Select a data screen. or . 5 Select 6 Select . Alerts You can use alerts to train toward specific time, distance, calorie, heart rate, cadence, and power goals.
4 Select an option: • Select When Stopped to pause the timer automatically when you stop moving. • Select Custom Speed to pause the timer automatically when your speed drops below a specified value. 5 If necessary, customize optional time data fields (Adding a Data Screen, page 19). Using Auto Scroll You can use the Auto Scroll feature to automatically cycle through all of the training data screens while the timer is running. > Activity Profiles. 1 Select 2 Select a profile.
Turning the Device Tones On and Off Select > System > Tones. Changing the Device Language Select > System > Language. Time Zones NOTE: If you have already set up your device with Wi‑Fi connectivity, Garmin Connect can automatically download available software updates to your device when it connects using Wi‑Fi. Specifications Each time you turn on the device and acquire satellites or sync with your smartphone, the device automatically detects your time zone and the current time of day.
Avoid chemical cleaners, solvents, and insect repellents that can damage plastic components and finishes. Secure the weather cap tightly to prevent damage to the USB port. Cleaning the Device 1 Wipe the device using a cloth dampened with a mild detergent solution. 2 Wipe it dry. After cleaning, allow the device to dry completely. Caring for the Heart Rate Monitor NOTICE You must unsnap and remove the module before washing the strap.
Troubleshooting Resetting the Device If the device stops responding, you may need to reset it. This does not erase any of your data or settings. Hold for 10 seconds. The device resets and turns on. Restoring the Default Settings You can restore the default configuration settings and activity profiles. This will not remove your history or activity data, such as rides, workouts, and courses. Select > System > Device Reset > Reset Default Settings > .
%Heart Rate Reserve: The percentage of heart rate reserve (maximum heart rate minus resting heart rate). %Max Heart Rate: The percentage of maximum heart rate. 10s Balance: The 10-second moving average of the left/right power balance. 10s Power: The 10-second moving average of power output. 10s Watts/kg: The 10-second moving average of power output in watts per kilogram. 30s Balance: The 30-second moving average of the left/right power balance. 30s Power: The 30-second moving average of power output.
Heading: The direction you are moving. Heart Rate: Your heart rate in beats per minute (bpm). Your device must be connected to a compatible heart rate monitor. Heart Rate Bars: A bar graph showing your current, average, and maximum heart rate values for the current activity. Heart Rate Graph: A line graph showing your current, average, and maximum heart rate values for the current activity. Heart Rate to Go: During a workout, the amount you are above or below the heart rate target.
Time Standing: The time spent standing while pedaling for the current activity. Time to Destination: The estimated time remaining before you reach the destination. You must be navigating for this data to appear. Time to Go: During a workout or course, the remaining time when you are using a time target. Time to Next: The estimated time remaining before you reach the next waypoint in the route. You must be navigating for this data to appear.
Tire Size Wheel Circumference (mm) 20 × 1.75 1515 20 × 1-3/8 1615 22 × 1-3/8 1770 22 × 1-1/2 1785 24 × 1 1753 24 × 3/4 Tubular 1785 24 × 1-1/8 1795 24 × 1.75 1890 24 × 1-1/4 1905 24 × 2.00 1925 24 × 2.125 1965 26 × 7/8 1920 26 × 1-1.0 1913 26 × 1 1952 26 × 1.25 1953 26 × 1-1/8 1970 26 × 1.40 2005 26 × 1.50 2010 26 × 1.75 2023 26 × 1.95 2050 26 × 2.00 2055 26 × 1-3/8 2068 26 × 2.10 2068 26 × 2.125 2070 26 × 2.35 2083 26 × 1-1/2 2100 26 × 3.
Index A accessories 14, 16, 24 acclimation 7 addresses, finding 10 alerts 20 altimeter, calibrating 24 altitude 7 ANT+ sensors 1, 14, 16, 17 fitness equipment 6 pairing 6, 16 applications 12, 14, 19 smartphone 1 assistance 13 Auto Lap 20 Auto Pause 20 auto scroll 21 auto sleep 20 B back to start 10 backlight 21 bands 24 battery charging 1 maximizing 24 replacing 23 type 2 Bluetooth sensors 1, 14 Bluetooth technology 12, 14, 21 C cadence 16 alerts 20 calendar 5 calibrating, power meter 16 calorie, alerts 2
support.garmin.