
User manual

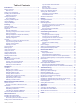

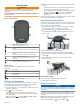
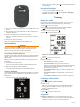

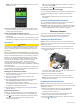
Table Of Contents
- Table of Contents
- Introduction
- Training
- My Stats
- Navigation
- Bluetooth Connected Features
- Wireless Sensors
- History
- Customizing Your Device
- Device Information
- Troubleshooting
- Appendix
- Index

2
Plug the small end of the USB cable into the USB port on the
device.
3
Plug the large end of the USB cable into an AC adapter or a
computer USB port.
4
Plug the AC adapter into a standard wall outlet.
When you connect the device to a power source, the device
turns on.
5
Charge the device completely.
After you charge the device, close the weather cap.
About the Battery
WARNING
This device contains a lithium-ion battery. See the Important
Safety and Product Information guide in the product box for
product warnings and other important information.
Acquiring Satellite Signals
The device may need a clear view of the sky to acquire satellite
signals. The time and date are set automatically based on the
GPS position.
TIP: For more information about GPS, go to www.garmin.com
/aboutGPS.
1
Go outdoors to an open area.
The front of the device should be oriented toward the sky.
2
Wait while the device locates satellites.
It may take 30–60 seconds to locate satellite signals.
Viewing Widgets
Your device comes preloaded with several widgets. You should
pair your device with a smartphone to get the most of out your
Edge device.
• From the home screen, select or .
The device scrolls through the widget loop.
• While in an active widget, select to view additional options
for that widget.
Using the Backlight
• To turn on the backlight, select any key.
• To adjust the timeout, hold , select System > Backlight
Timeout, and select an option.
Training
Going for a Ride
If your device was packaged with an ANT+
®
sensor, they are
already paired and can be activated during initial setup.
1
Hold to turn on the device.
2
Go outside, and wait while the device locates satellites.
appears solid when the device is ready.
3
From the home screen, select .
4
Select to start the activity timer.
NOTE: History is recorded only while the activity timer is
running.
5
Select to stop the activity timer.
6
Select an option:
• Select Resume to resume your ride.
• Select Save Ride to stop your ride and save it.
TIP: You can select the ride type. Accurate ride type data
is important for creating bike friendly courses on your
Garmin Connect account.
• Select Discard Ride to stop your ride and delete it from
your device.
• Select Back to Start to navigate back to your starting
location.
• Select Mark Location to mark your location and save it.
Following a Saved Ride
1
Hold .
2
Select Navigation > Ride an Activity.
3
Select a ride.
TIP: You can select to view more detailed information
about your ride, such as a summary, map location, lap
details, or to delete this ride.
4
Select Ride.
5
Select to start the activity timer.
Segments
Following a segment: You can send segments from your
Garmin Connect account to your device. After a segment is
saved to your device, you can follow the segment.
2 Training