EDGE 130 ® Owner’s Manual
© 2018 Garmin Ltd. or its subsidiaries All rights reserved. Under the copyright laws, this manual may not be copied, in whole or in part, without the written consent of Garmin. Garmin reserves the right to change or improve its products and to make changes in the content of this manual without obligation to notify any person or organization of such changes or improvements. Go to www.garmin.com for current updates and supplemental information concerning the use of this product.
Table of Contents Introduction.....................................................................1 Device Overview ......................................................................... 1 Status Icons ........................................................................... 1 Pairing Your Smartphone ........................................................... 1 Installing the Standard Mount ..................................................... 1 Releasing the Edge .....................................
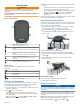
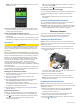
Introduction WARNING See the Important Safety and Product Information guide in the product box for product warnings and other important information. Always consult your physician before you begin or modify any exercise program. Device Overview 3 Select an option to add your device to your Garmin Connect account: • If this is the first device you have paired with the Garmin Connect app, follow the on-screen instructions.
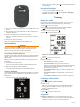
• While in an active widget, select for that widget. to view additional options Using the Backlight • To turn on the backlight, select any key. • To adjust the timeout, hold , select System > Backlight Timeout, and select an option. Training Going for a Ride If your device was packaged with an ANT+ sensor, they are already paired and can be activated during initial setup. to turn on the device. 1 Hold 2 Go outside, and wait while the device locates satellites. appears solid when the device is ready.
NOTE: When you download a course from your Garmin Connect account, all segments in the course are downloaded automatically. Racing a segment: You can race a segment, trying to match or exceed your personal record or other cyclists who have ridden the segment. 3 If necessary, hold Strava™ Segments Setting a Segment to Adjust Automatically You can download Strava segments to your Edge 130 device.
• Stay away from your course path as you warm up. When you are ready to begin, head toward your course. When you are on any part of the course path, a message appears. NOTE: As soon as you select , your Virtual Partner starts the course and does not wait for you to warm up. • Scroll to the map to view the course map. If you stray from the course, the device displays a message. Viewing Course Details 1 Hold . 2 Select Navigation > Courses. 3 Select a course.
Deleting a Personal Record 1 Hold . 2 Select My Stats > Personal Records. 3 Select a personal record. 4 Select Options > Clear Record > Yes. Navigation Navigation features and settings also apply to navigating courses (Courses, page 3) and segments (Segments, page 2). • Locations (Locations, page 5) • Map settings (Viewing User Locations on the Map, page 5) Locations You can record and store locations in the device. Marking Your Location Before you can mark a location, you must locate satellites.
NOTE: Some data requires an optional accessory such as a heart rate monitor. TIP: You can select cancel the message. 2 If necessary, select before the countdown is complete to to send the message immediately. Cancelling an Assistance Message You can cancel the assistance message on your Edge device or your paired smartphone before it is sent to your emergency contacts. Select Cancel > Yes before the end of the thirty-second countdown.
After you put on the heart rate monitor, it is active and sending data. TIP: If the heart rate data is erratic or does not appear, see the troubleshooting tips (Tips for Erratic Heart Rate Data, page 7). Tips for Erratic Heart Rate Data 4 Rotate the crank arm to check for clearance. The sensor and bands should not contact any part of your bike or shoe. NOTE: The LED flashes green for five seconds to indicate activity after two revolutions.
The recovery time appears. The maximum time is 4 days, and the minimum time is 6 hours. About VO2 Max. Estimates VO2 max. is the maximum volume of oxygen (in milliliters) you can consume per minute per kilogram of body weight at your maximum performance. In simple terms, VO2 max. is an indication of athletic performance and should increase as your level of fitness improves. VO2 max. estimates are provided and supported by Firstbeat.
4 Select an option. • For Apple computers, select the device, and select File > Eject. 2 Disconnect the cable from your computer. Deleting a Ride 1 2 3 4 Hold . Select History > Rides. Select a ride to delete. Select Delete > Yes. Viewing Data Totals Data Management NOTE: The device is not compatible with Windows 95, 98, Me, Windows NT , and Mac OS 10.3 and earlier.
Auto Scroll: Enables you to move through all of the data screens automatically while the timer is running (Using Auto Scroll, page 4). Segment Alerts: Enables prompts that alert you to approaching segments (Segments, page 2). Nav. Prompts: Enables or disables turn-by-turn navigation prompts and off course warnings. GPS: Allows you to turn off GPS (Training Indoors, page 4), or change the satellite setting (Changing the Satellite Setting, page 10).
Device Care Replacing the Speed Sensor or Cadence Sensor Battery NOTICE Do not store the device where prolonged exposure to extreme temperatures can occur, because it can cause permanent damage. Avoid chemical cleaners, solvents, and insect repellents that can damage plastic components and finishes. Secure the weather cap tightly to prevent damage to the USB port. Avoid extreme shock and harsh treatment, because it can degrade the life of the product.
• Select the GPS setting (Changing the Satellite Setting, page 10). • Remove wireless sensors that you no longer use. • Go to buy.garmin.com, or contact your Garmin dealer for information about optional accessories and replacement parts. Improving GPS Satellite Reception • Frequently sync the device to your Garmin Connect account: ◦ Connect your device to a computer using the USB cable and the Garmin Express™ application.
Power - 3s Avg.: The 3-second moving average of power output. Power - Avg.: The average power output for the current activity. Power - kJ: The accumulated work performed (power output) in kilojoules. Power - Lap: The average power output for the current lap. Power - Max.: The top power output for the current activity. Power Zone: The current range of power output (1 to 7) based on your custom settings. Speed: The current rate of travel. Sunrise: The time of sunrise based on your GPS position.
Tire Size Wheel Circumference (mm) 27 × 1-1/8 2155 27 × 1-1/4 2161 27 × 1-3/8 2169 29 x 2.1 2288 29 x 2.2 2298 29 x 2.
Index indoor training 4 installing 1, 6 A K accessories 6, 8, 12 activities, starting 2 alerts 10 ANT+ sensors 6, 8 pairing 8 power meters 8 applications 5 smartphone 1 assistance 6 Auto Lap 4 Auto Pause 4 Auto Scroll 4 keys 1 B back to start 5 backlight 2 bands 12 battery charging 1 maximizing 9, 11 replacing 11 type 2 bike sensors 8 Bluetooth sensors 6 Bluetooth technology 1, 5, 10 C cadence 7 calibrating, power meter 8 calorie, alerts 10 cleaning the device 11 clearing data 11 computer, connecting
support.garmin.