EDGE 130 PLUS ® Owner’s Manual
© 2020 Garmin Ltd. or its subsidiaries All rights reserved. Under the copyright laws, this manual may not be copied, in whole or in part, without the written consent of Garmin. Garmin reserves the right to change or improve its products and to make changes in the content of this manual without obligation to notify any person or organization of such changes or improvements. Go to www.garmin.com for current updates and supplemental information concerning the use of this product.
Table of Contents Introduction.....................................................................1 Device Overview ......................................................................... 1 Status Icons ........................................................................... 1 Viewing Widgets .................................................................... 1 Using the Shortcut Menu ....................................................... 1 Pairing Your Smartphone ...................................
Improving GPS Satellite Reception .......................................... 14 My Device is in the Wrong Language ....................................... 14 Replacement O-rings ................................................................ 14 Updating the Software Using the Garmin Connect App ........... 14 Updating the Software Using Garmin Express ......................... 14 Product Updates ....................................................................... 14 Getting More Information ............
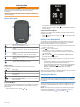
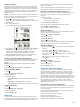
Introduction WARNING See the Important Safety and Product Information guide in the product box for product warnings and other important information. Always consult your physician before you begin or modify any exercise program. Device Overview The device scrolls through the widget loop. • While in an active widget, select to view additional options for that widget. Using the Shortcut Menu Shortcut menu options are available to quickly access features or perform functions.
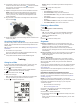
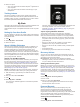
Releasing the Edge 1 Turn the Edge clockwise to unlock the device. 2 Lift the Edge off the mount. 2 Plug the small end of the USB cable into the USB port on the device. 3 Plug the large end of the USB cable into an AC adapter or a computer USB port. 4 Plug the AC adapter into a standard wall outlet. When you connect the device to a power source, the device turns on. 5 Charge the device completely. After you charge the device, close the weather cap.
6 If necessary, use the 2 mm hex key to remove the two screws on the back side of the mount , remove and rotate the connector, and replace the screws to change the orientation of the mount. 7 Replace and tighten the screw on the handlebar connector. NOTE: Garmin recommends tightening the screw so the mount is secure, with a maximum torque specification of 7 lbf-in. (0.8 N-m). You should check the tightness of the screw periodically.
Racing a Segment Segments are virtual race courses. You can race a segment, and compare your performance to past activities, other riders' performance, connections in your Garmin Connect account, or other members of the cycling community. You can upload your activity data to your Garmin Connect account to view your segment position. NOTE: If your Garmin Connect account and Strava account are linked, your activity is automatically sent to your Strava account so you can review the segment position.
5 Select an option: • Sync your device with the Garmin Express™ application on your computer. • Sync your device with the Garmin Connect app on your smartphone. Training Indoors The device includes an indoor activity profile where GPS is turned off. When GPS is turned off, speed and distance are not available unless you have a compatible sensor or indoor trainer that sends speed and distance data to the device.
Reverting a Personal Record 4 Select Details. You can set each personal record back to the one previously recorded. 1 Hold . 2 Select My Stats > Personal Records. 3 Select a record to revert. 4 Select Options > Use Previous > Yes. NOTE: This does not delete any saved activities. Viewing User Locations on the Map 1 Hold . 2 Select Map > User Locations. 3 Select Show. Deleting a Personal Record 1 Hold . 2 Select My Stats > Personal Records. 3 Select a personal record.
• Stay away from your course path as you warm up. When you are ready to begin, head toward your course. When you are on any part of the course path, a message appears. NOTE: As soon as you select , your Virtual Partner starts the course and does not wait for you to warm up. • Scroll to the map to view the course map. If you stray from the course, the device displays a message. Viewing Course Details 1 Hold . 2 Select Navigation > Courses. 3 Select a course.
A message appears on your device indicating your contacts will be informed after a countdown has elapsed. If assistance is not needed, you can cancel the message. Adding Contacts You can add up to 50 contacts to the Garmin Connect app. Contact emails can be used with the LiveTrack feature. Three of these contacts can be used as emergency contacts (Adding Emergency Contacts, page 8). 1 From the Garmin Connect app, select or . 2 Select Contacts. 3 Follow the on-screen instructions.
4 Wrap the strap around your chest, and connect the strap hook to the loop. NOTE: Make sure the care tag does not fold over. After you put on the heart rate monitor, it is active and sending data. Tips for Erratic Heart Rate Data If the heart rate data is erratic or does not appear, you can try these tips. • Reapply water to the electrodes and contact patches (if applicable). • Tighten the strap on your chest. • Warm up for 5 to 10 minutes.
Training with Power Meters • Go to www.garmin.com/intosports for a list of ANT+ sensors that are compatible with your device (such as Vector™). • For more information, see the owner's manual for your power meter. Calibrating Your Power Meter Before you can calibrate your power meter, you must install it, pair it with your device, and begin actively recording data with it. For calibration instructions specific to your power meter, see the manufacturer's instructions. 1 Hold . 2 Select Sensors.
Transferring Files to Your Device 1 Connect the device to your computer. 2 3 4 5 6 7 On Windows computers, the device appears as a removable drive or a portable device. On Mac computers, the device appears as a mounted volume. NOTE: Some computers with multiple network drives may not display device drives properly. See your operating system documentation to learn how to map the drive. On your computer, open the file browser. Select a file. Select Edit > Copy.
Marking Laps You can use the Auto Lap feature to mark a lap at a specific distance automatically, and you can mark laps manually. This feature is helpful for comparing your performance over different parts of an activity. 1 Hold . 2 Select Ride Settings > Laps. 3 Select an option: • Select Auto Lap to use the Auto Lap feature. The device automatically marks a lap every 5 miles or 5 kilometers, depending on your system settings (System Settings, page 12).
Device Information Specifications Edge 130 Plus Specifications Battery type Rechargeable, built-in lithium-ion battery Battery life Up to 12 hr. Operating temperature range From -20º to 60ºC (from -4º to 140ºF) Charging temperature range From 0º to 45ºC (from 32º to 113ºF) Wireless frequency 2.4 GHz @ 5.6 dBm nominal Water rating IEC 60529 IPX71 Heart Rate Monitor Specifications Battery type User-replaceable CR2032, 3 V Battery life Up to 3.5 yr. at 1 hr.
then stops flashing, the device is active and ready to send data. Viewing E-label Regulatory and Compliance Information The label for this device is provided electronically. The e-label may provide regulatory information, such as identification numbers provided by the FCC or regional compliance markings, as well as applicable product and licensing information. 1 Hold . 2 Select System > About. 3 Select . Troubleshooting Restarting the Device If the device stops responding, you may need to restart it.
Distance to Dest.: The remaining distance to the final destination. You must be navigating for this data to appear. Distance to Next: The remaining distance to the next waypoint on the route. You must be navigating for this data to appear. Elapsed Time: The total time recorded. For example, if you start the timer and run for 10 minutes, then stop the timer for 5 minutes, then start the timer and run for 20 minutes, your elapsed time is 35 minutes.
Heart Rate Zone Calculations Tire Size Wheel Circumference (mm) Zone % of Maximum Heart Rate Perceived Exertion 29 x 2.1 2288 29 x 2.2 2298 29 x 2.
Index A accessories 8, 10, 14 activities, starting 3 alerts 11 ANT+ sensors 8, 10 pairing 9 power meters 10 applications 7 smartphone 1 assistance 7, 8 Auto Lap 12 Auto Pause 12 Auto Scroll 12 B back to start 6 backlight 12 bands 14 battery charging 1 maximizing 12, 14 replacing 13 type 2 bike sensors 9 Bluetooth sensors 8 Bluetooth technology 1, 7, 12 C viewing 10 I icons 1, 6 incident detection 7, 8 indoor training 5 installing 2, 9 K keys 1 L language 12, 14 laps 1, 12 LiveTrack 8 locations 6 categ
support.garmin.