
User manual


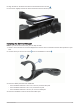
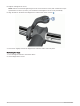
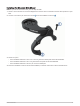
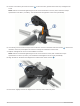
Table Of Contents
- Table of Contents
- Introduction
- Training
- My Stats
- Performance Measurements
- Training Status Levels
- About VO2 Max. Estimates
- Training Load
- Training Load Focus
- Viewing Cycling Ability
- About Training Effect
- Recovery Time
- Getting Your FTP Estimate
- Viewing Your Real-Time Stamina
- Viewing Your Stress Score
- Turning Off Performance Notifications
- Viewing Your Power Curve
- Pausing Your Training Status
- Personal Records
- Training Zones
- Performance Measurements
- Navigation
- Locations
- Courses
- Map Settings
- Route Settings
- Connected Features
- Pairing Your Phone
- Bluetooth Connected Features
- Safety and Tracking Features
- Incident Detection
- Assistance
- Adding Emergency Contacts
- Viewing Your Emergency Contacts
- Requesting Assistance
- Turning Incident Detection On and Off
- Cancelling an Automated Message
- Sending a Status Update After an Incident
- Turning On LiveTrack
- Starting a GroupTrack Session
- Setting the Bike Alarm
- Playing Audio Prompts on Your Phone
- Safety and Tracking Features
- Wi‑Fi Connected Features
- Wireless Sensors
- History
- Customizing Your Device
- Connect IQ Downloadable Features
- Profiles
- About Training Settings
- Phone Settings
- System Settings
- Setting Up Extended Display Mode
- Device Information
- Troubleshooting
- Appendix

5 Use the 3 mm hex key to loosen the screw on the mount arm, position the mount arm, and tighten the
screw.
NOTE: Garmin recommends tightening the screw so the mount arm is secure, with a maximum torque
specification of 20 lbf-in. (2.26 N-m). You should check the tightness of the screw periodically.
6 If necessary, use the 2 mm hex key to remove the two screws on the back side of the mount , remove and
rotate the connector, and replace the screws to change the orientation of the mount.
7 Replace and tighten the screw on the handlebar connector.
NOTE: Garmin recommends tightening the screw so the mount is secure, with a maximum torque
specification of 7 lbf-in. (0.8 N-m). You should check the tightness of the screw periodically.
8 Align the tabs on the back of the Edge device with the bike mount notches .
9 Press down slightly and turn the Edge device clockwise until it locks into place.
72 Device Information