
User manual

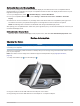

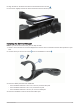
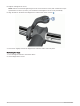
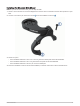
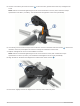
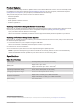
Table Of Contents
- Table of Contents
- Introduction
- Training
- My Stats
- Performance Measurements
- Training Status Levels
- About VO2 Max. Estimates
- Training Load
- Training Load Focus
- Viewing Cycling Ability
- About Training Effect
- Recovery Time
- Getting Your FTP Estimate
- Viewing Your Real-Time Stamina
- Viewing Your Stress Score
- Turning Off Performance Notifications
- Viewing Your Power Curve
- Pausing Your Training Status
- Personal Records
- Training Zones
- Performance Measurements
- Navigation
- Locations
- Courses
- Map Settings
- Route Settings
- Connected Features
- Pairing Your Phone
- Bluetooth Connected Features
- Safety and Tracking Features
- Incident Detection
- Assistance
- Adding Emergency Contacts
- Viewing Your Emergency Contacts
- Requesting Assistance
- Turning Incident Detection On and Off
- Cancelling an Automated Message
- Sending a Status Update After an Incident
- Turning On LiveTrack
- Starting a GroupTrack Session
- Setting the Bike Alarm
- Playing Audio Prompts on Your Phone
- Safety and Tracking Features
- Wi‑Fi Connected Features
- Wireless Sensors
- History
- Customizing Your Device
- Connect IQ Downloadable Features
- Profiles
- About Training Settings
- Phone Settings
- System Settings
- Setting Up Extended Display Mode
- Device Information
- Troubleshooting
- Appendix

4 Plug the AC adapter into a standard wall outlet.
When you connect the device to a power source, the device turns on.
5 Charge the device completely.
After you charge the device, close the weather cap.
About the Battery
WARNING
This device contains a lithium-ion battery. See the Important Safety and Product Information guide in the product
box for product warnings and other important information.
Installing the Standard Mount
For the best GPS reception, position the bike mount so the front of the device is oriented toward the sky. You
can install the bike mount on the stem or the handlebar.
NOTE: If you do not have this mount, you can skip this task.
1 Select a secure location to mount the device where it does not interfere with the safe operation of your bike.
2 Place the rubber disk on the back of the bike mount.
Two rubber disks are included, and you can select the disk that best fits your bike. The rubber tabs align with
the back of the bike mount so it stays in place.
3 Place the bike mount on the bike stem.
4 Attach the bike mount securely using the two bands .
68 Device Information