
User manual
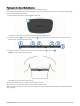


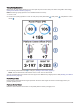
Table Of Contents
- Table of Contents
- Introduction
- Training
- My Stats
- Performance Measurements
- Training Status Levels
- About VO2 Max. Estimates
- Training Load
- Training Load Focus
- Viewing Cycling Ability
- About Training Effect
- Recovery Time
- Getting Your FTP Estimate
- Viewing Your Real-Time Stamina
- Viewing Your Stress Score
- Turning Off Performance Notifications
- Viewing Your Power Curve
- Pausing Your Training Status
- Personal Records
- Training Zones
- Performance Measurements
- Navigation
- Locations
- Courses
- Map Settings
- Route Settings
- Connected Features
- Pairing Your Phone
- Bluetooth Connected Features
- Safety and Tracking Features
- Incident Detection
- Assistance
- Adding Emergency Contacts
- Viewing Your Emergency Contacts
- Requesting Assistance
- Turning Incident Detection On and Off
- Cancelling an Automated Message
- Sending a Status Update After an Incident
- Turning On LiveTrack
- Starting a GroupTrack Session
- Setting the Bike Alarm
- Playing Audio Prompts on Your Phone
- Safety and Tracking Features
- Wi‑Fi Connected Features
- Wireless Sensors
- History
- Customizing Your Device
- Connect IQ Downloadable Features
- Profiles
- About Training Settings
- Phone Settings
- System Settings
- Setting Up Extended Display Mode
- Device Information
- Troubleshooting
- Appendix

Pairing Your Wireless Sensors
Before you can pair, you must put on the heart rate monitor or install the sensor.
Pairing is the connecting of ANT+ or Bluetooth wireless sensors, for example, connecting a heart rate monitor
with your Garmin device.
1 Bring the device within 3 m (10 ft.) of the sensor.
NOTE: Stay 10 m (33 ft.) away from other riders' sensors while pairing.
2 Select > Sensors > Add Sensor.
3 Select an option:
• Select a sensor type.
• Select Search All to search for all nearby sensors.
A list of available sensors appears.
4 Select one or more sensors to pair with your device.
5 Select Add.
When the sensor is paired with your device, the sensor status is Connected. You can customize a data field
to display sensor data.
Wireless Sensor Battery Life
After you go for a ride, battery life levels for the wireless sensors that were connected during the activity appear.
The list is sorted by battery level.
Training with Power Meters
• Go to www.garmin.com/intosports for a list of ANT+ sensors that are compatible with your Edge device
(such as Rally and Vector).
• For more information, see the owner's manual for your power meter.
• Adjust your power zones to match your goals and abilities (Setting Your Power Zones, page 51).
• Use range alerts to be notified when you reach a specified power zone (Setting Range Alerts, page 62).
• Customize the power data fields (Adding a Data Screen, page 61).
Setting Your Power Zones
The values for the zones are default values and may not match your personal abilities. You can manually adjust
your zones on the device or using Garmin Connect. If you know your functional threshold power (FTP) value, you
can enter it and allow the software to calculate your power zones automatically.
1 Select > My Stats > Training Zones > Power Zones.
2 Enter your FTP value.
3 Select Based On:.
4 Select an option:
• Select watts to view and edit the zones in watts.
• Select % FTP to view and edit the zones as a percentage of your functional threshold power.
Calibrating Your Power Meter
Before you can calibrate your power meter, you must install it, pair it with your device, and begin actively
recording data with it.
For calibration instructions specific to your power meter, see the manufacturer's instructions.
1 Select > Sensors.
2 Select your power meter.
3 Select Calibrate.
4 Keep your power meter active by pedaling until the message appears.
5 Follow the on-screen instructions.
Wireless Sensors 51