
User manual
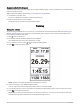
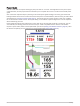


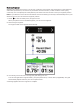
Table Of Contents
- Table of Contents
- Introduction
- Training
- My Stats
- Performance Measurements
- Training Status Levels
- About VO2 Max. Estimates
- Training Load
- Training Load Focus
- Viewing Cycling Ability
- About Training Effect
- Recovery Time
- Getting Your FTP Estimate
- Viewing Your Real-Time Stamina
- Viewing Your Stress Score
- Turning Off Performance Notifications
- Viewing Your Power Curve
- Pausing Your Training Status
- Personal Records
- Training Zones
- Performance Measurements
- Navigation
- Locations
- Courses
- Map Settings
- Route Settings
- Connected Features
- Pairing Your Phone
- Bluetooth Connected Features
- Safety and Tracking Features
- Incident Detection
- Assistance
- Adding Emergency Contacts
- Viewing Your Emergency Contacts
- Requesting Assistance
- Turning Incident Detection On and Off
- Cancelling an Automated Message
- Sending a Status Update After an Incident
- Turning On LiveTrack
- Starting a GroupTrack Session
- Setting the Bike Alarm
- Playing Audio Prompts on Your Phone
- Safety and Tracking Features
- Wi‑Fi Connected Features
- Wireless Sensors
- History
- Customizing Your Device
- Connect IQ Downloadable Features
- Profiles
- About Training Settings
- Phone Settings
- System Settings
- Setting Up Extended Display Mode
- Device Information
- Troubleshooting
- Appendix

Creating a Power Guide
Before you can create a power guide, you must pair a power meter with your device (Pairing Your Wireless
Sensors, page 51).
1 Select Training > Power Guide > .
2 Select an option:
• Select Use Saved Course to use a saved course, and select the course.
• Select Course Creator to create a new course, and select > Create Power Guide.
3 Enter a name for the power guide, and select .
4 Select a riding position.
5 Select a gear weight.
6 Select Save.
Starting a Power Guide
Before you can start a power guide, you must create a power guide (Creating a Power Guide, page 9).
1 Select Training > Power Guide.
2 Select a power guide.
3 Select Ride.
4 Press to start the activity timer.
Workouts
You can create custom workouts that include goals for each workout step and for varied distances, times, and
calories. You can create workouts using Garmin Connect, and transfer them to your device. You can also create
and save a workout directly on your device.
You can schedule workouts using Garmin Connect. You can plan workouts in advance and store them on your
device.
Creating a Workout
1 Select Training > Workouts > .
2 Select > Rename, enter a workout name, and select (optional).
3 Select Add New Step.
4 Select the type of workout step.
For example, select Rest to use the step as a rest lap.
During a rest lap, the activity timer continues to run and data is recorded.
5 Select the workout step duration.
For example, select Distance to end the step after a specific distance.
6 If necessary, enter a custom value for the duration.
7 Select the workout step target type.
For example, select Heart Rate Zone to maintain a consistent heart rate during the step.
8 If necessary, select a target zone or enter a custom range.
For example, you can select a heart rate zone. Each time you exceed or drop below the specified heart rate,
the device beeps and displays a message.
NOTE: You can also select a secondary target. For example, you can ride for five minutes in a power zone as
your primary target, with a cadence rate as your secondary target.
9 Select to save the step.
10 Select Add New Step to add additional steps to the workout.
11 Select Add New Step > Repeat > to repeat a step.
12 Select to save the workout.
Training 9